
Overview
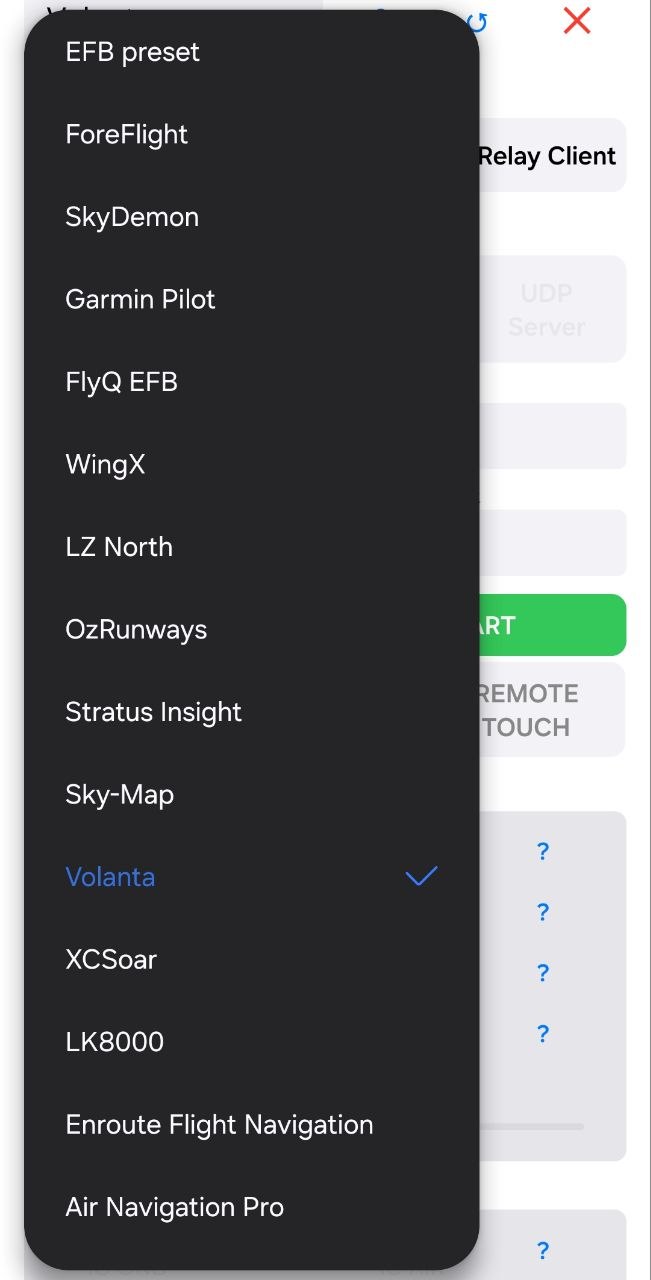
FS2EFB bridges Microsoft Flight Simulator (MSFS) to tablet/phone EFB apps (SkyDemon, ForeFlight, XCSoar, etc.). It has two components you configure together:
- MSFS Toolbar Panel — runs inside MSFS, reads SimVars, sends data to your device. Supports PC and Xbox, PS5 – waiting for MP access for 3rd party devs.
If you want to test this add-on on console before purchase – rent option is not available for tool add-ons, but you can rent L-13 Blanik aircraft for $0.99. It has same script built-in into the tablet, with same functions available but only for single aircraft.
PC DEMO version provided on this website has no flight plan and weather import scripts, relay server and Volanta/Navigraph export features.
- Mobile Bridge App — receives that data and forwards it to your EFB app. Available both for Android and iOS (iPhone, iPad) devices
Part 1: MSFS Toolbar Panel
Opening the Panel
The panel is a custom MSFS2020 in-game toolbar panel. Open it via the MSFS toolbar during flight (or in the main menu). It loads as a Web Component inside the MSFS Coherent GT browser engine.
For FS24, FS2EFB script provided as EFB app. While all the functionality provided as-is (same script used for both), EFB app has significant advantage – it can work at background so no need to keep toolbar panel opened. The UI colors adjusted to fit newer palette scheme, but all the interactive elements position is the same.
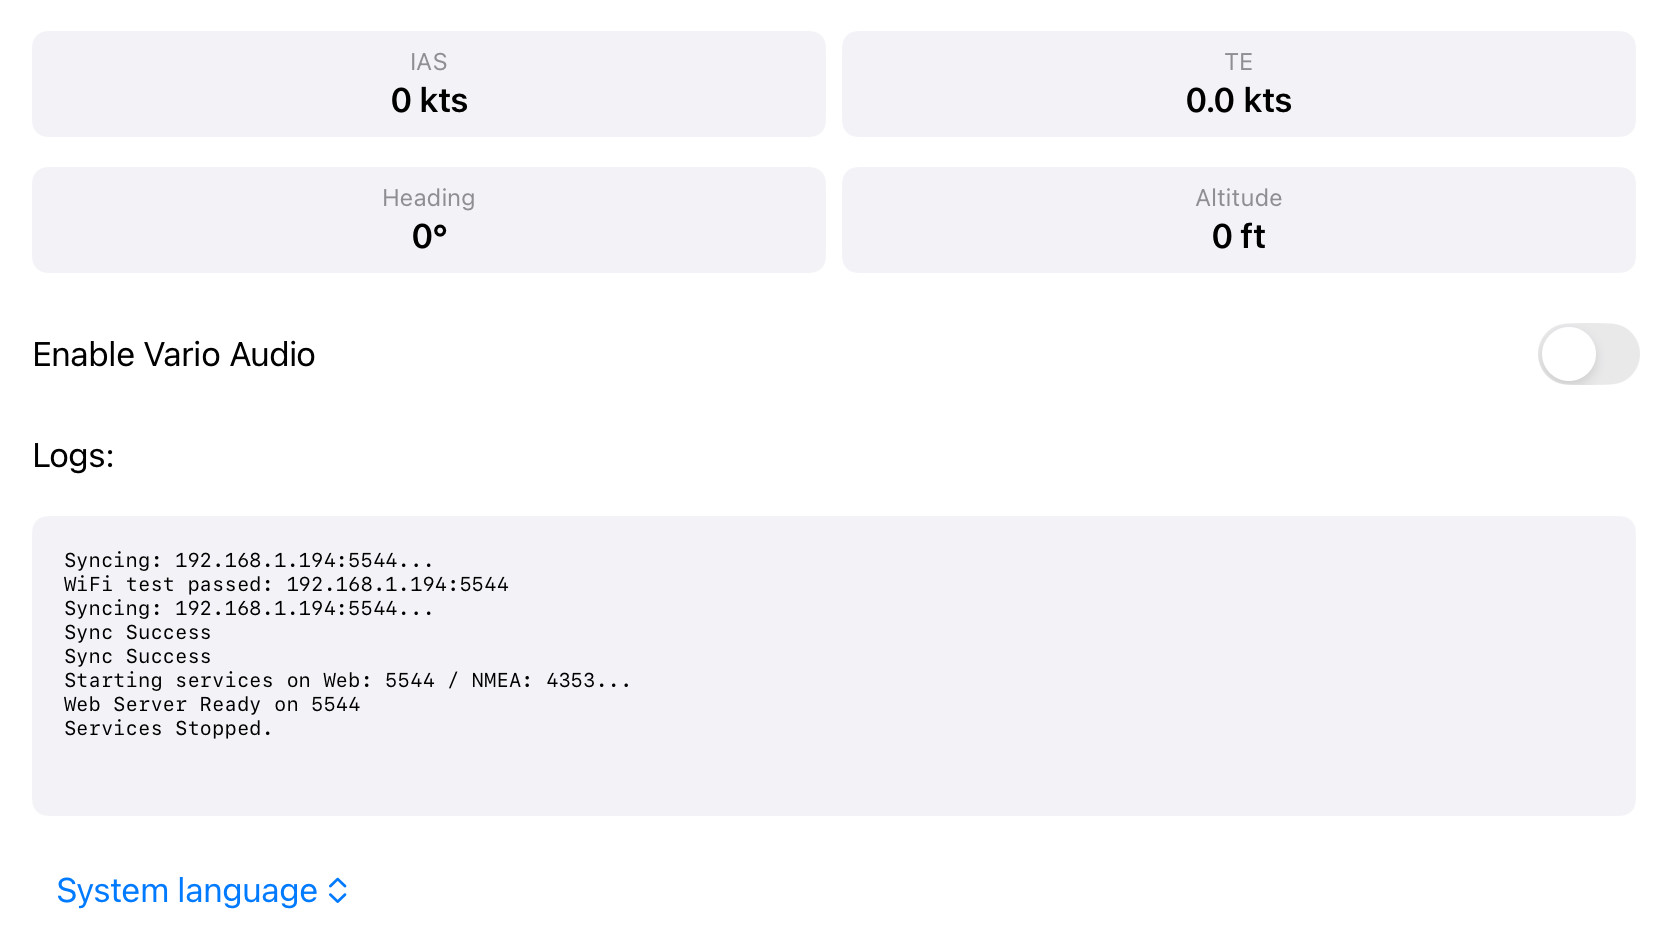
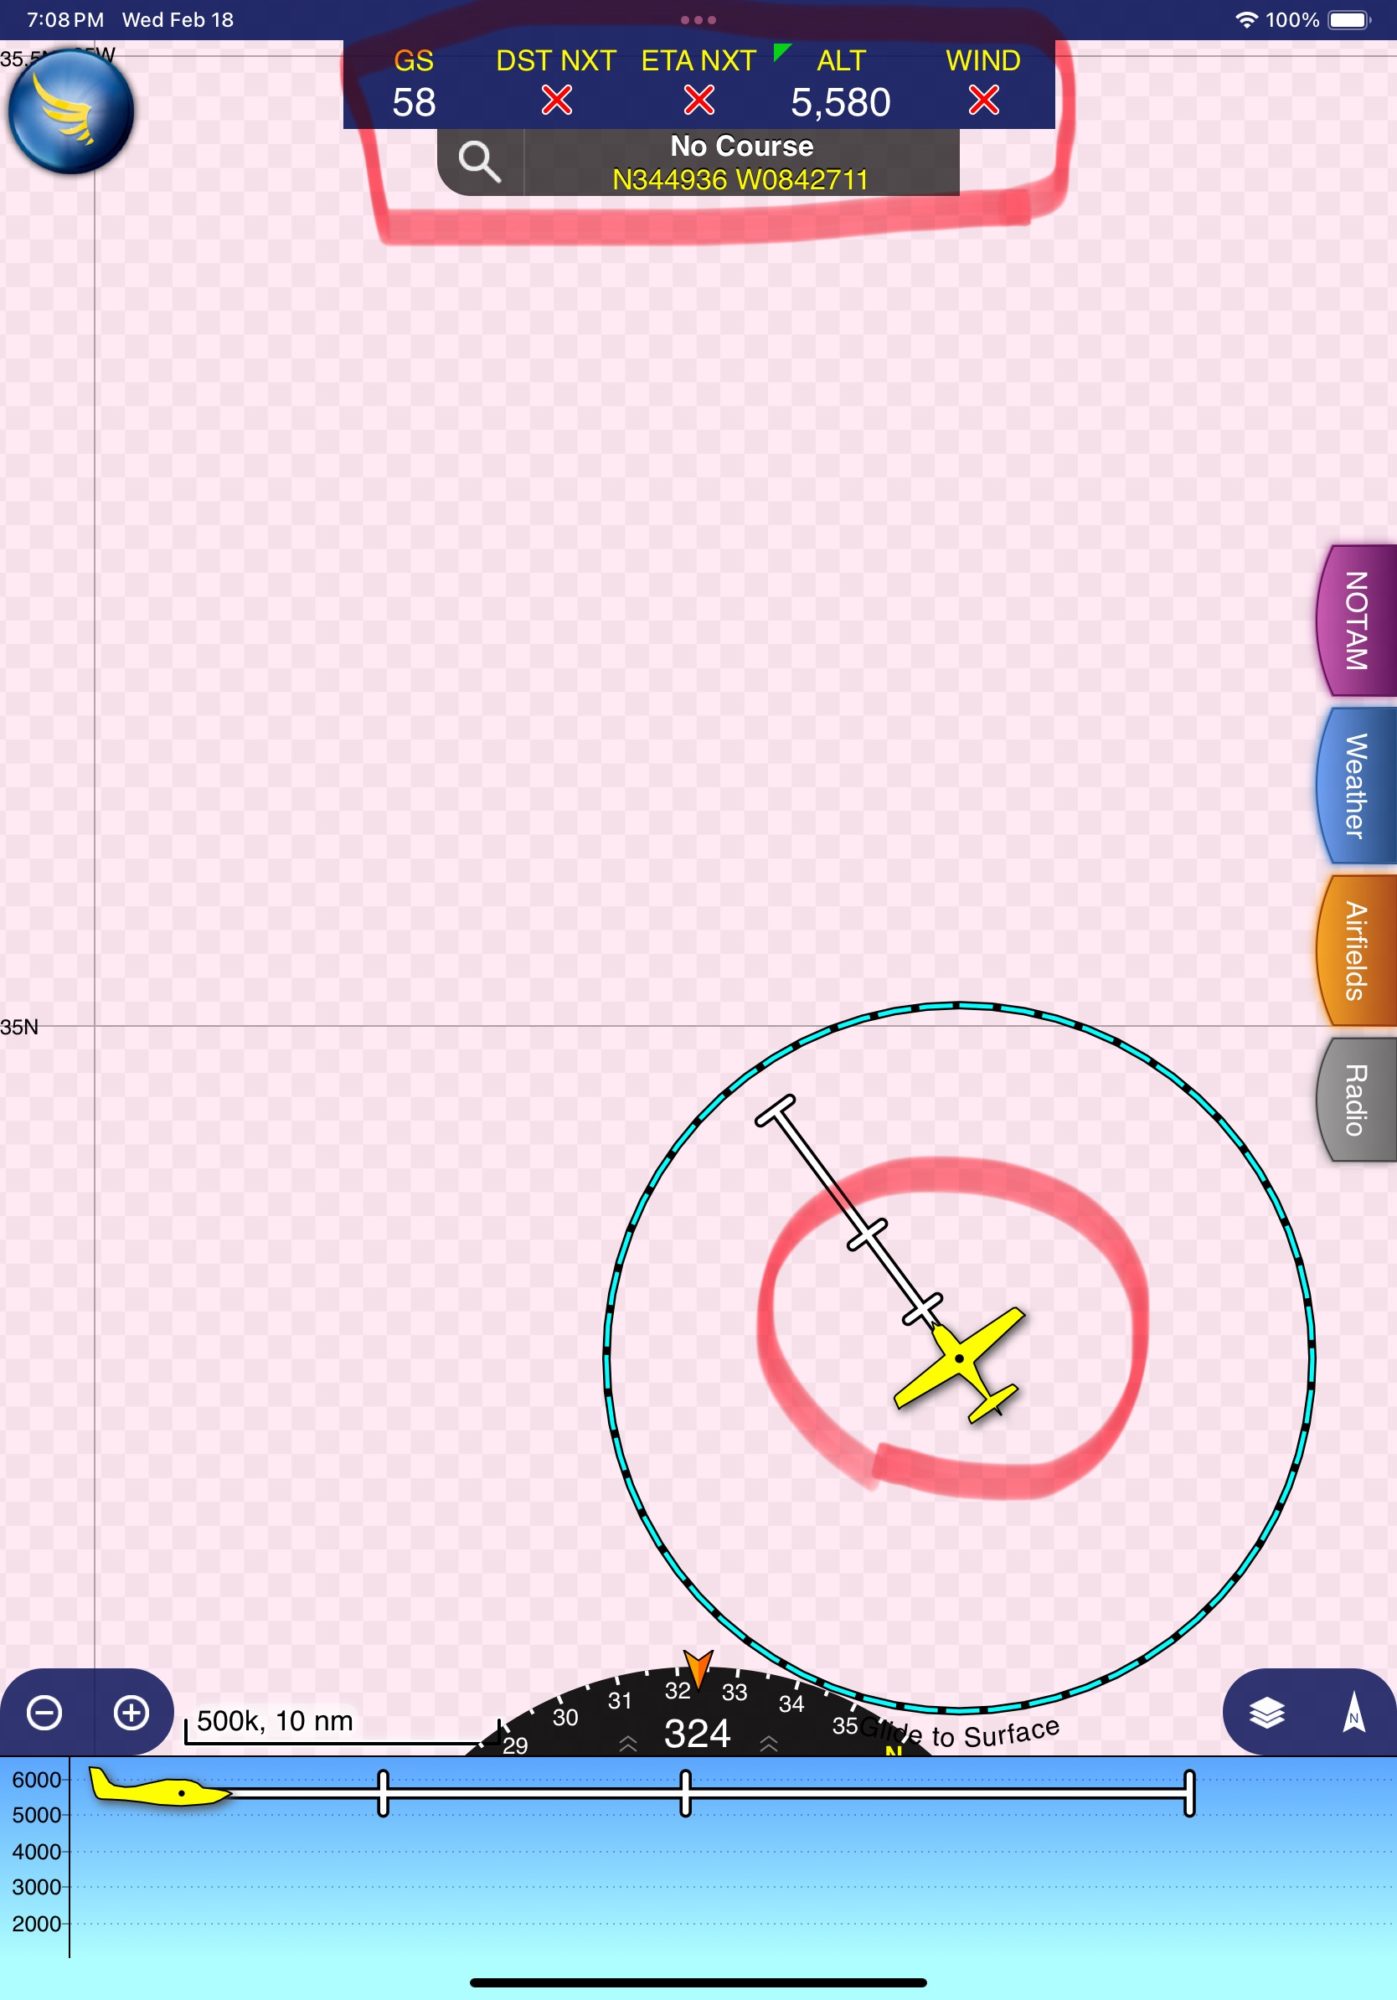
Panel Layout (direct connection mode)
The panel has three main zones:
[ Connection Mode Buttons ]
[ IP Address Display        ]
[ SYNC IP / SHOW QR Button  ][ Help ]
[ Virtual Keyboard          ]
[ QR Codes (Android / iOS)  ]
[ START / STOP Button       ]
[ Log Area                  ]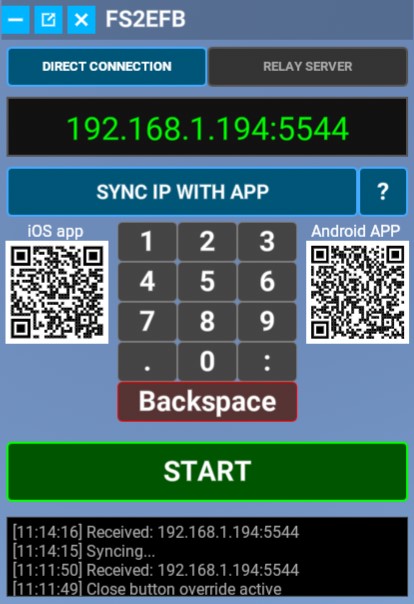
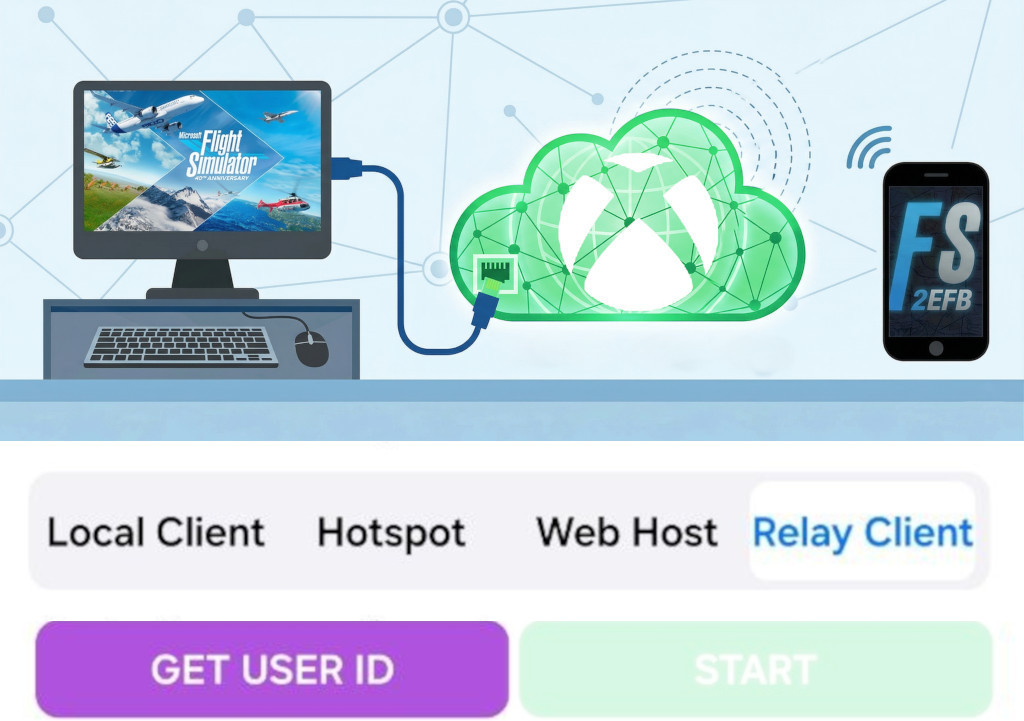
Panel Layout (relay server mode)
As connection happens through dedicated server, IP field is no longer required. Instead, unique ID used to connect your smartphone/tablet app with MSFS toolbar or EFB app.
[ Connection Mode Buttons ]
[ SHOW USER ID QR  ][ Help ]
[ START / STOP Button       ]
[ Log Area                  ]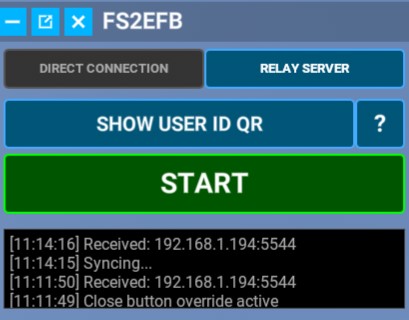
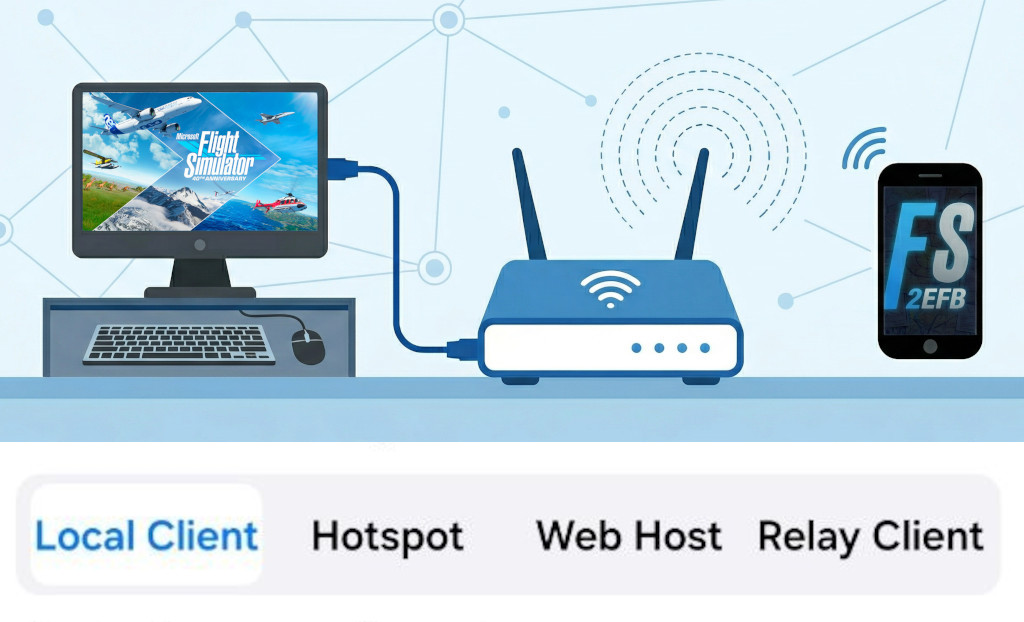
Connection Mode
Two buttons at the top switch between connection methods:
| Button | Mode | When to use |
|---|---|---|
| DIRECT CONNECTION | Sends data directly to a local IP:port | Same WiFi network, hotspot, or USB tether |
| RELAY SERVER | Routes data via dedicated relay server | When direct network access isn’t possible |
The active mode is highlighted. Switching modes changes which controls are visible.
IP Address Entry (Direct Mode)
The large green display shows the current target address (e.g. 192.168.1.5:5544).
Below it is a virtual numeric keyboard for entering the address directly in-sim:
- Keys
0–9,.,:— enter digits and separators - Red backspace key — delete last character
- Format must be
IP:PORT(e.g.192.168.1.50:5544)
The address is saved automatically to browser storage and restored on next launch. You only need keyboard if SYNC feature does not work correctly for some reason.
In RELAY mode, the keyboard is hidden (no IP needed).
SYNC IP WITH APP Button
In Direct mode, this button attempts to discover the Android/iOS app’s IP automatically.
- Launch FS2EFB app on your smartphone or tablet
- Click SYNC IP button
- “Syncing…” appears in the log
- On success: IP field updates and button turns blue
- On failure: button turns red, log shows
Sync Failed: Network ErrororSync Failed: Timeout. In this case, check the mobile IP on your device screen, type it using keyboard into IP field of the toolbar.
In Relay mode, this button changes to SHOW USER ID QR, which displays a QR code popup containing the session UID. Scan this from the mobile app to pair them.
START / STOP Button
The large button at the bottom of the controls section starts and stops data transmission:
| State | Appearance | Action |
|---|---|---|
| START | Green border, black background | Click to begin sending SimVar data |
| STOP | Red background, red border | Click to end transmission |
When active, the panel reads SimVars every frame via requestAnimationFrame and sends HTTP GET requests to the bridge app at the configured frequency.
Log Area
The dark scrollable area below the buttons shows real-time status messages, each with a timestamp:
| Message | Meaning |
|---|---|
Ready | Panel loaded, awaiting action |
Starting send to 192.168.1.5:5544 | Transmission started |
Stopped. | Transmission ended |
Syncing... | IP sync in progress |
Received: 192.168.1.5 | Sync succeeded |
Sync Failed: Network Error | Cannot reach device |
Error: Invalid Format. Use IP:PORT | Malformed address entered |
[N] traffic planes received | Traffic data count |
Flight plan received: [N] waypoints | Mobile app sent a flight plan |
Teleporting to [WP] at [alt] ft | Position set in-sim |
Weather preset applied successfully | Weather updated |
Click the log area to copy its contents to the clipboard.
Help / Tutorial
The ? button (top-right of the panel) launches an 8-step interactive tutorial:
| Step | Topic |
|---|---|
| 0 | Welcome |
| 1 | Platform selection (Android / iOS) |
| 2 | Connection method overview |
| 3 | Local connection (WiFi client) |
| 4 | Hotspot connection |
| 5 | Relay server explanation |
| 6 | QR code scanning and UID |
| 7 | Starting data transfer |
| 8 | Completion |
The tutorial can be dismissed at any step. It only auto-launches on first use.
QR Codes
Two QR codes link to the Android and iOS app download pages.
Android: https://play.google.com/store/apps/details?id=com.touchingcloud.msfs2nmea
iOS: https://apps.apple.com/app/fs2efb/id6759614296
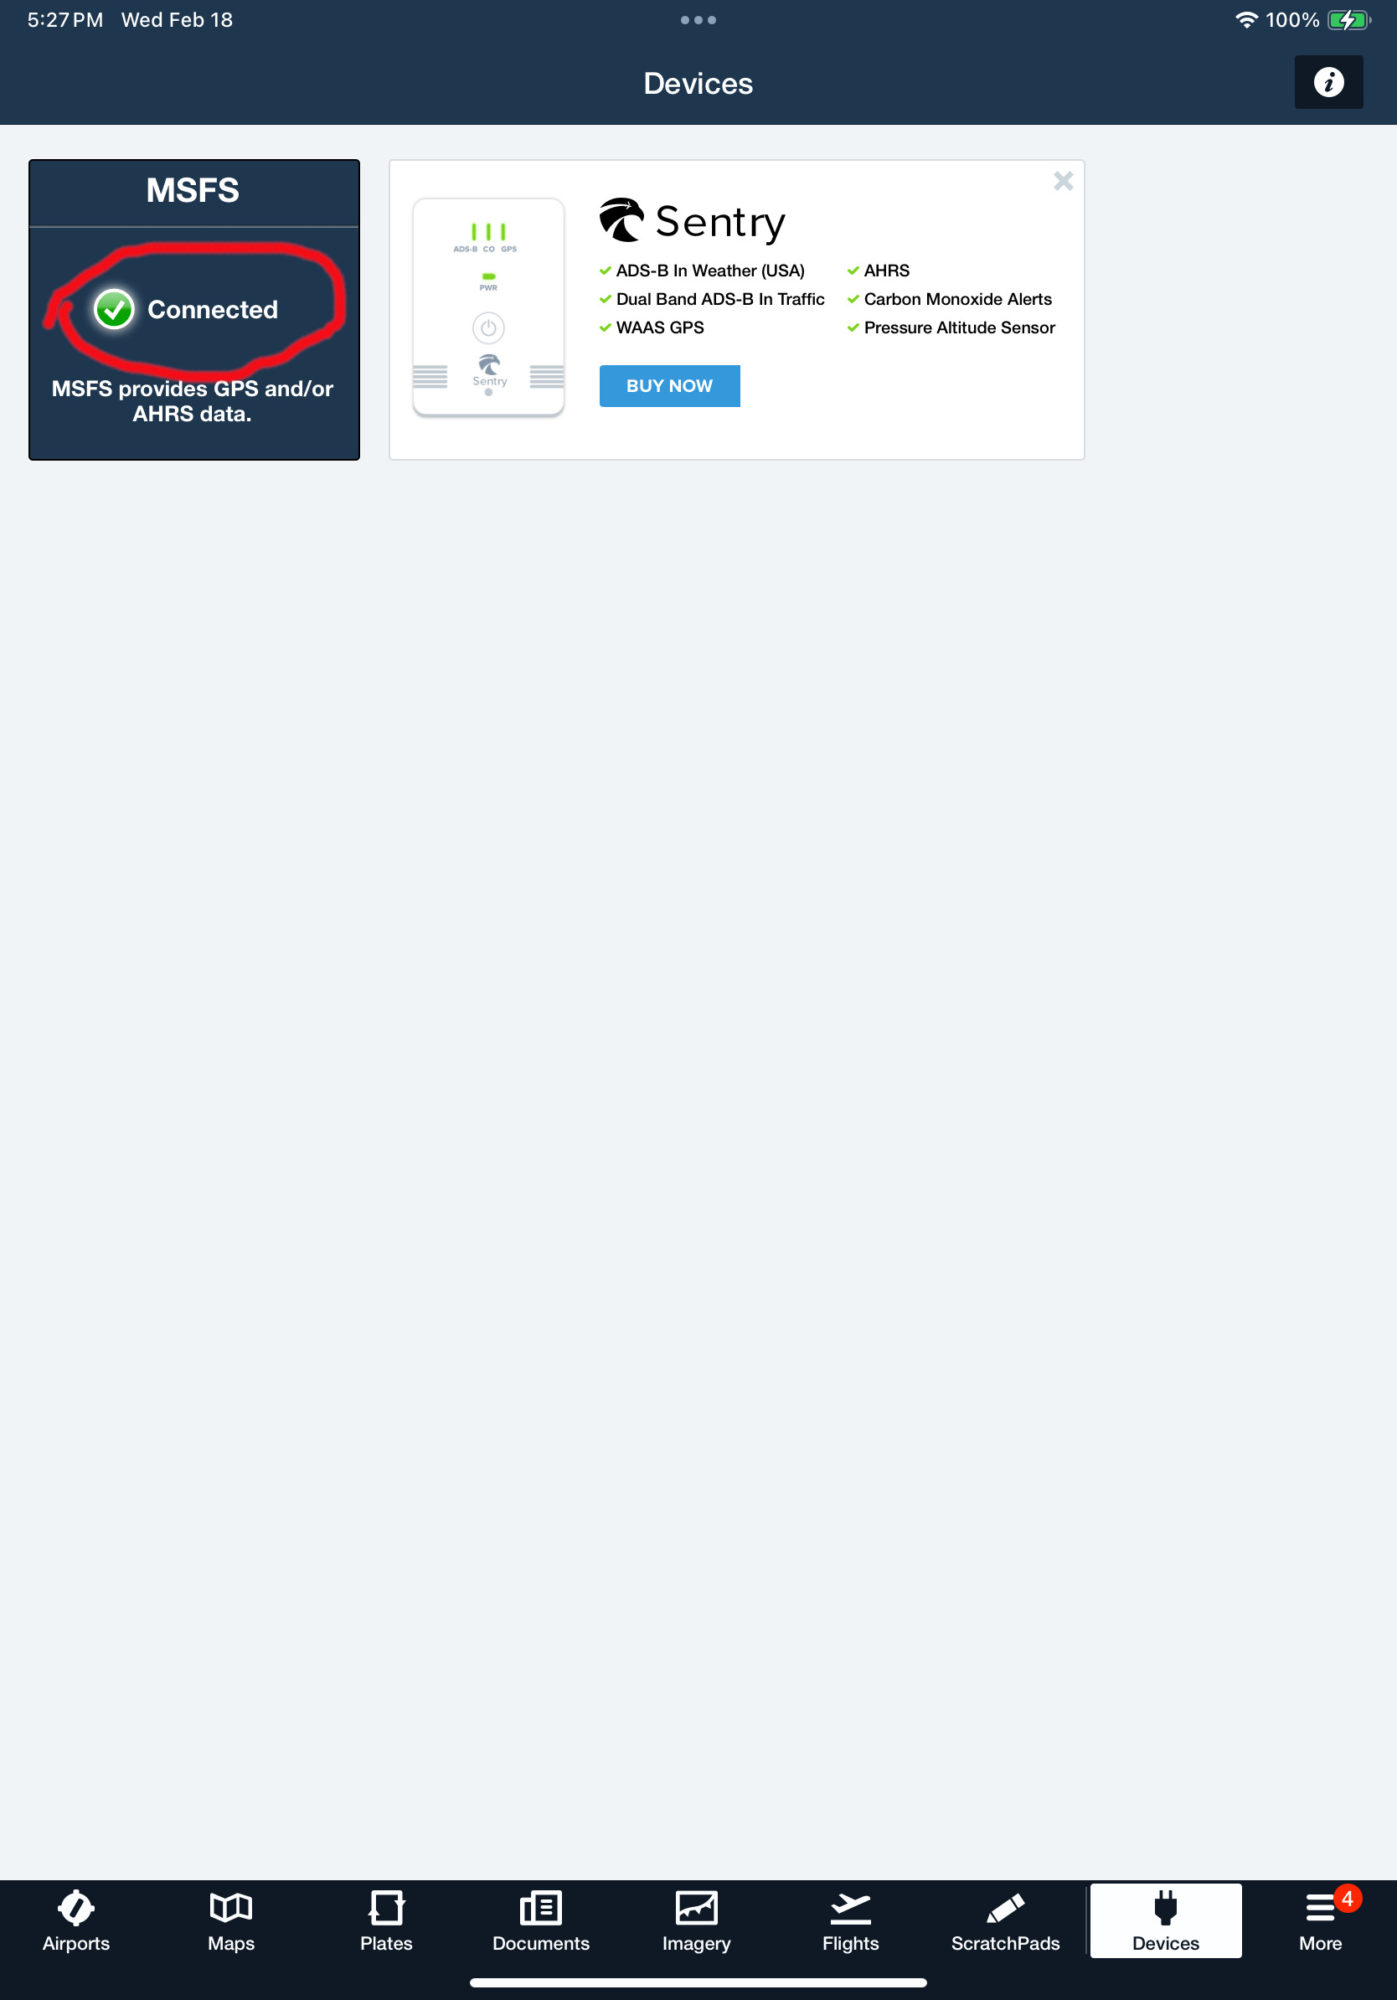
Screen Capture Overlay (Remote Touch, Android app only)
When Screen Cast is enabled in the Android app, the panel displays a live screenshot of the Android device. If Remote Touch also enabled, Tapping or dragging on this image sends touch events back to the phone via the HTTP response, allowing you to control the Android device from within MSFS.
Flight Plan Import
When the mobile app sends a flight plan, a popup appears in the panel:
- “Flight plan received: N waypoints”
- Click LOAD to inject waypoints into the MSFS active flight plan
- If Load & Teleport , the sim teleports to the first waypoint; aircraft attitude is preserved for ~10 seconds while terrain loads
Panel Settings (Stored)
These are saved in MSFS browser storage between sessions:
| Setting | Description | Default |
|---|---|---|
NMEA_IP | Target IP:PORT | (last entered) |
FS2EFB_MODE | DIRECT or RELAY | DIRECT |
FS2EFB_UID | Relay session UID | (from QR scan) |
FS2EFB_TUTORIAL_DONE | Suppresses first-run tutorial | false |
Runtime parameters (frequency, traffic range, etc.) are synchronized from the mobile app via the HTTP response JSON — the panel does not configure these independently.
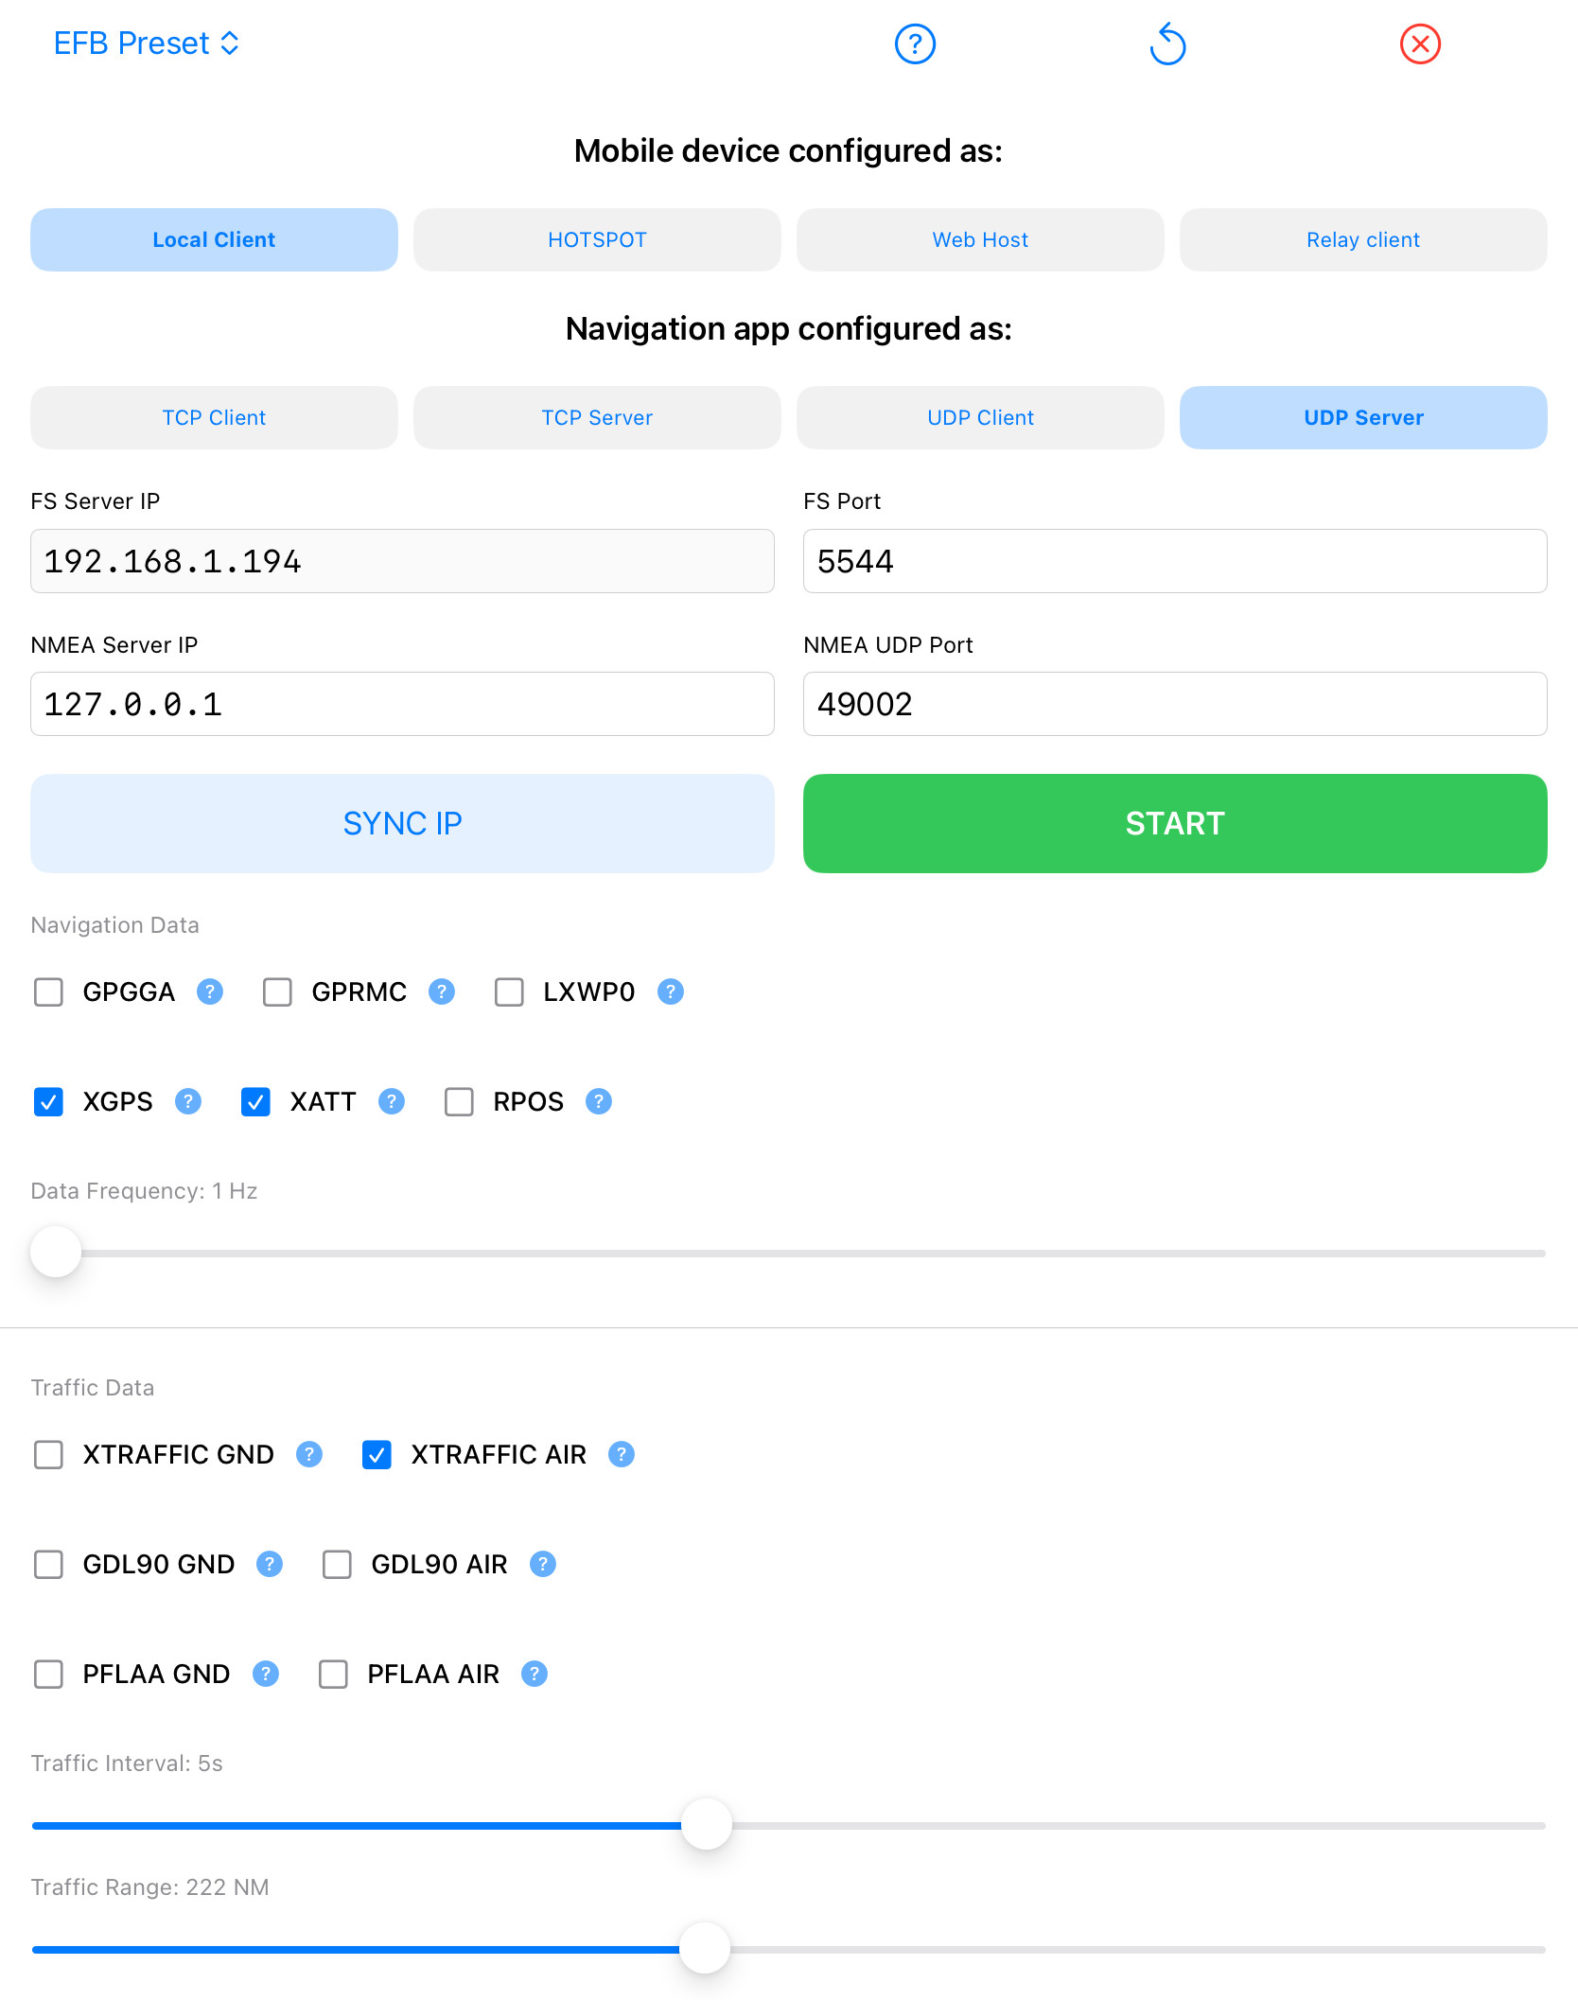
EFB app configuration
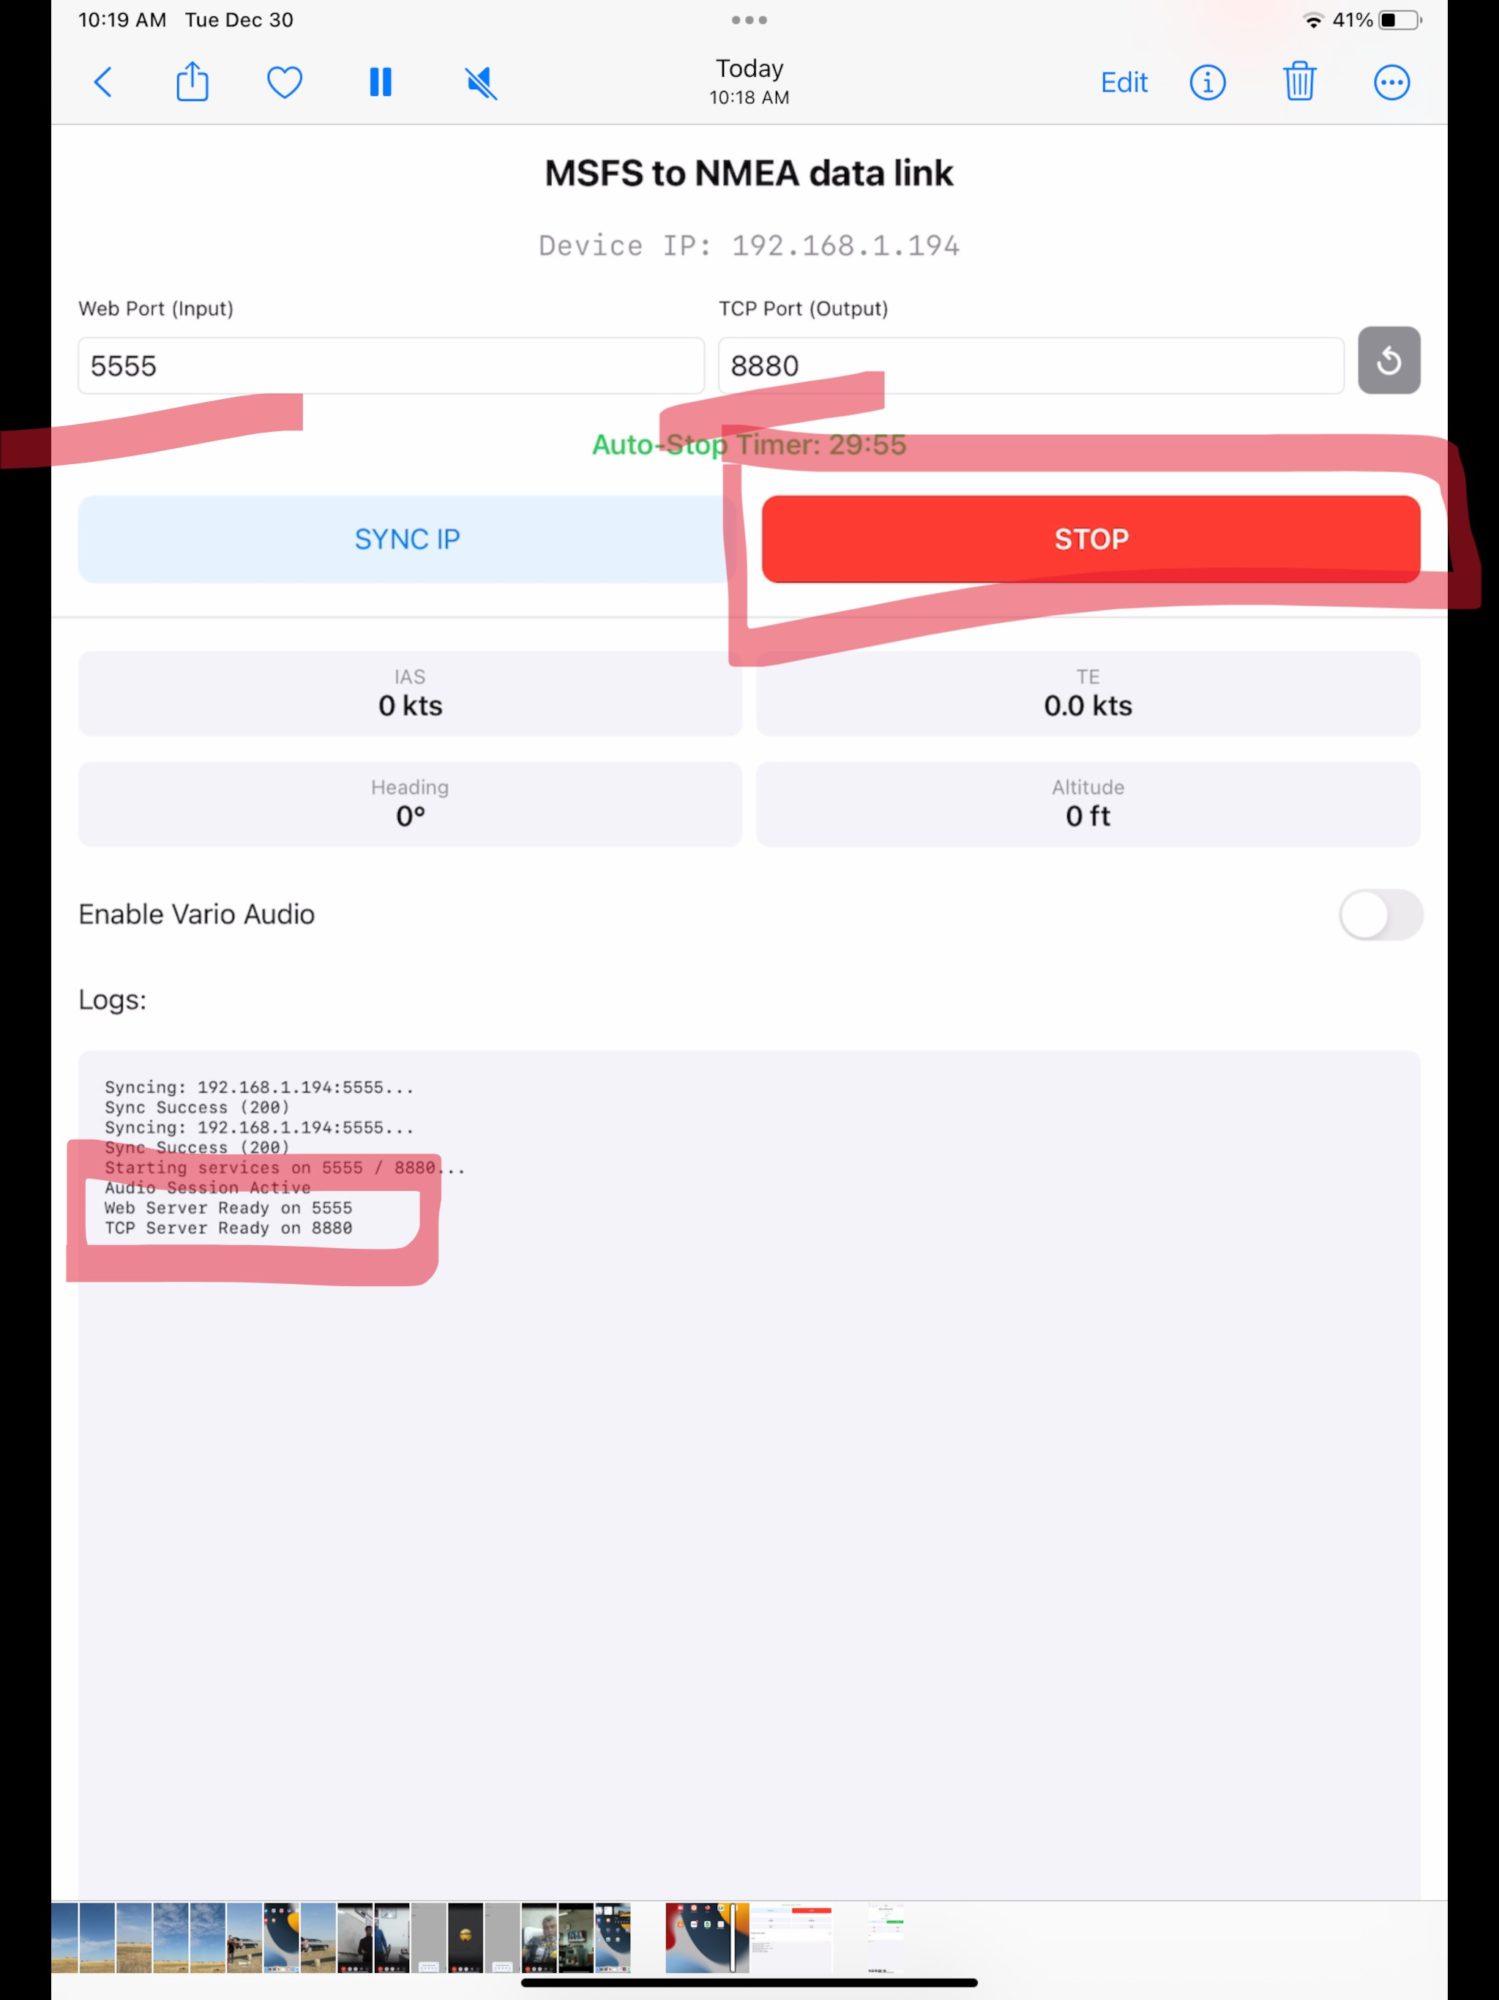
1.In the app, select TCP Client mode, TCP port 8880. press START button, Web Server OK and TCP Server OK should appear in log. If not, some of the ports are busy – change 5544 to 5545 for example, or 8880 to 8881. Press SYNC IP again, then START.
2. Open XCSoar and select FLY.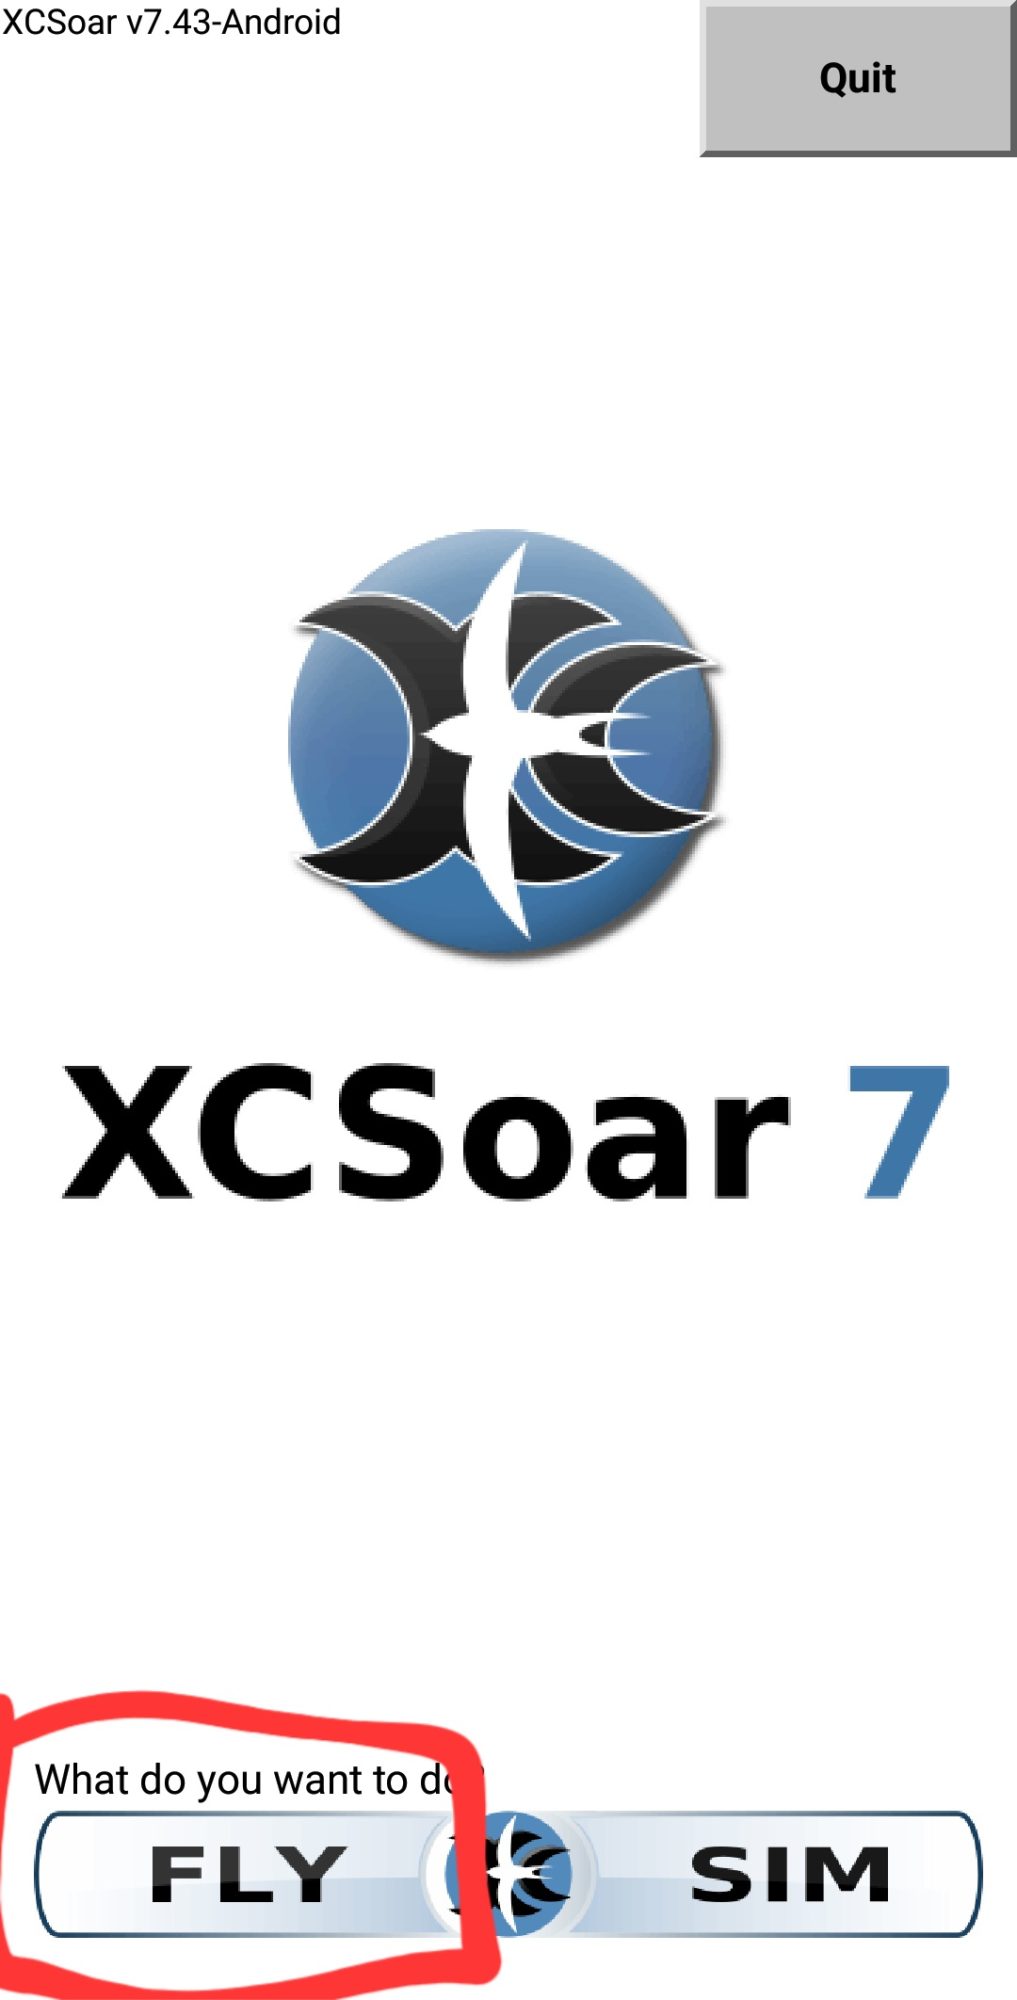 3. Tap twice the screen, choose CONFIG
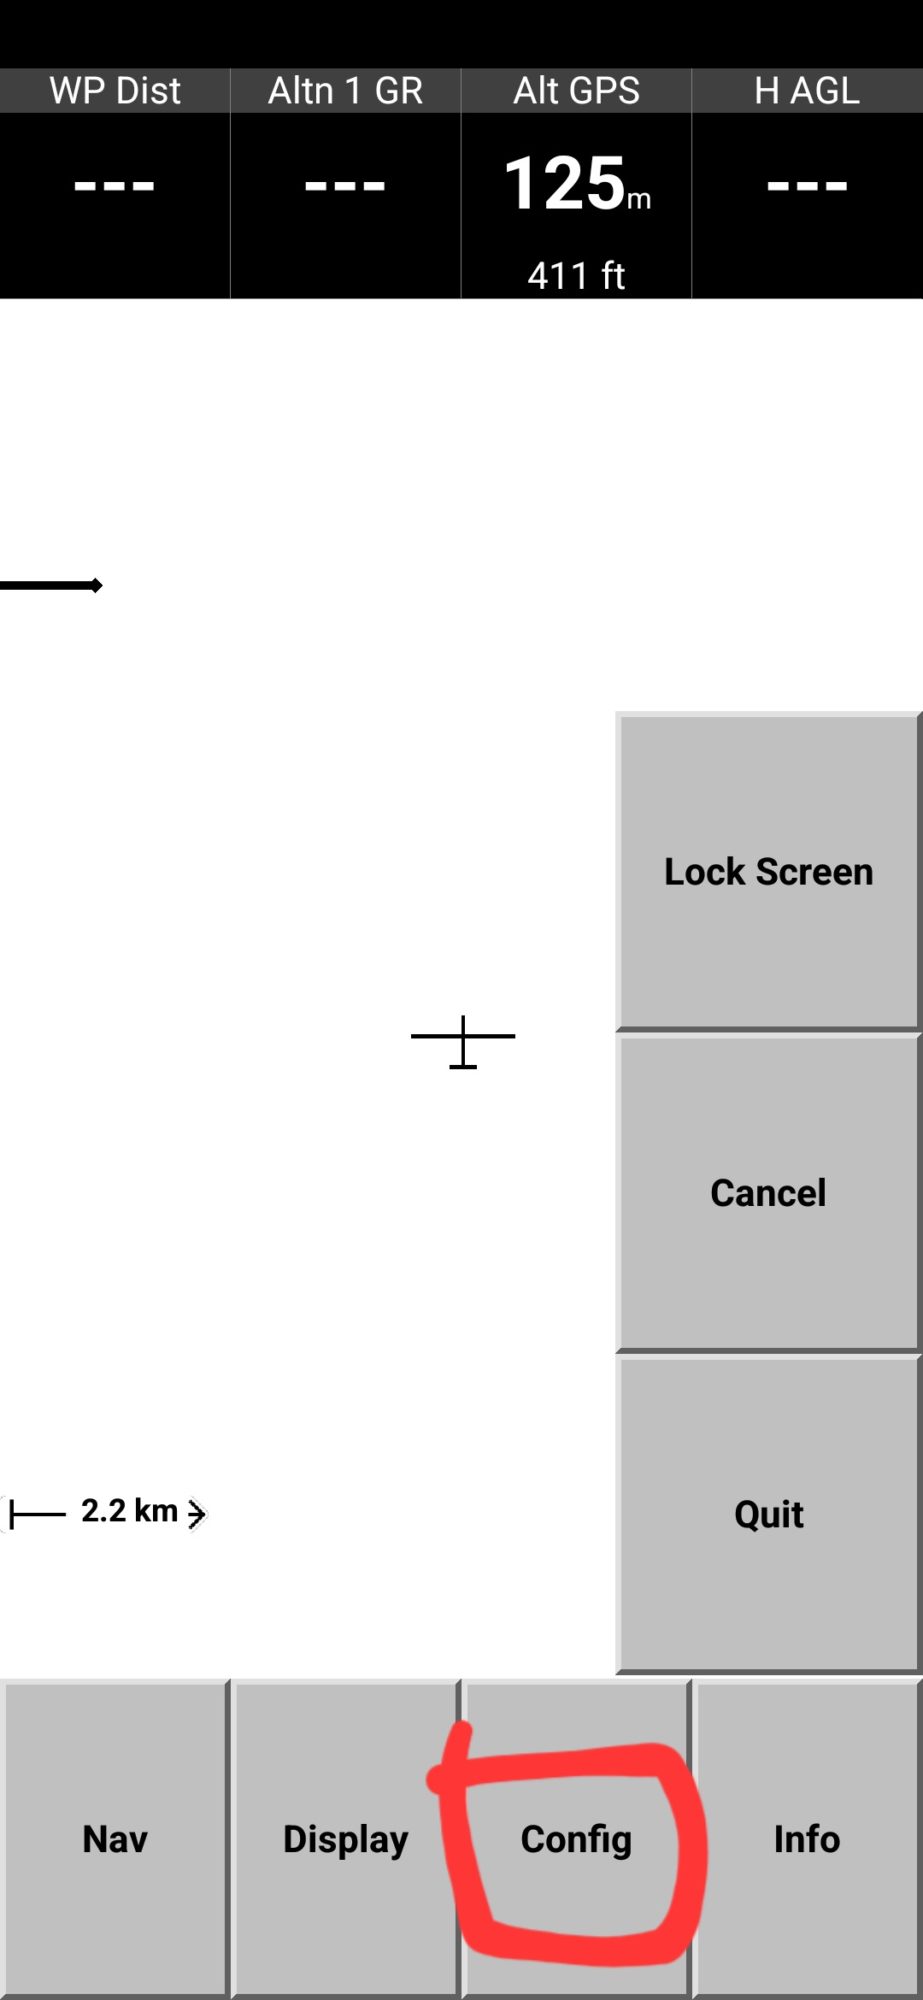 4. Then DEVICES
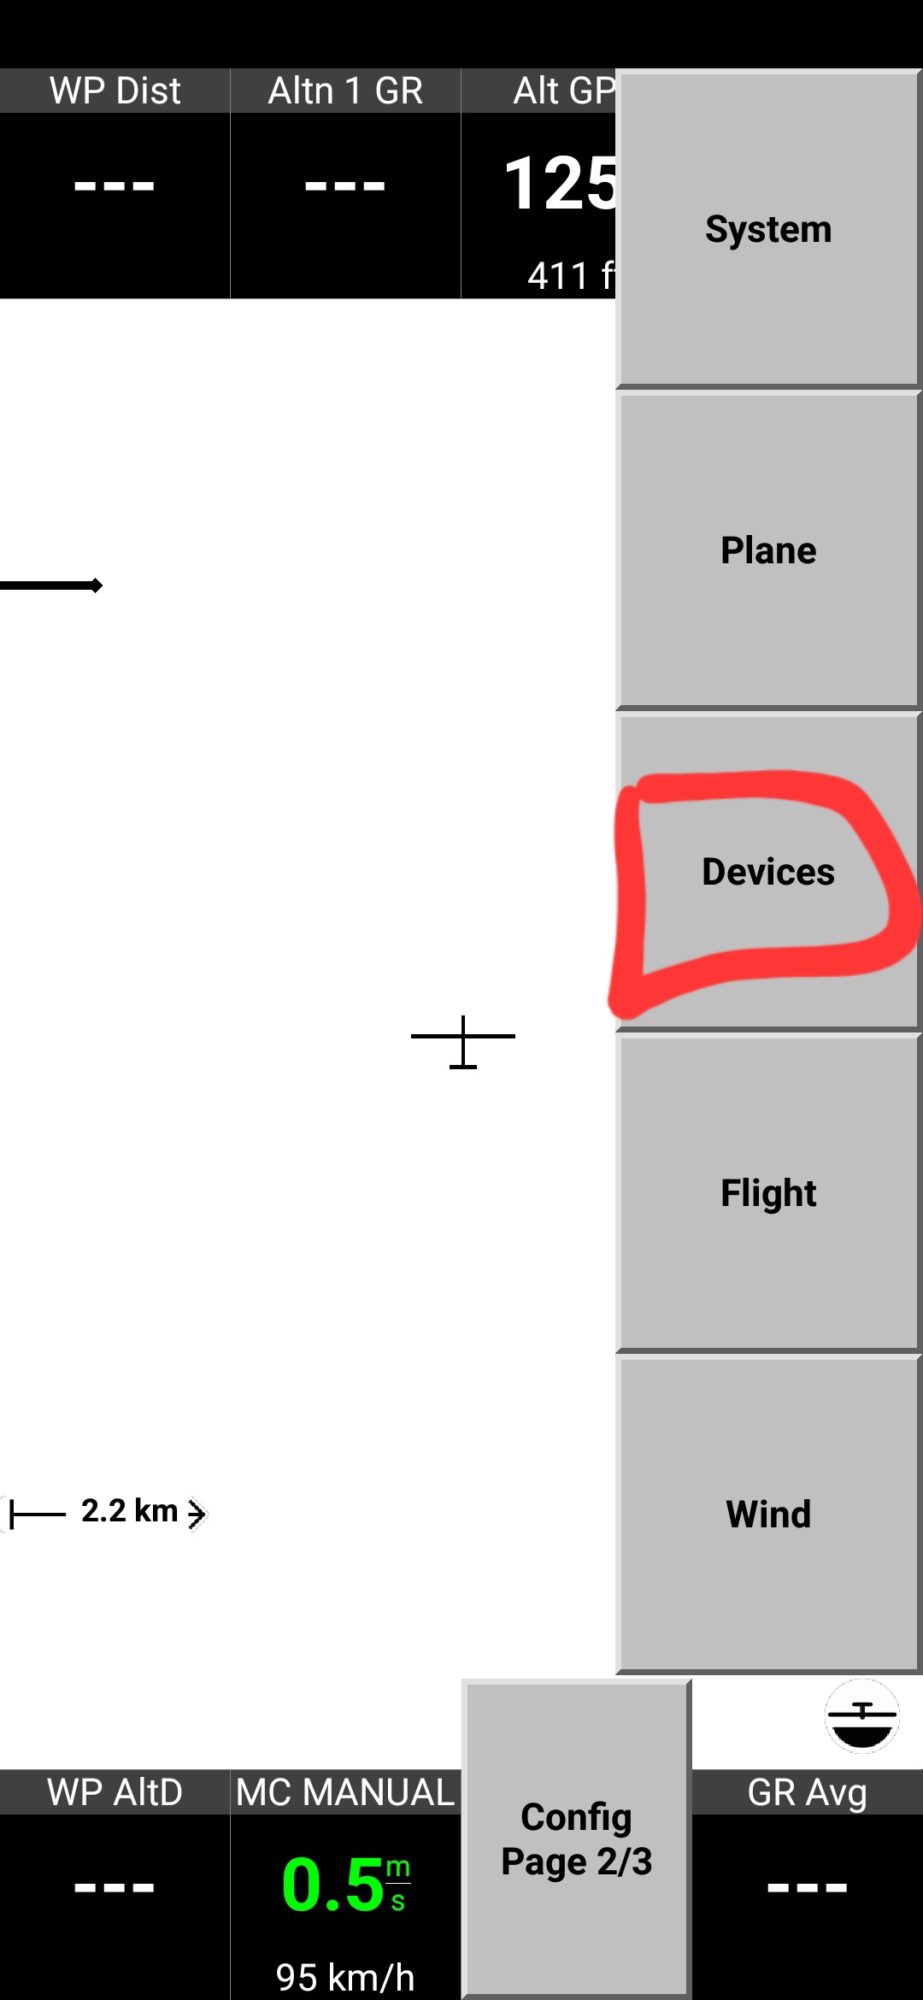 5. First, disable built in sensors. If you will not do it, your device GPS and barometer sensors data will conflict with simulator data. Select first line and tap DISABLE.
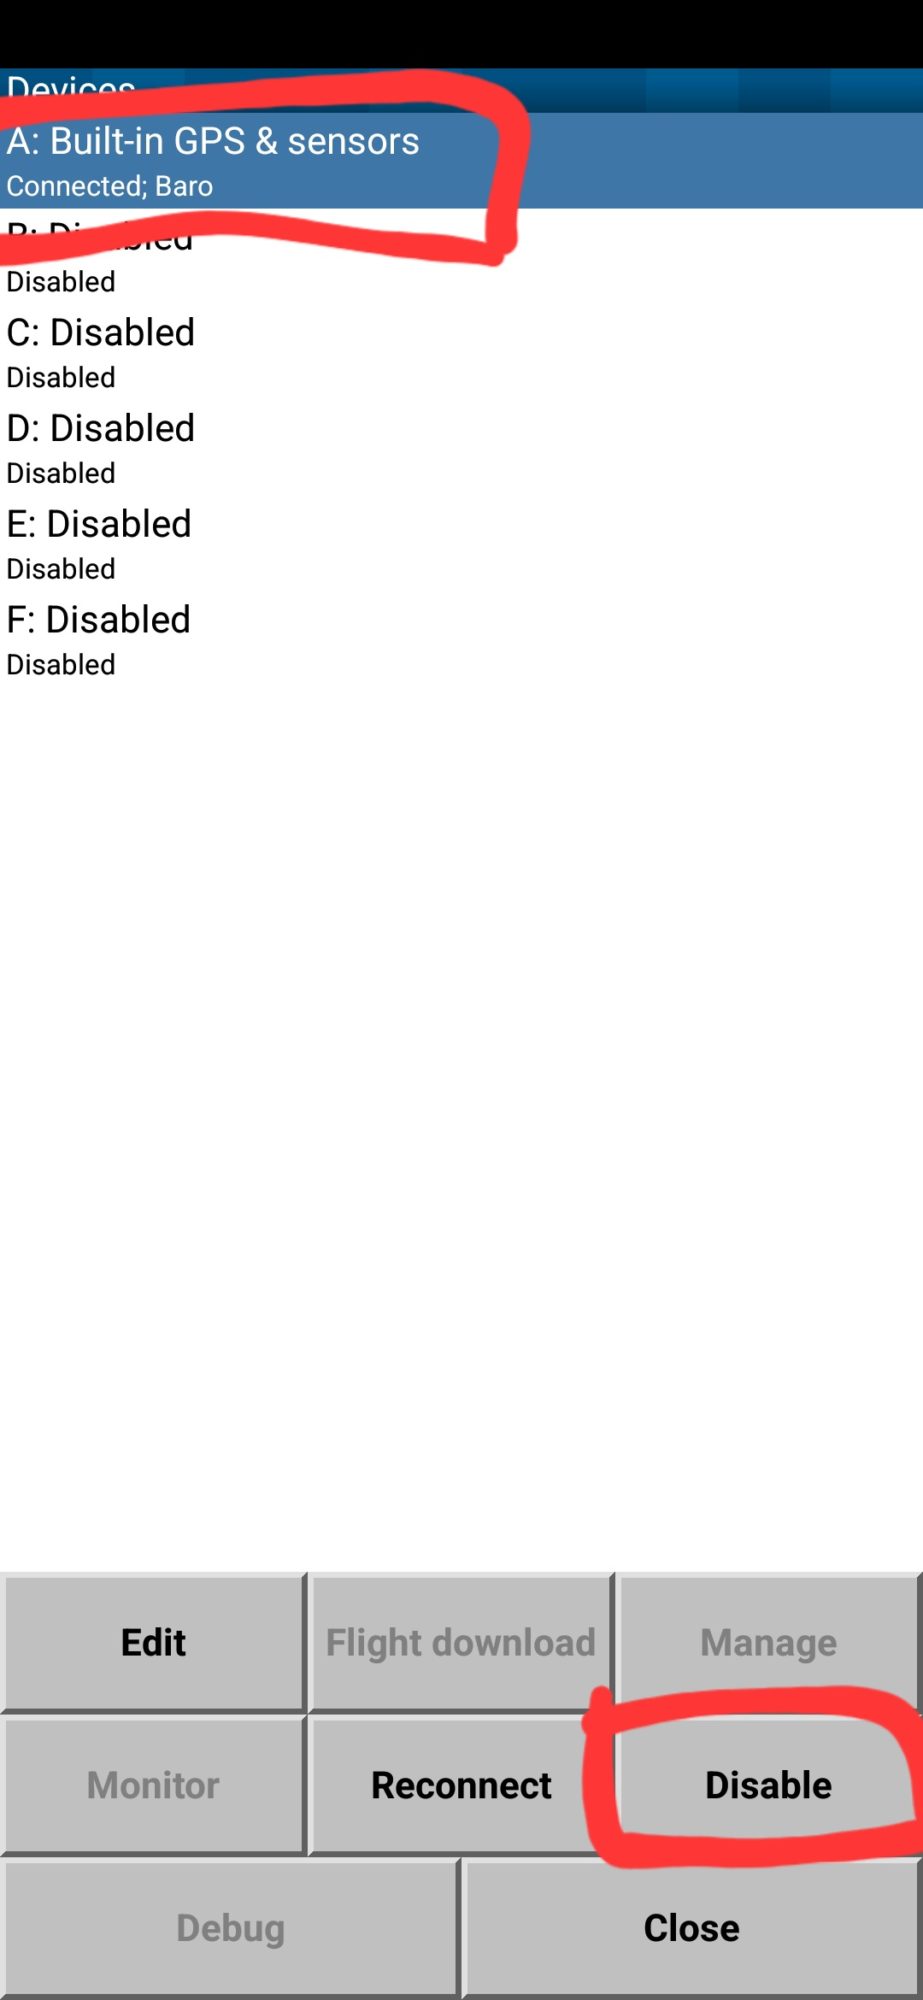
6. Then select 2nd device and tab EDIT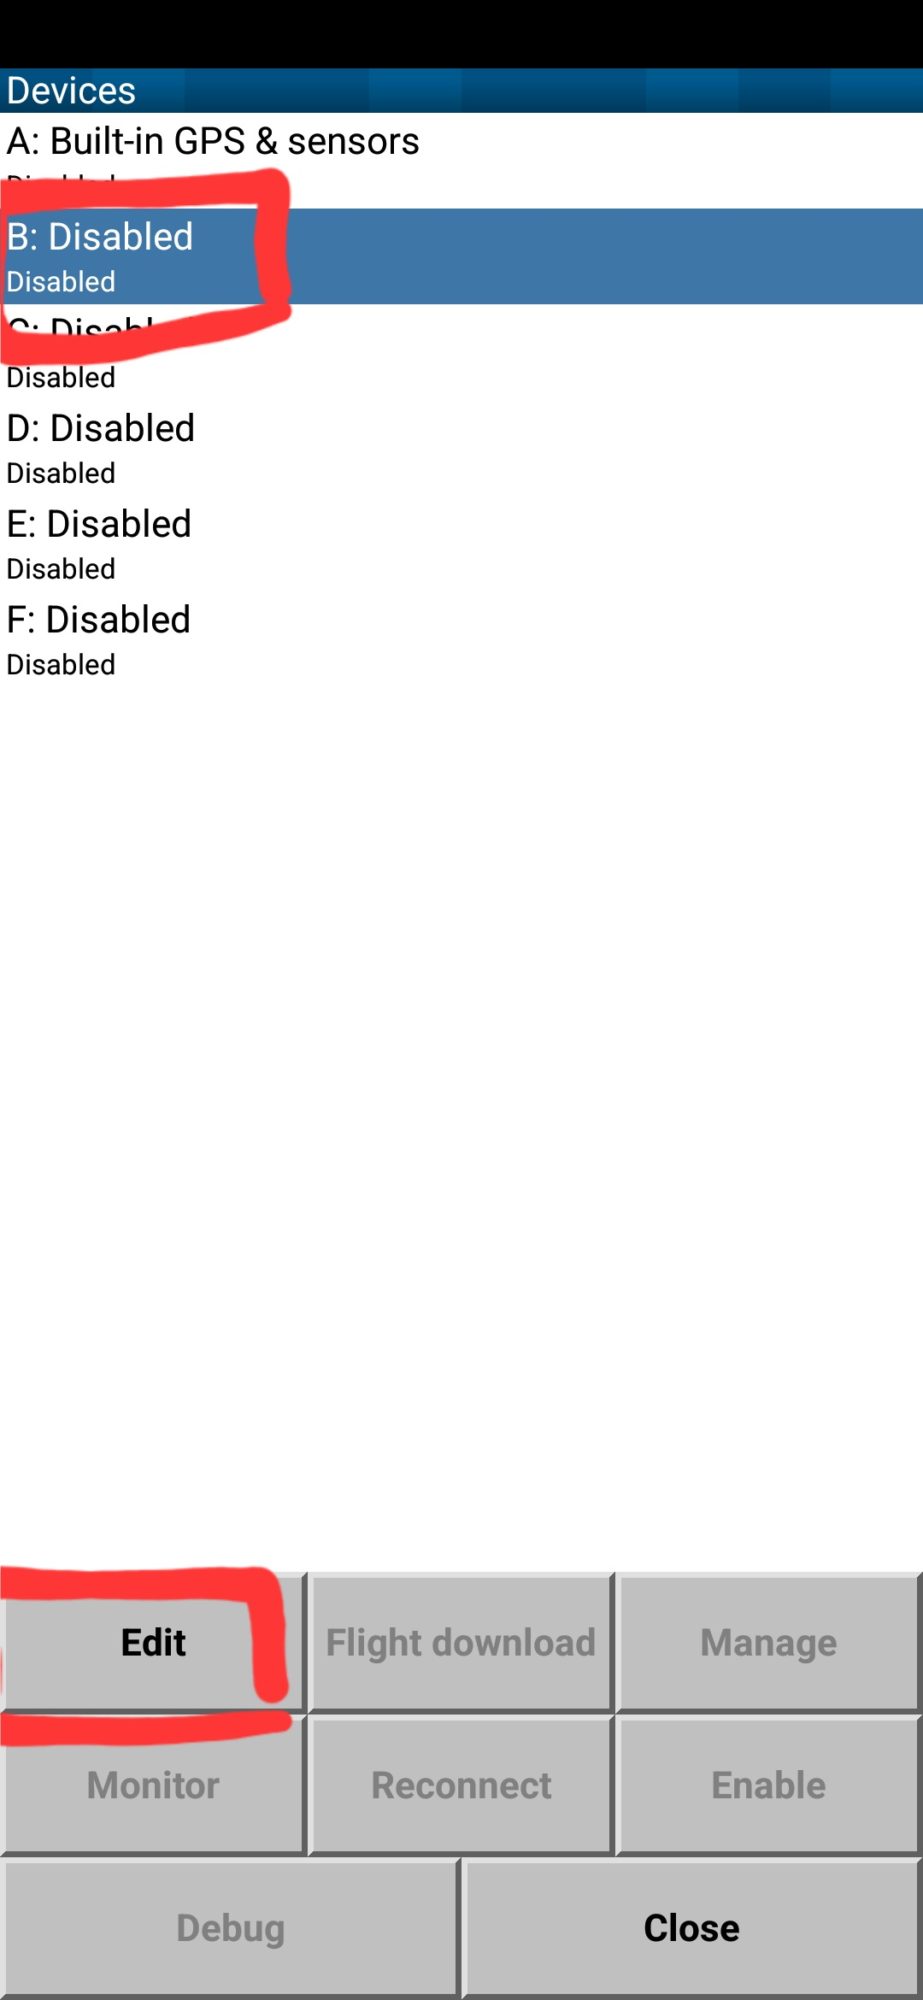 7. On the device page, set values like on the example picture.
– If your FS2EFB app installed on different device than XCSoar, IP address should match local IP of the device with app installed (you can find it at the top of the black screen
– If you change TCP server port, set new value in TCP Port field.
Once finished, press OK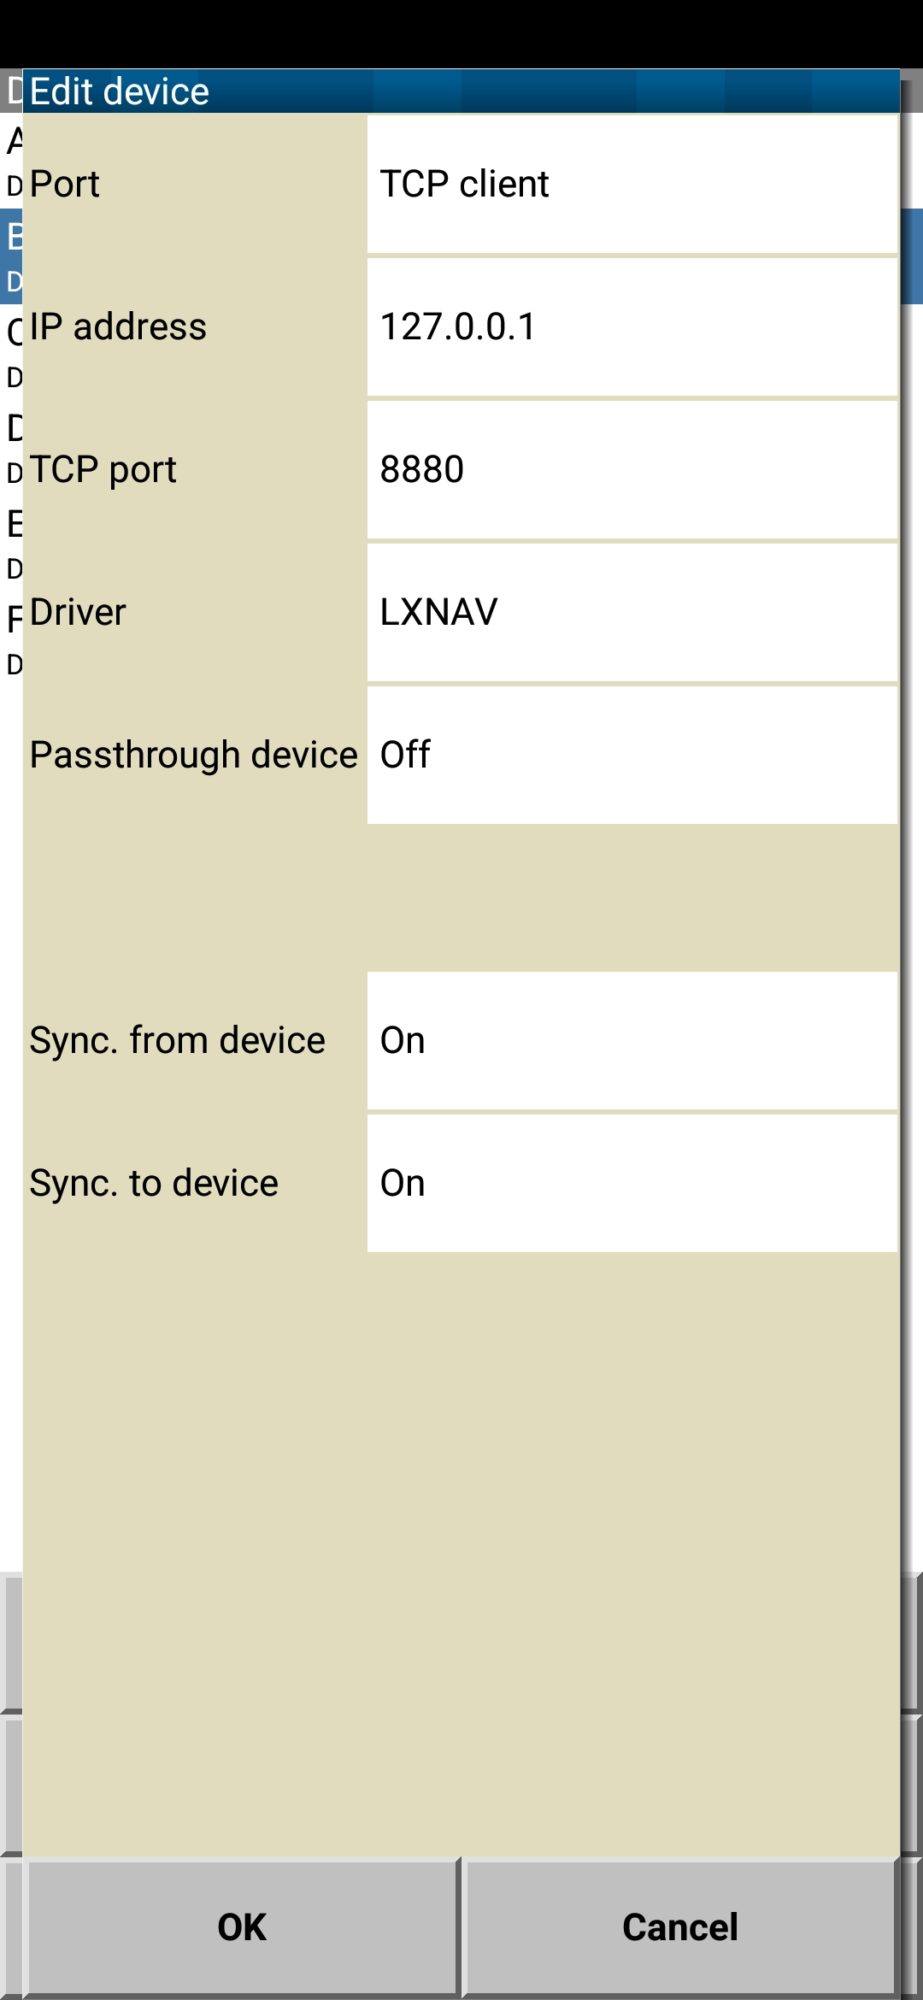
8. In the devices list, you can see such data comes from the device #2: GPS fix, Baro, Airspeed, Vario. Press CLOSE. 9. Validate XCSoar values with simulator data – altitude, airspeed should match.
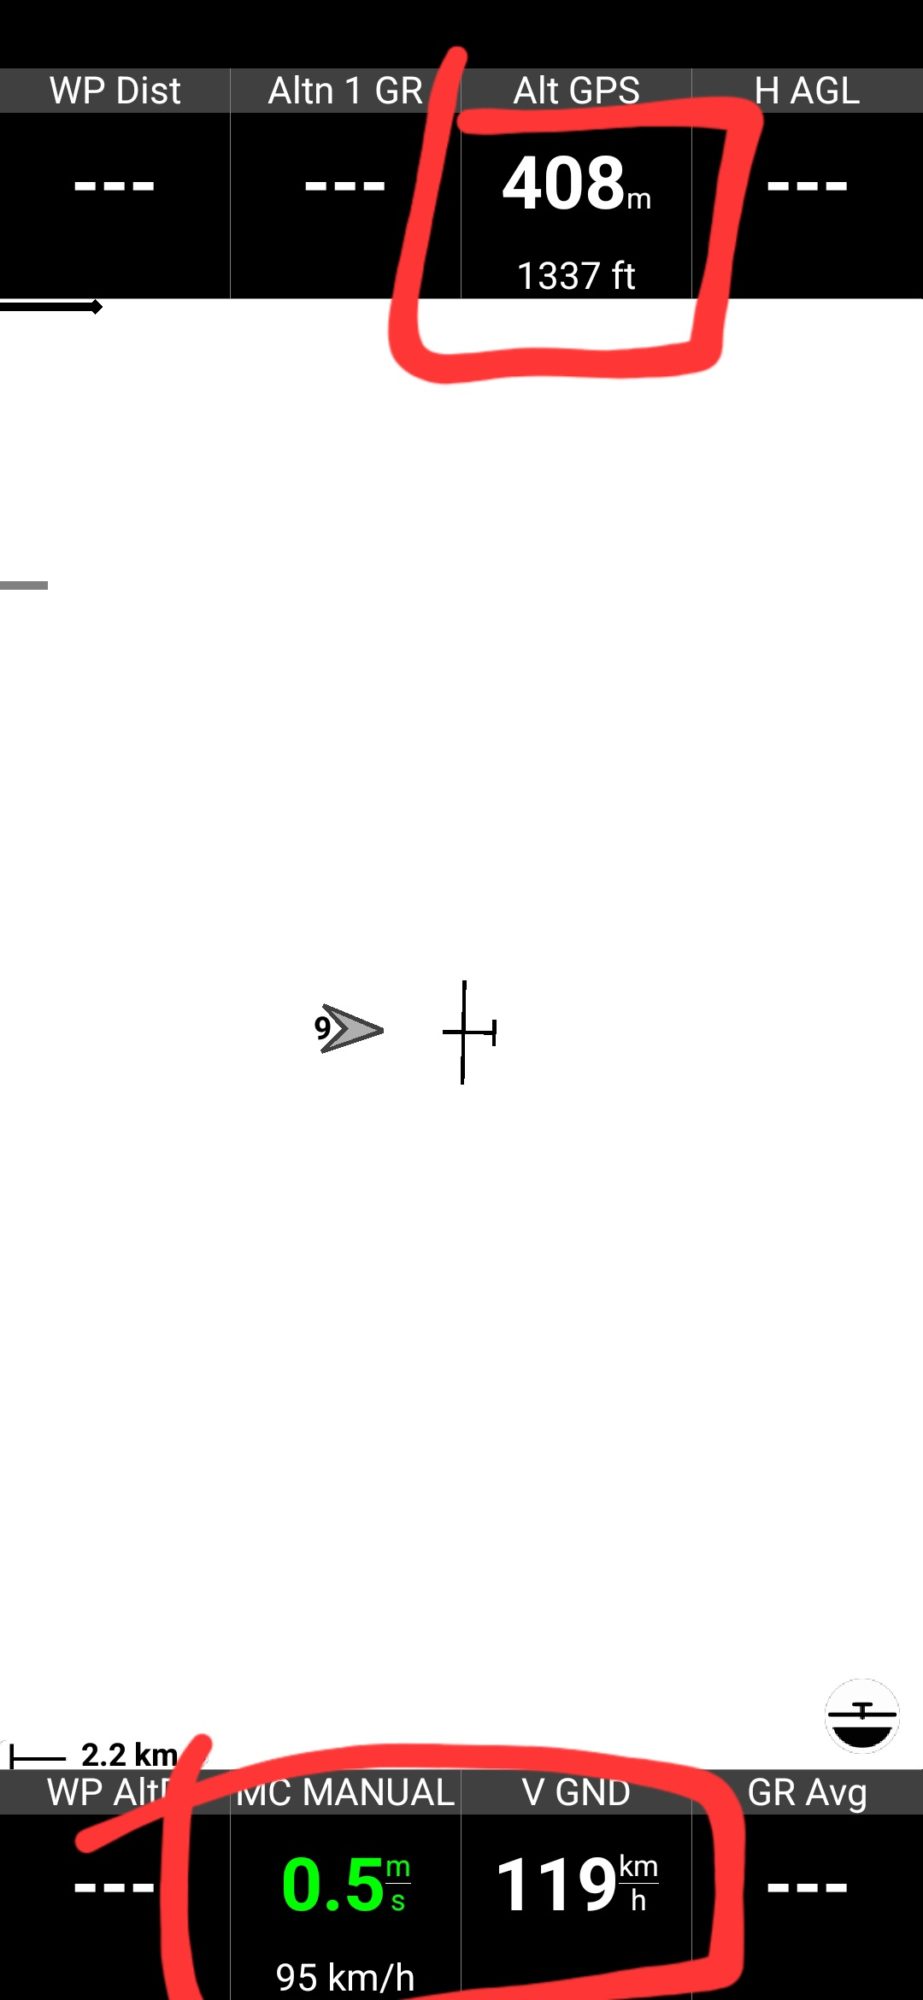 10. Configure XCSoar for your needs – track indication, thermalling assist, download map for your area. You can find detailed manual on the official website https://www.xcsoar.org/
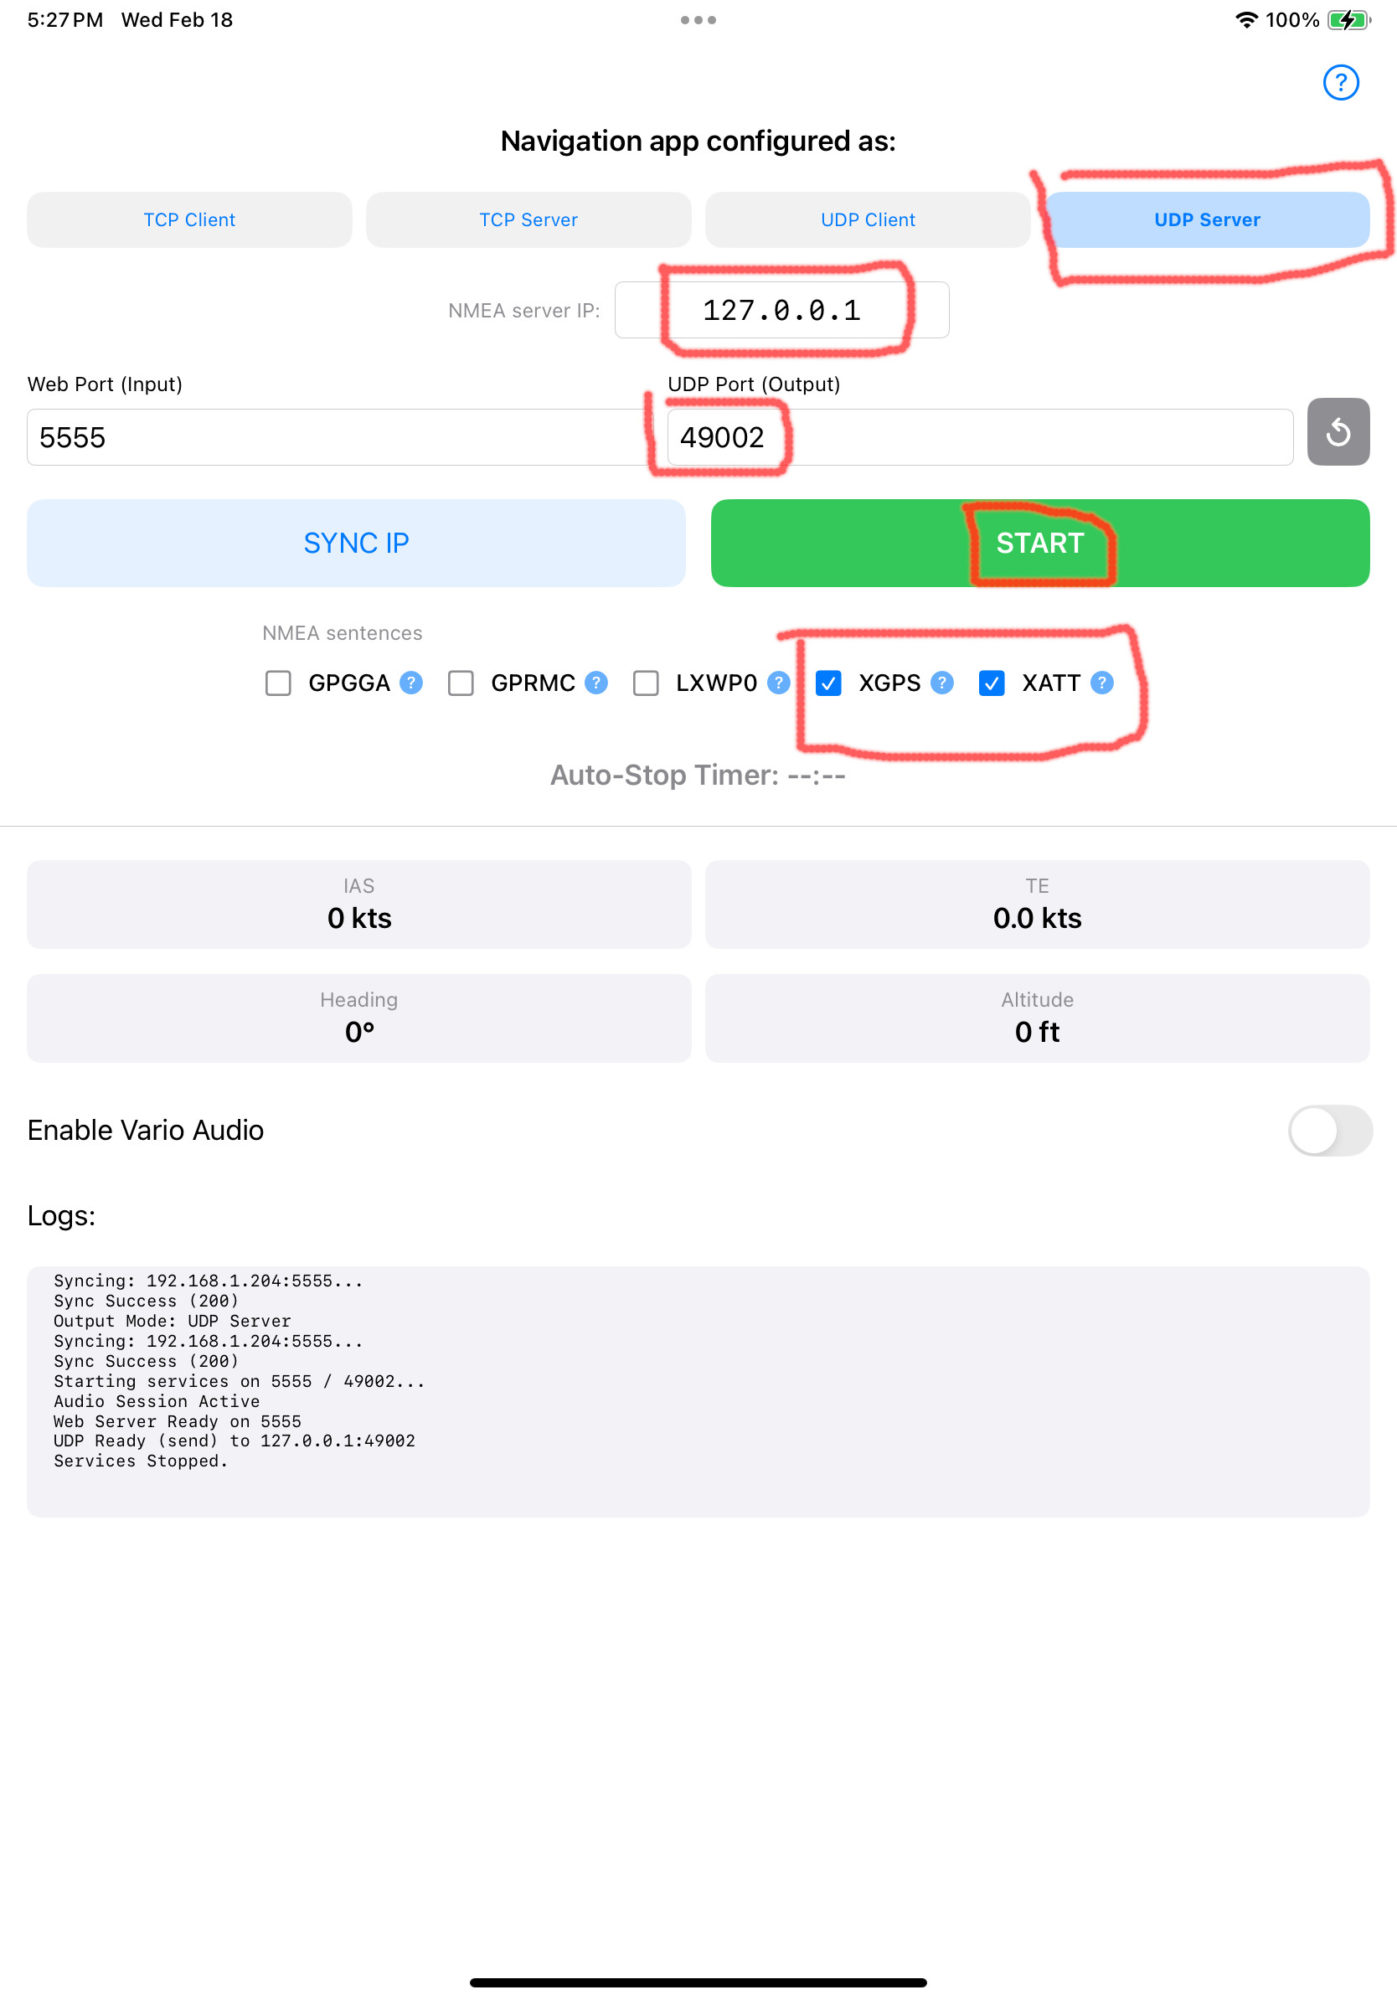
1.In the app, select UDP Server mode, IP 127.0.0.1 (if ForeFlight launched on same device, otherwise local IP of that device), UDP port 49002, ensure XGPS and XATT sentences are enabled. Press START button.
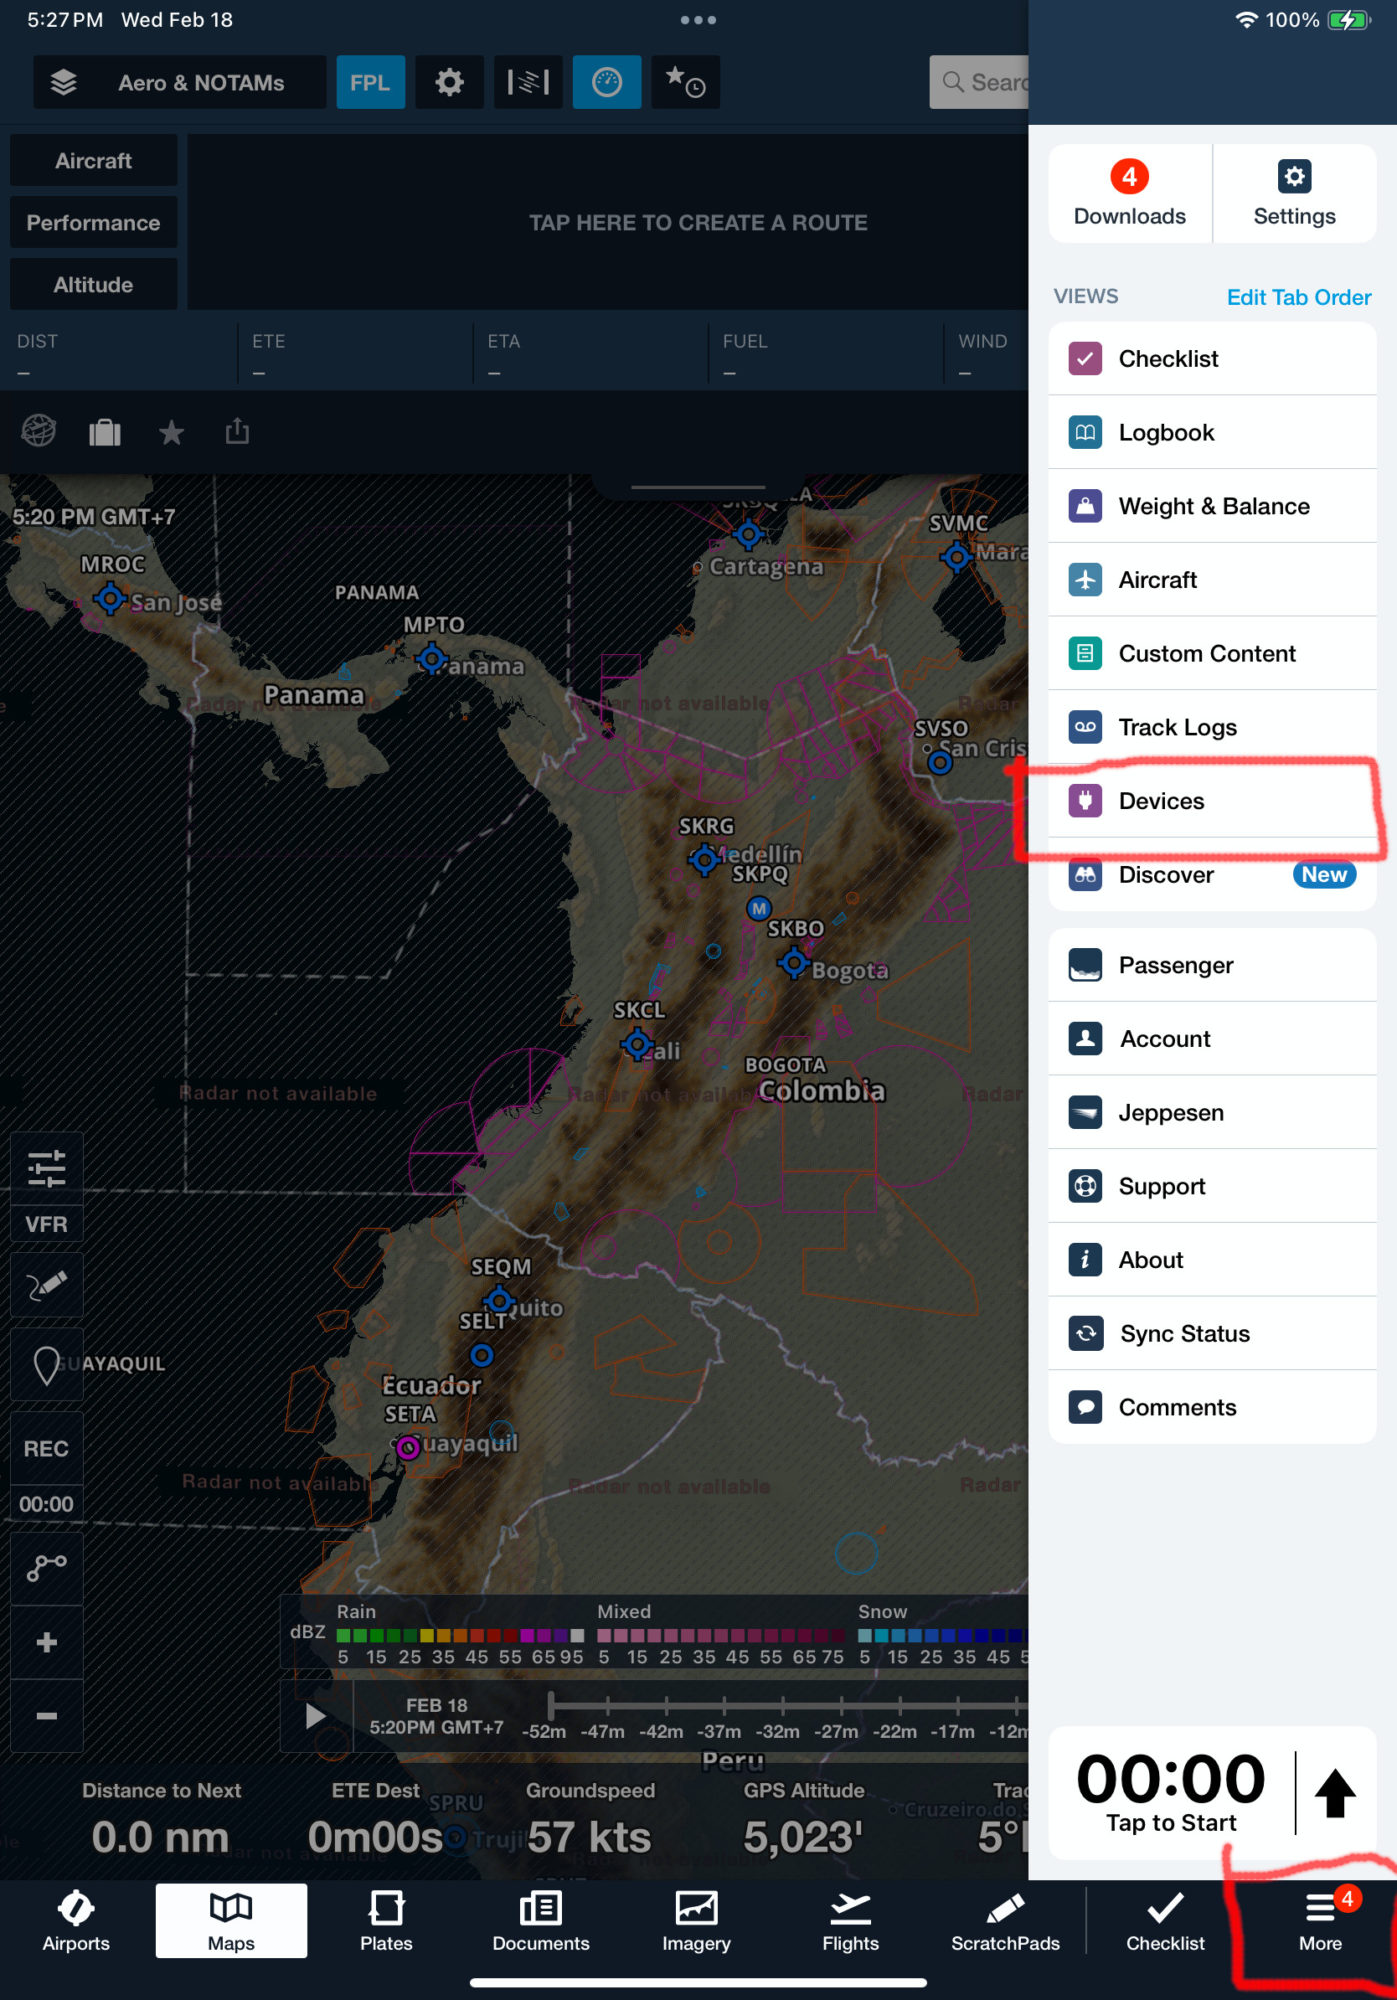
 2. Open ForeFlight, tap MENU and select DEVICES
 3. MSFS connection should be presented. Tap it to open connection settings.
If it missing, back to NMEA export app and restart the server. Check log for error messages.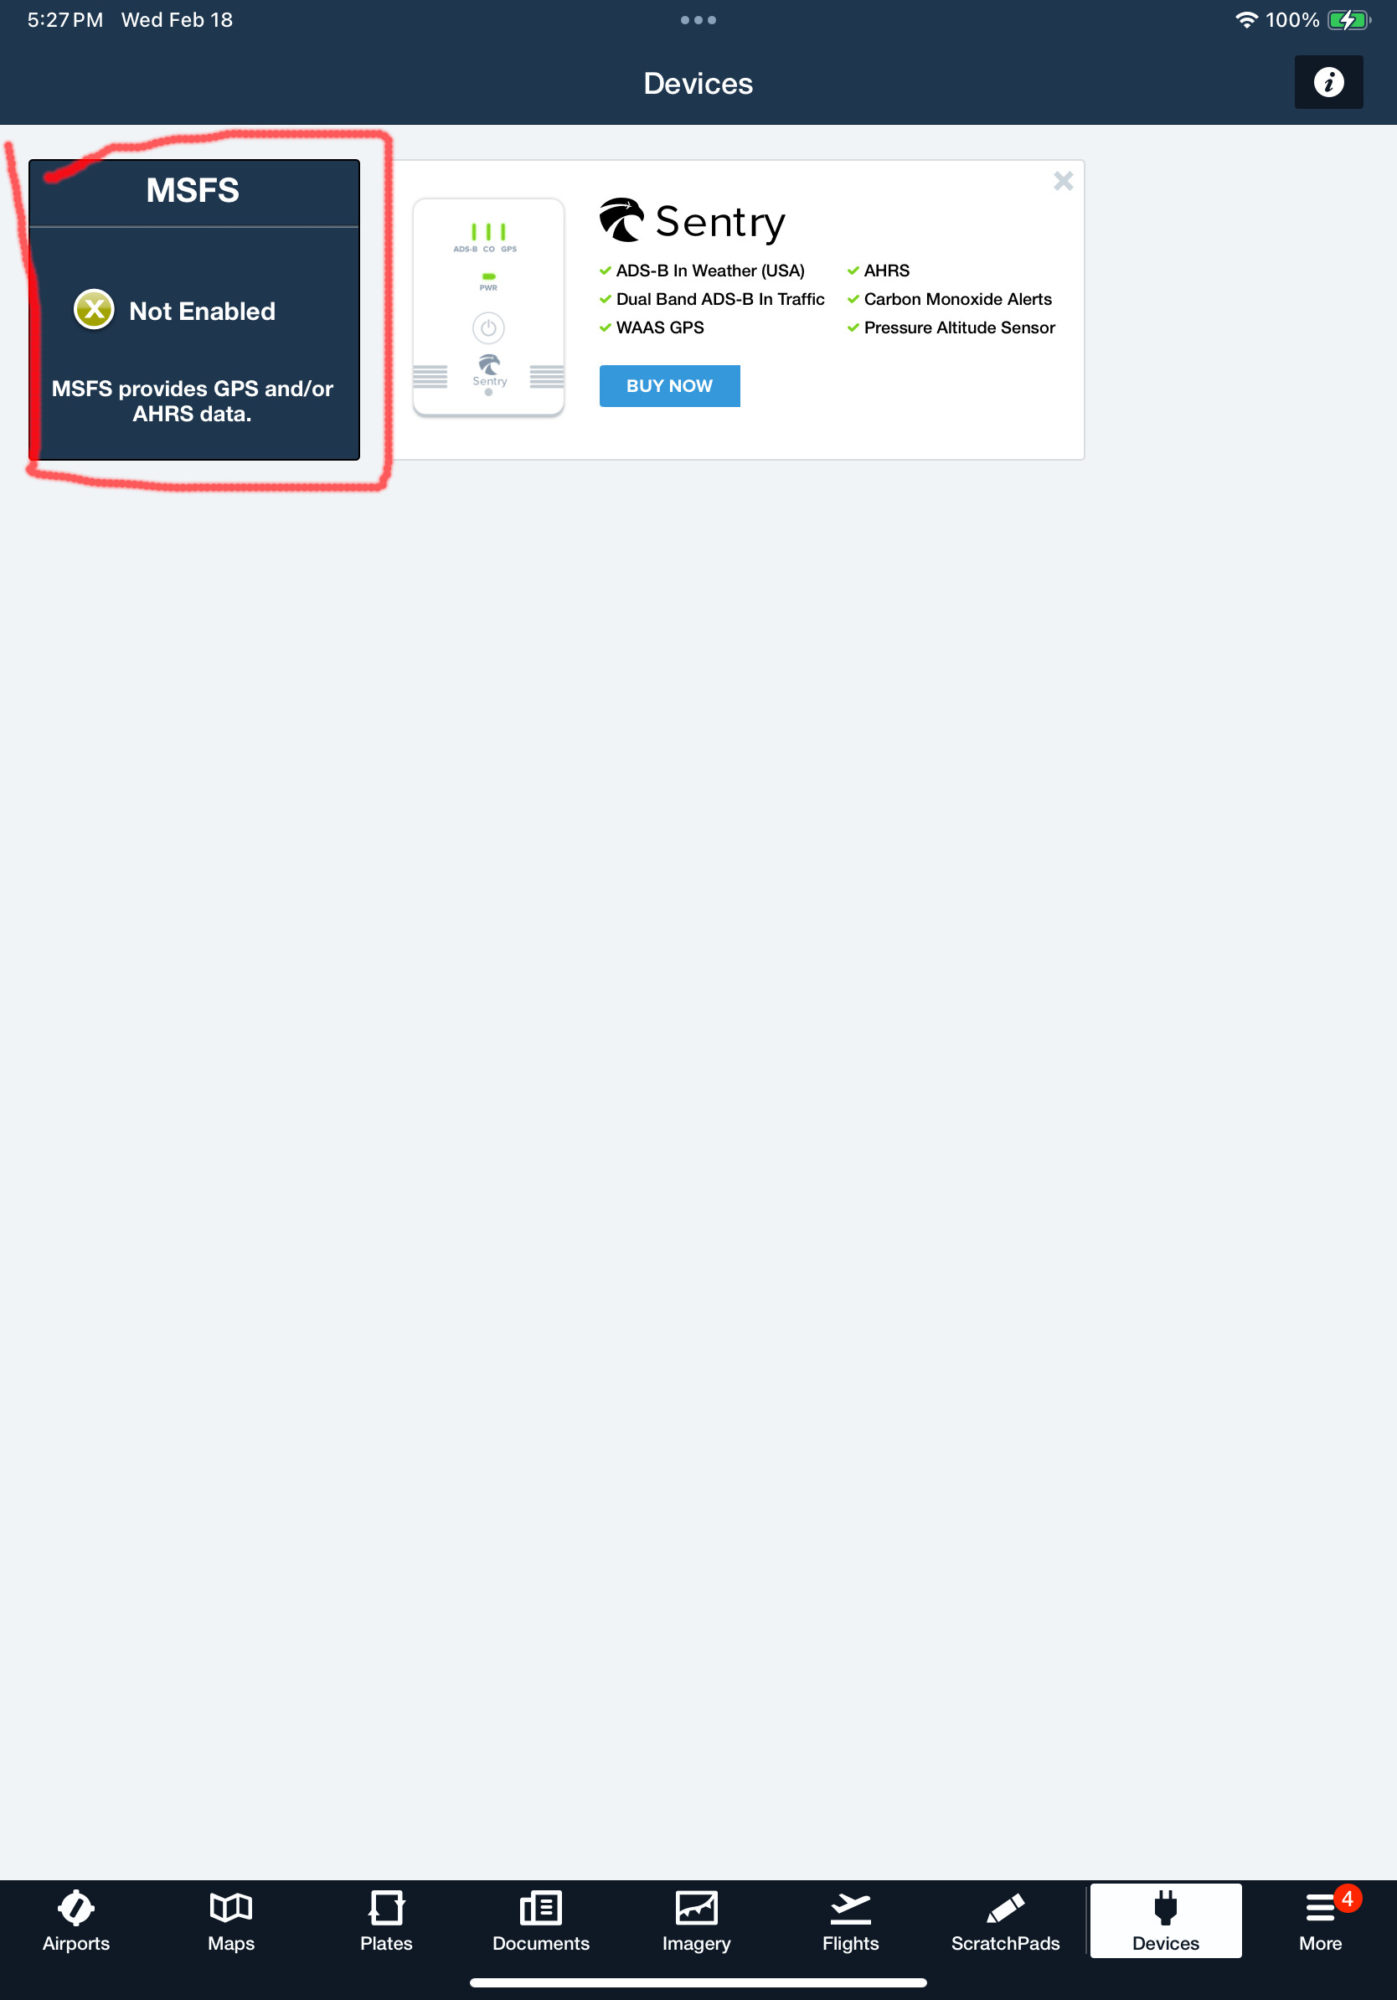 4. Enable connection, return to devices list
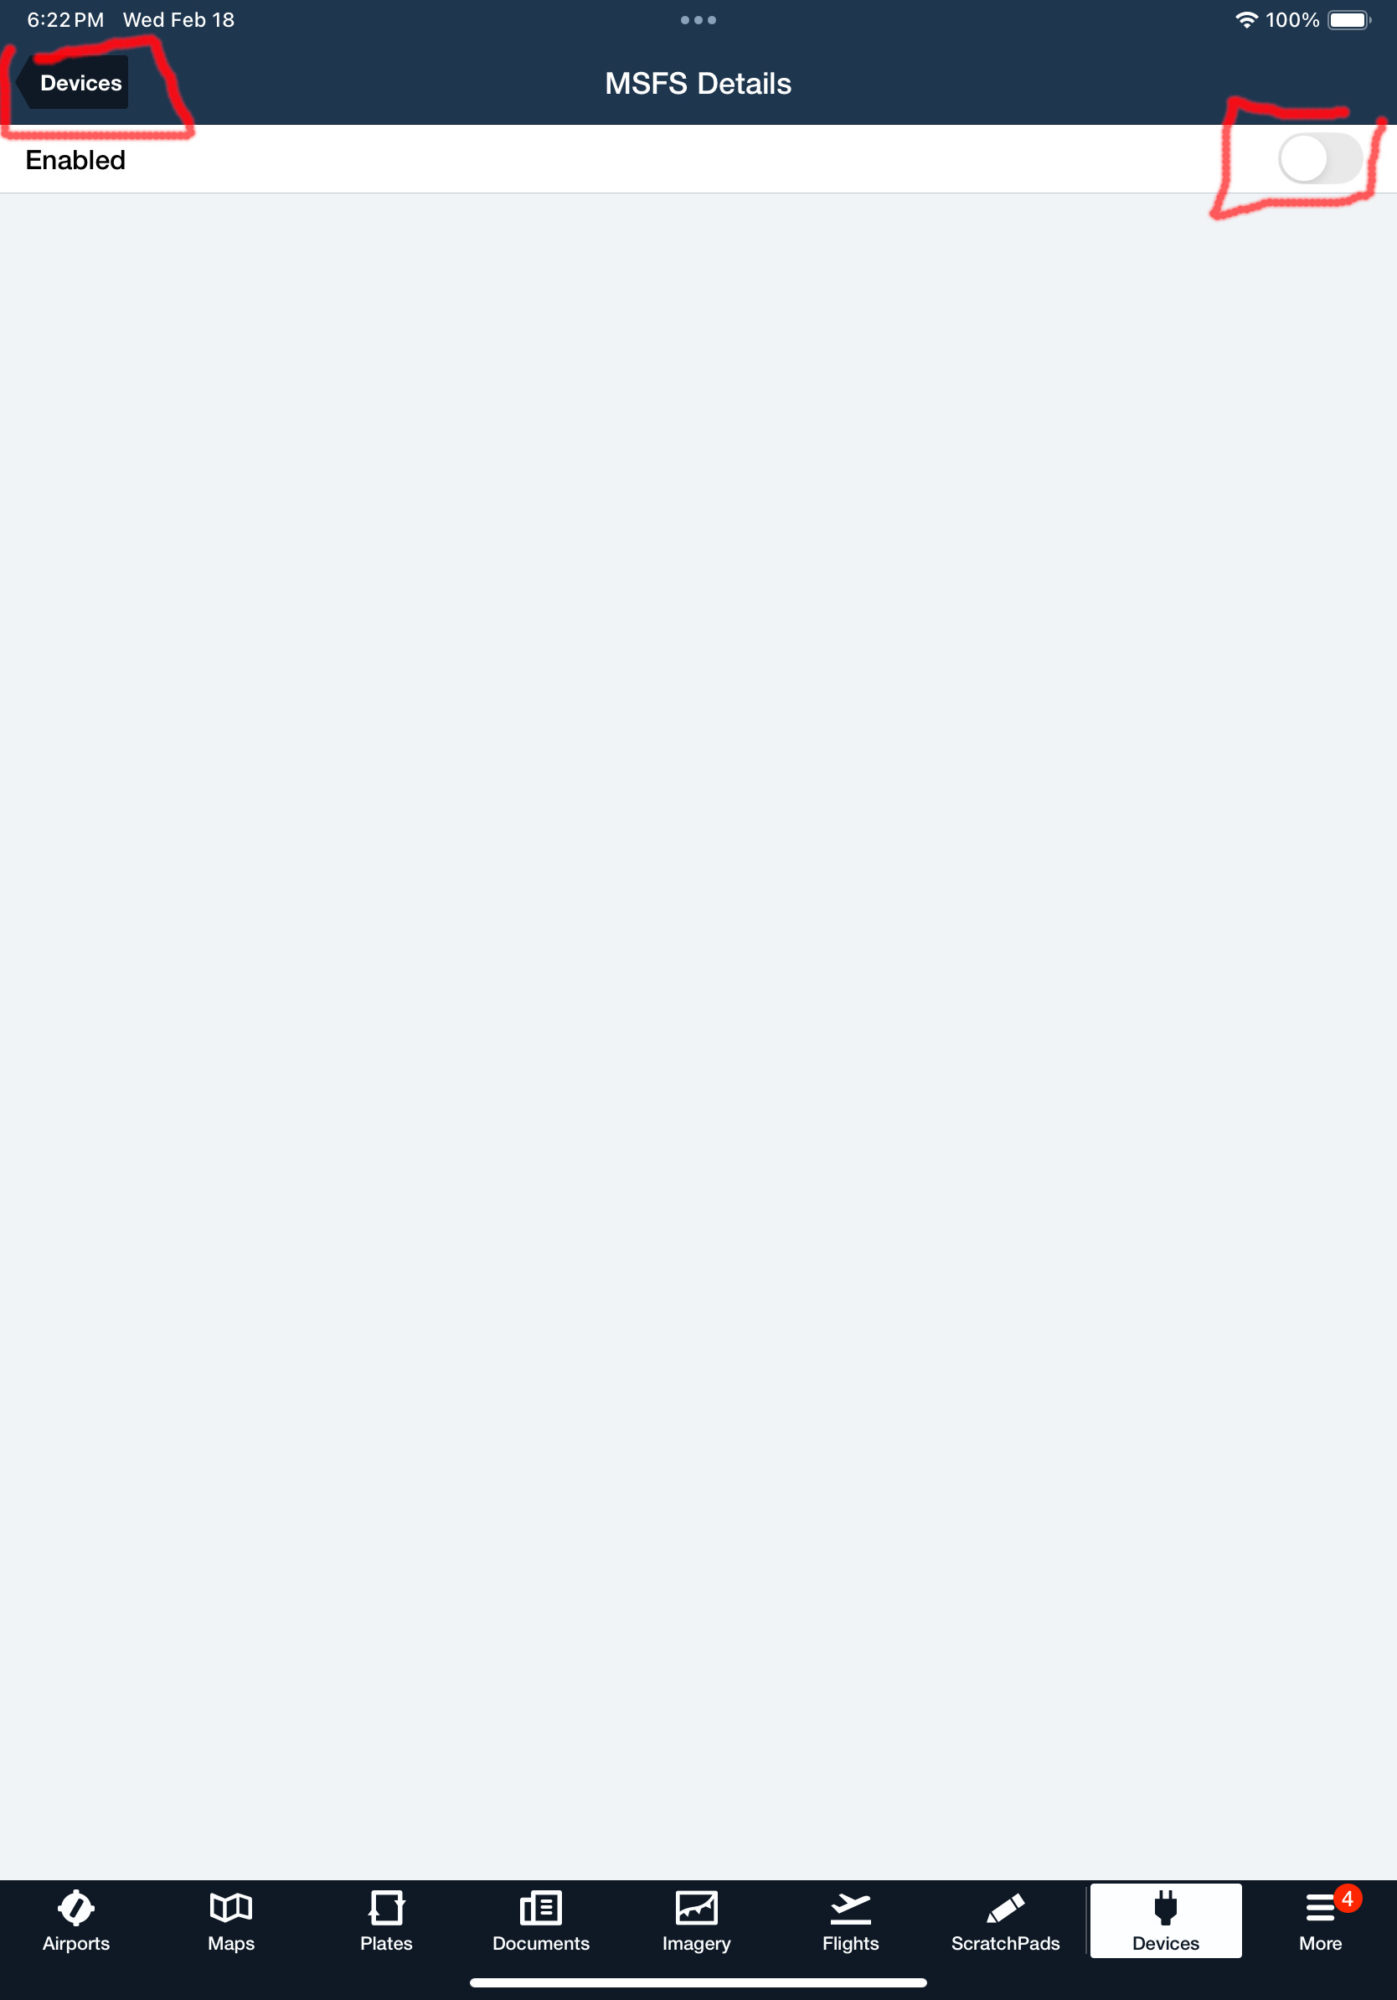 5. MSFS should appear as Connected now
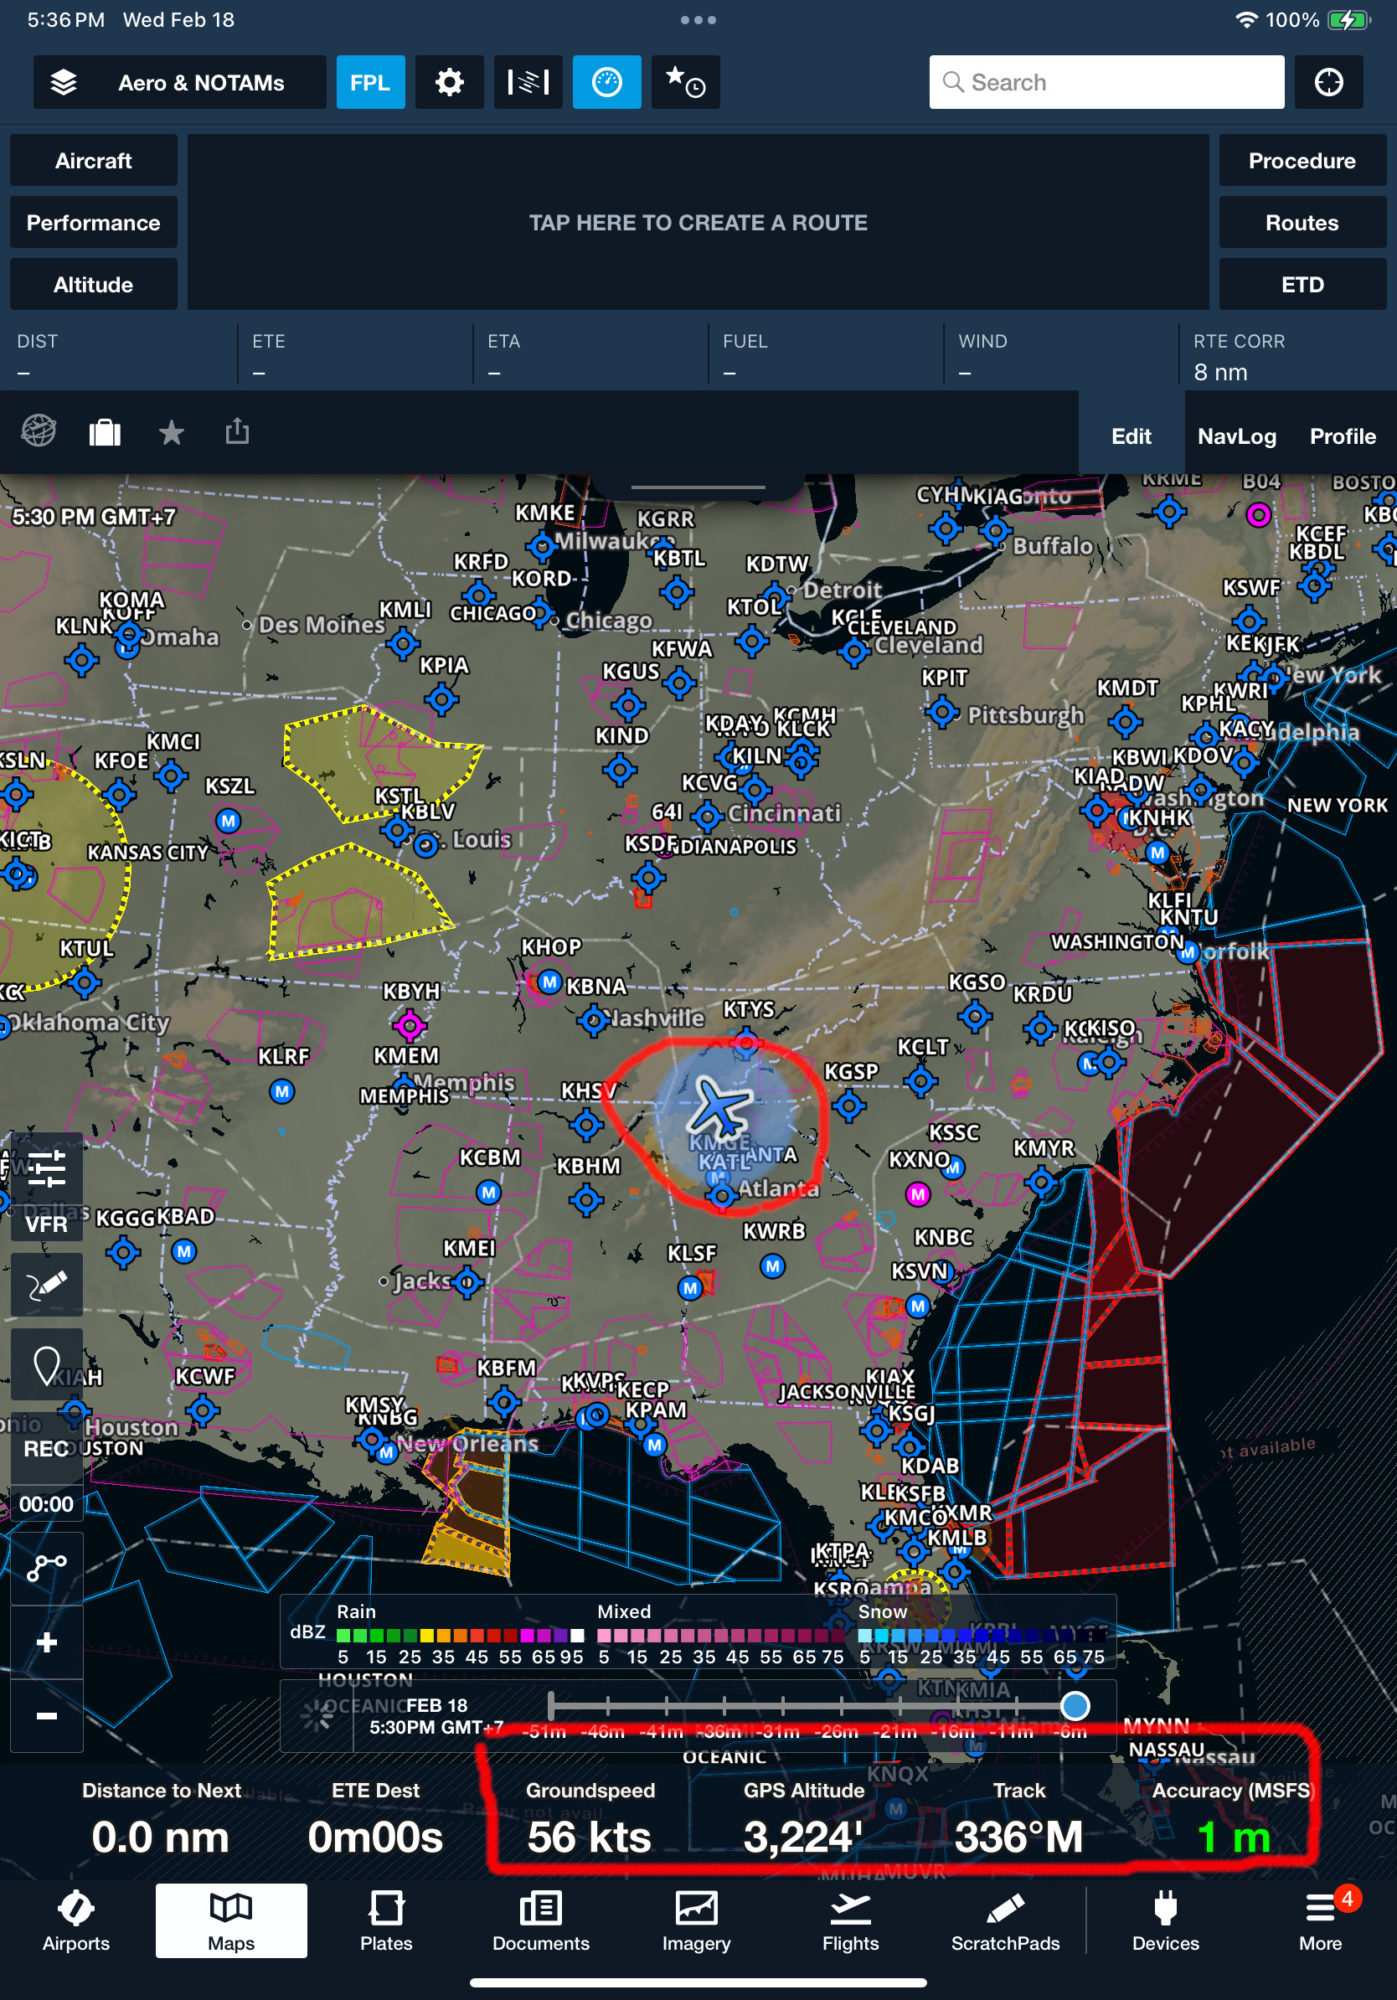
 6. Return to map, your simulation location should be received correctly. ForeFlight official tutorial
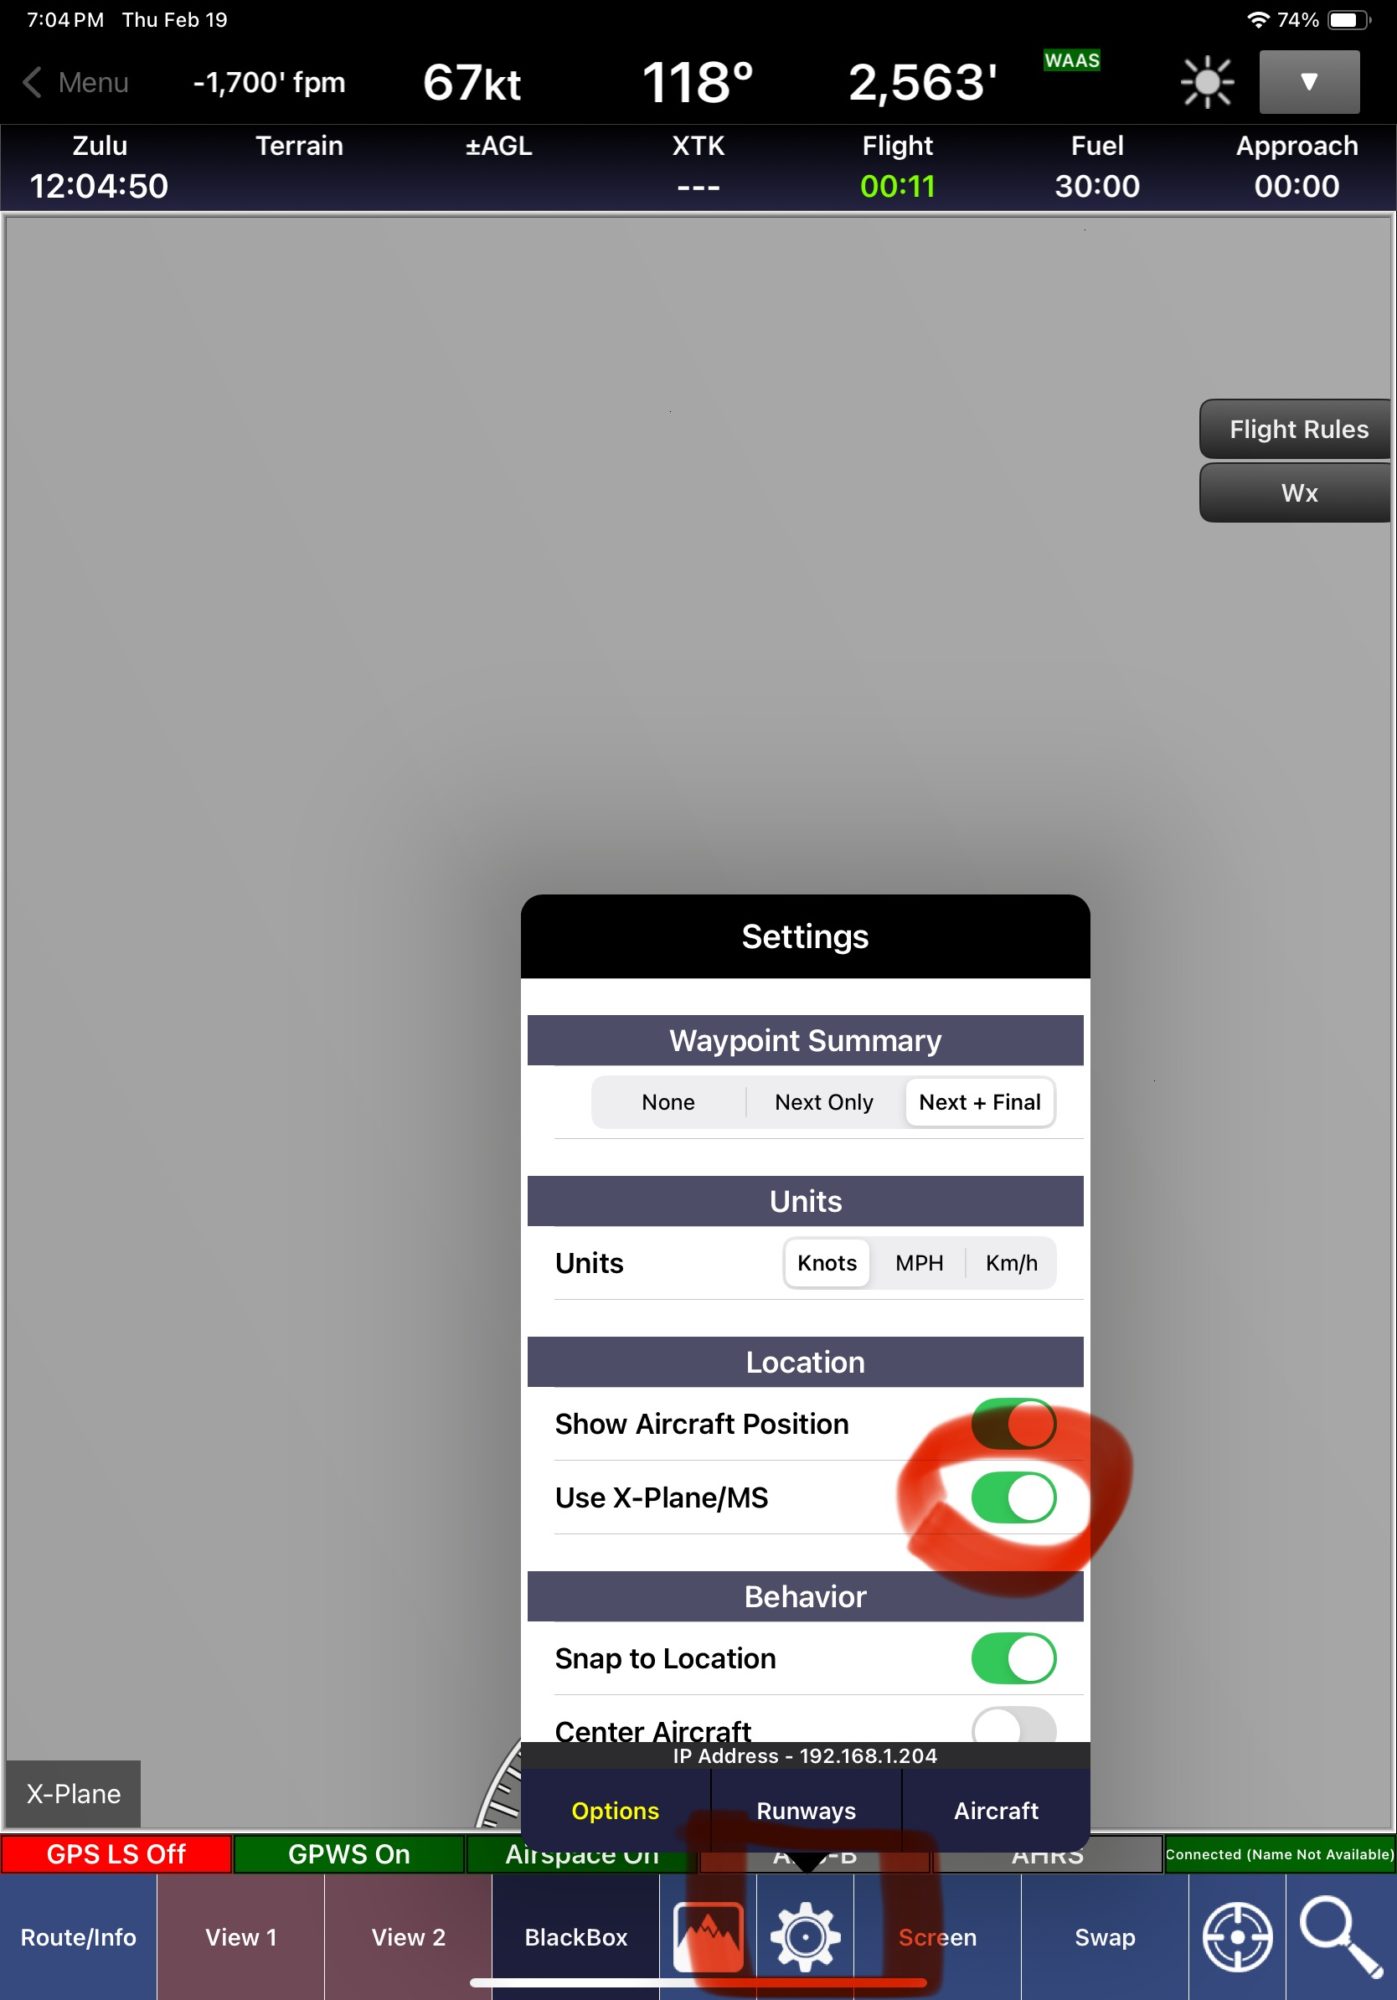
1.In the app, select UDP Server mode, IP 127.0.0.1 (if SkyDemon launched on same device, otherwise local IP of that device), UDP port 49002, ensure XGPS and XATT sentences are enabled. Press START button.
2. Open SkyDemon, tap Settings gear icon and select Connectivity
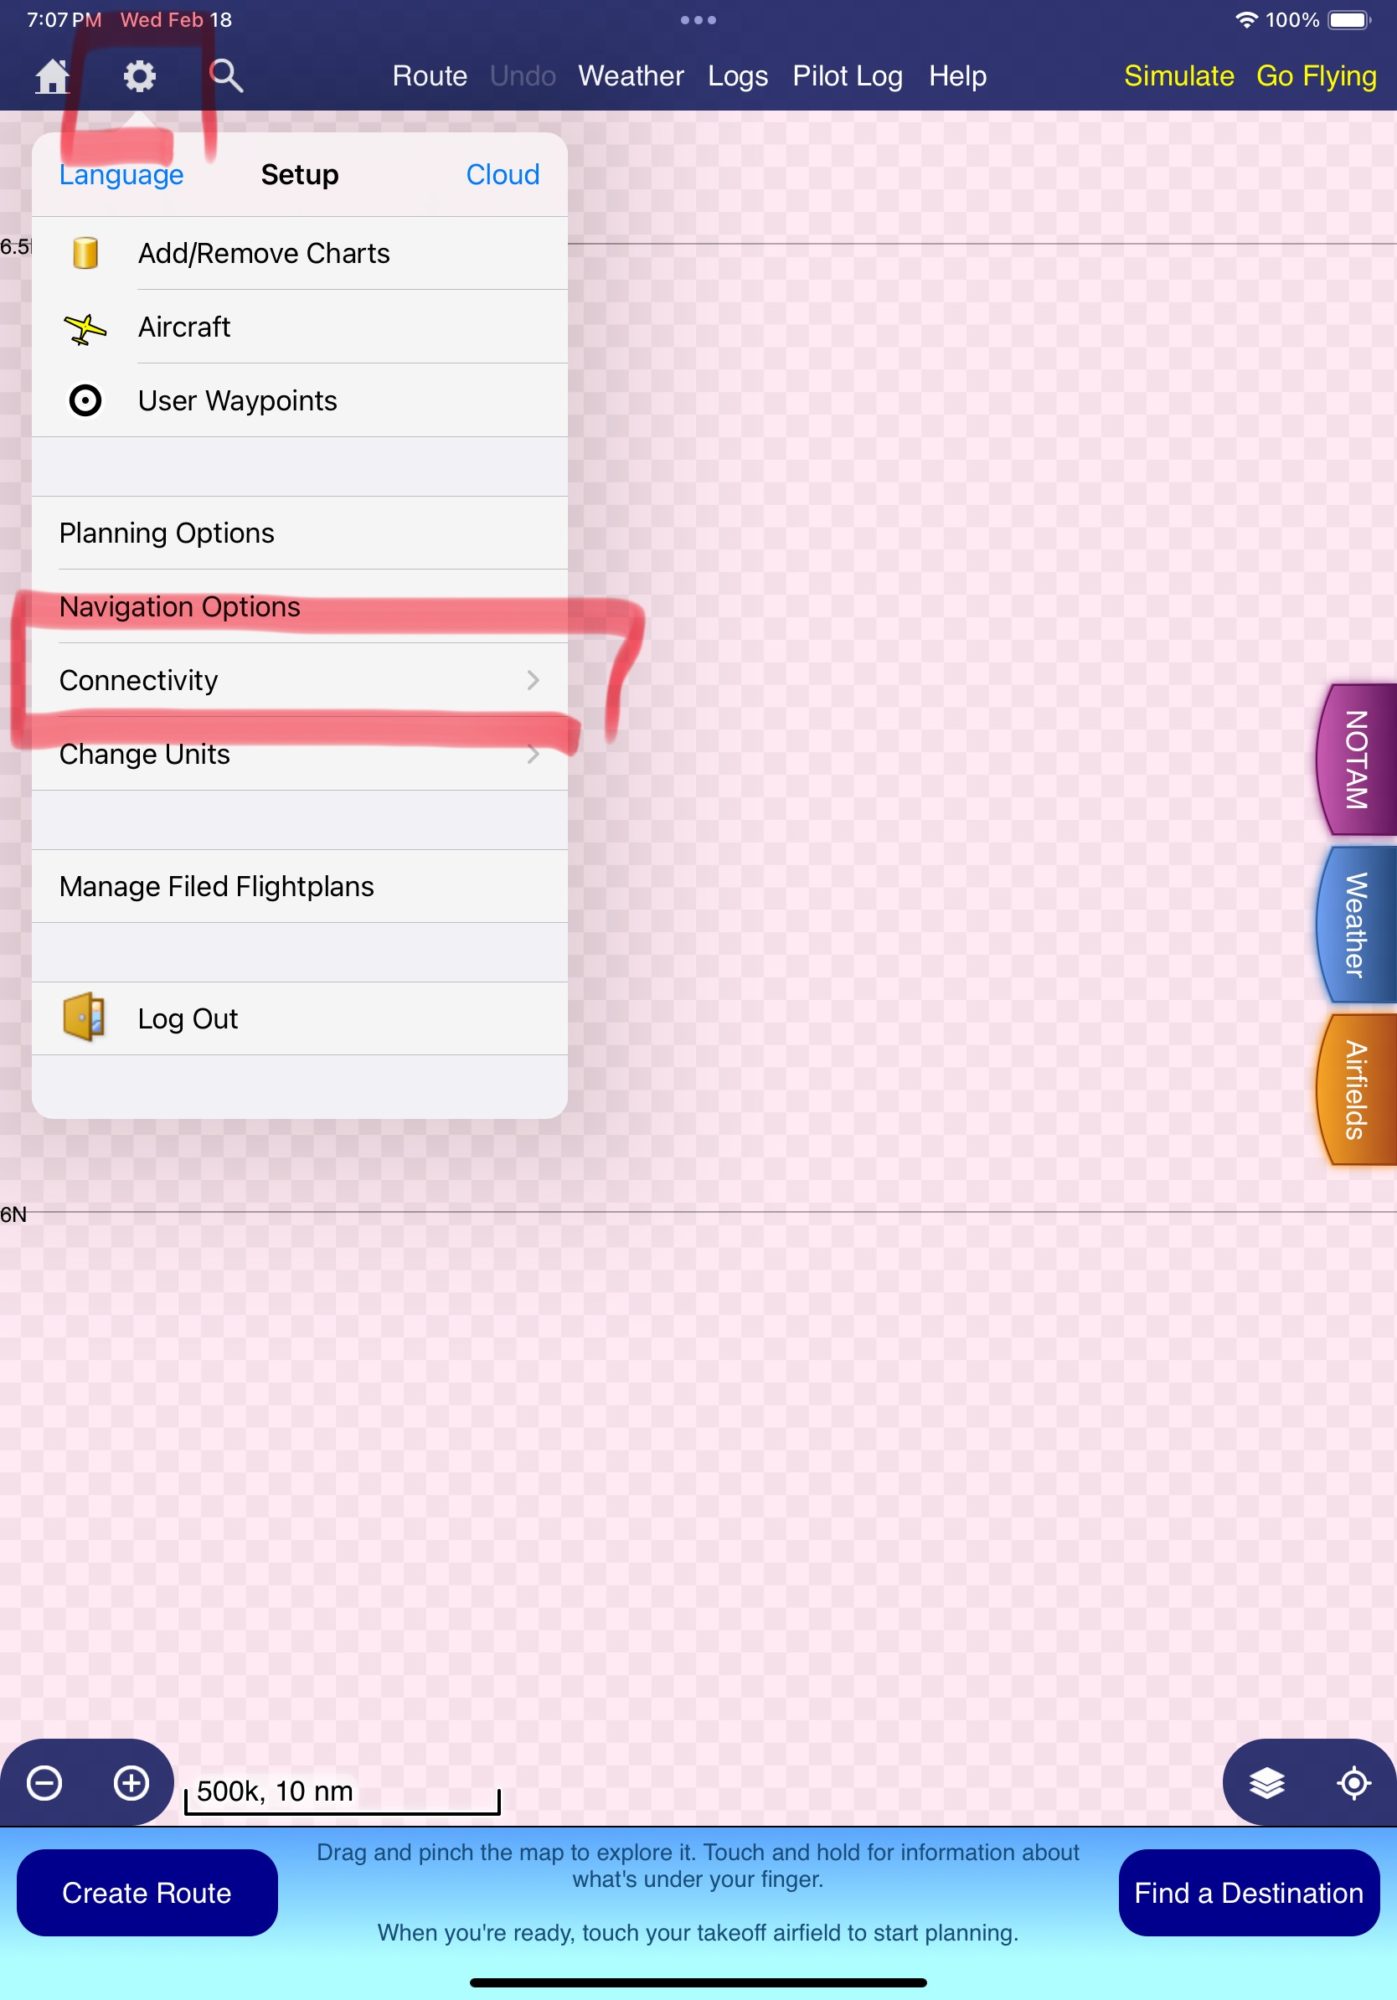 3. Enable Flight Simulator option
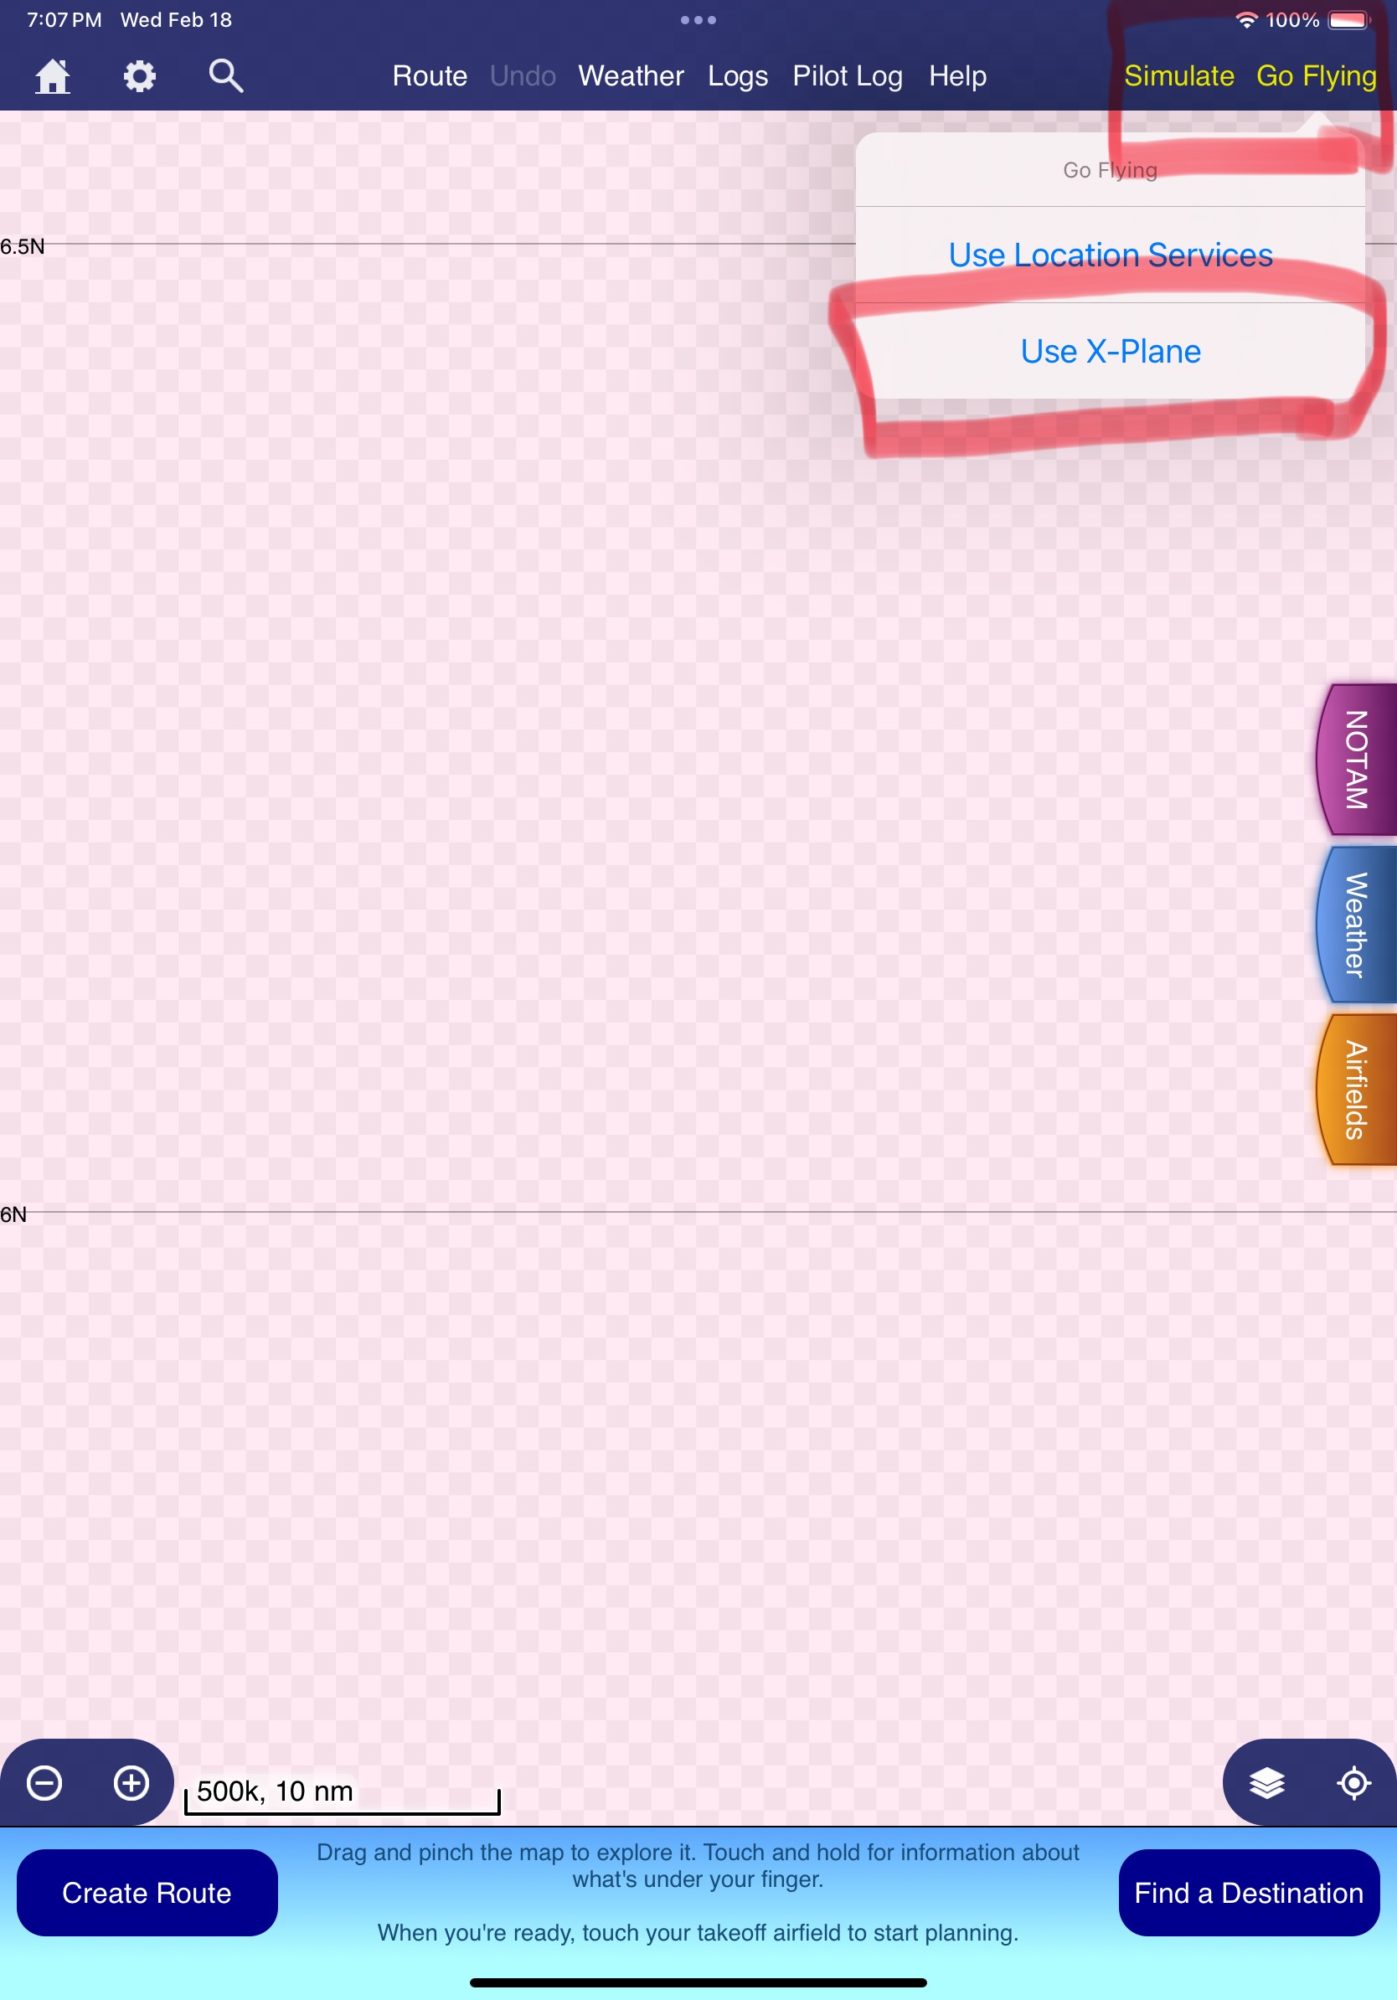
 4. Tap Go Flying, select Use X-Plane (as we use X-Plane data sentence)
 5. Return to map, your simulation location should be received correctly. SkyDemon official tutorial
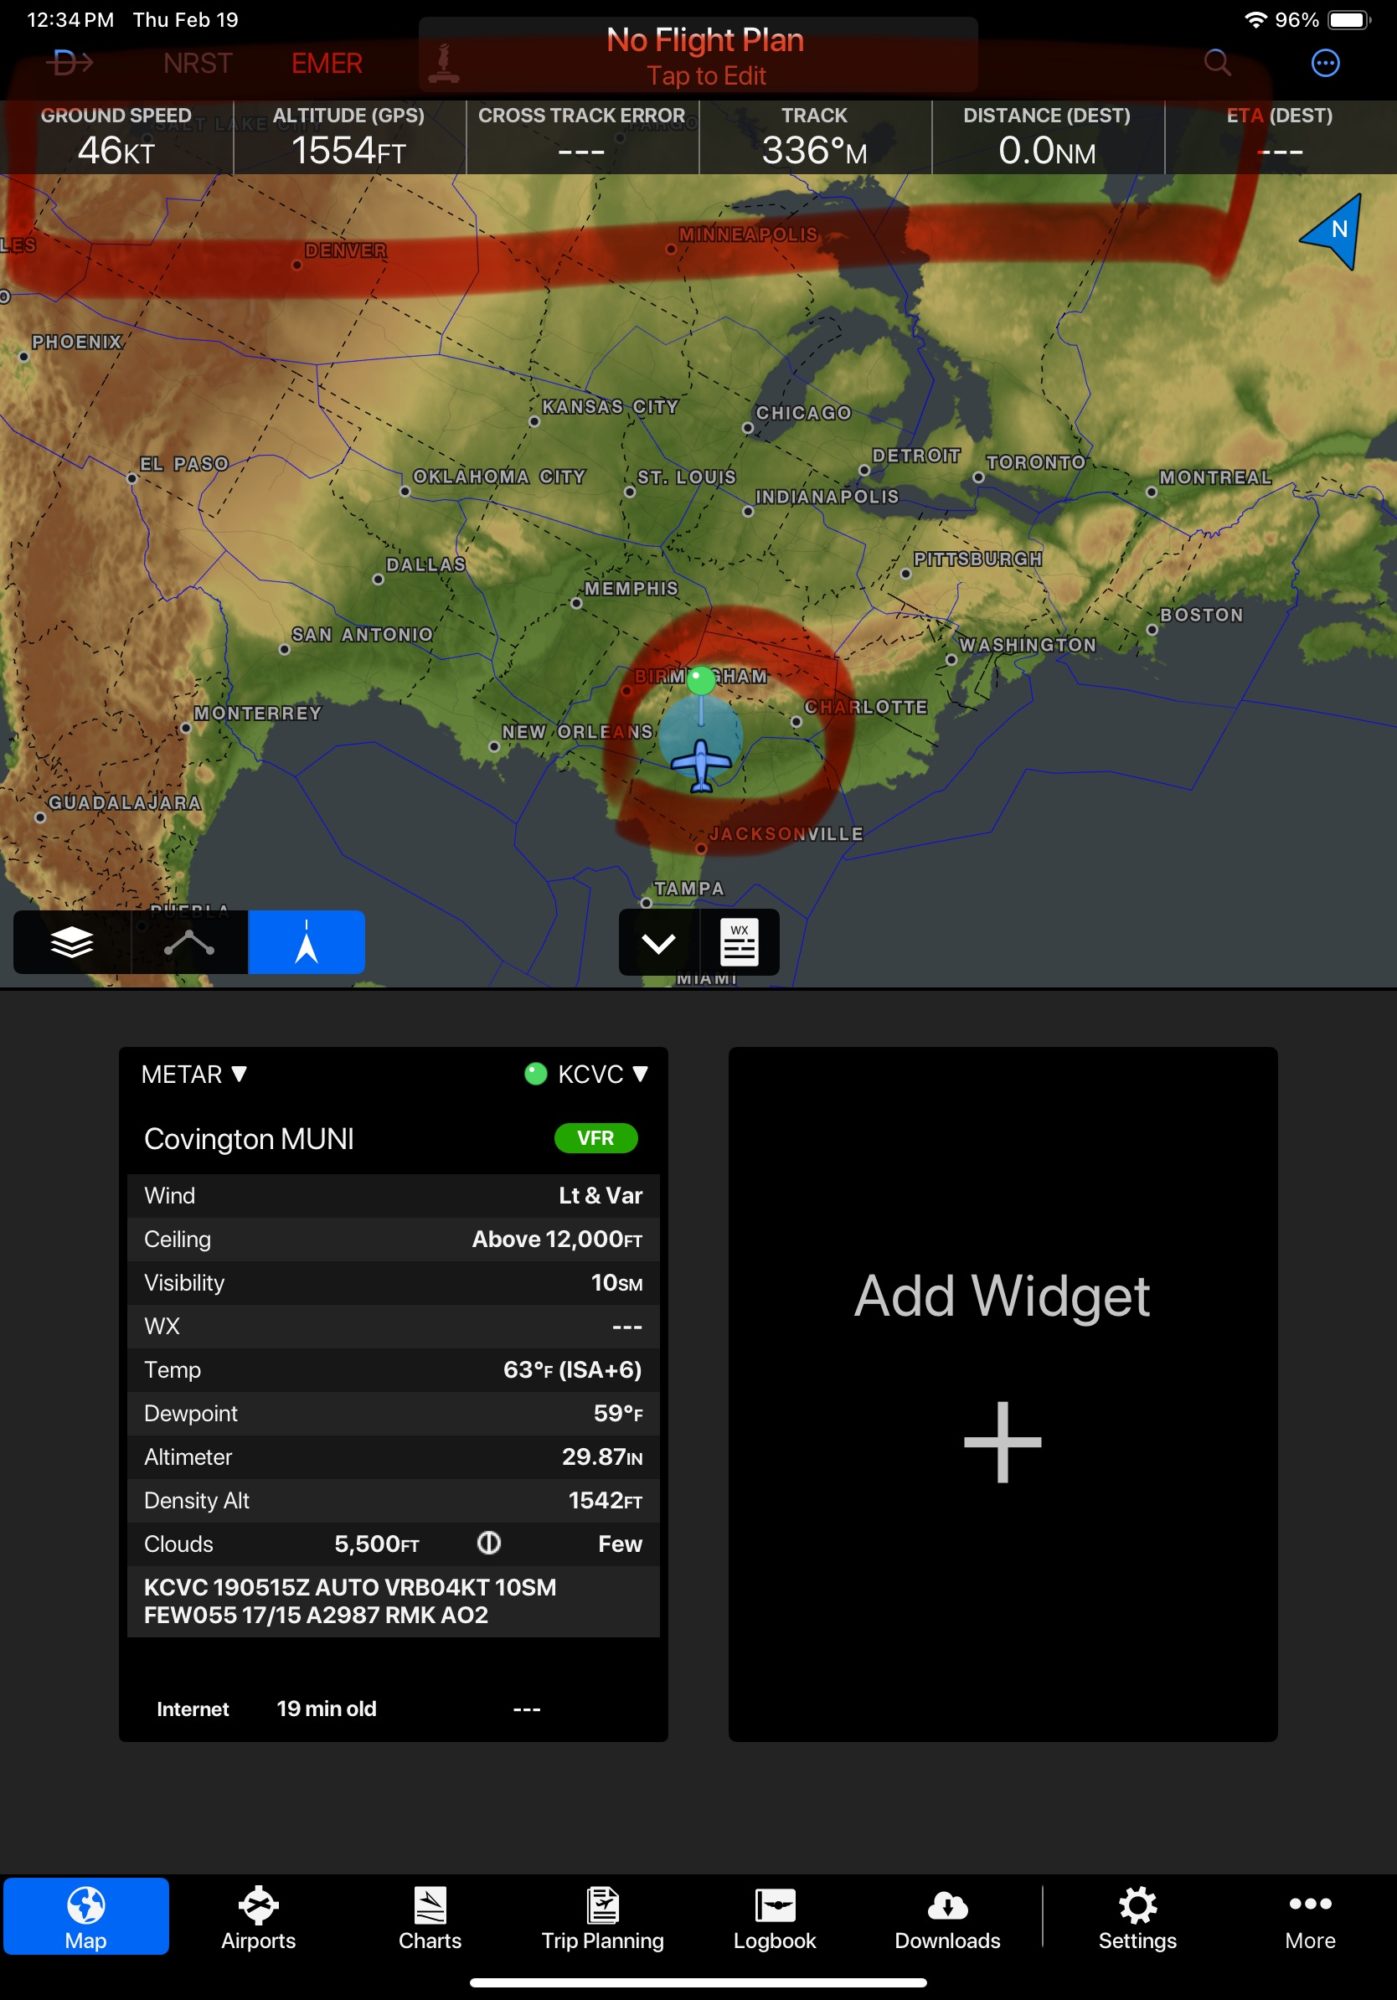
1.In the app, select UDP Server mode, IP 127.0.0.1 (if Garmin Pilot launched on same device, otherwise local IP of that device), UDP port 49002, ensure XGPS and XATT sentences are enabled. Press START button.
2. Open Garmin Pilot, tap Settings gear icon
 3. Enable Flight Simulation tab, enable Use Flight Simulator Data option
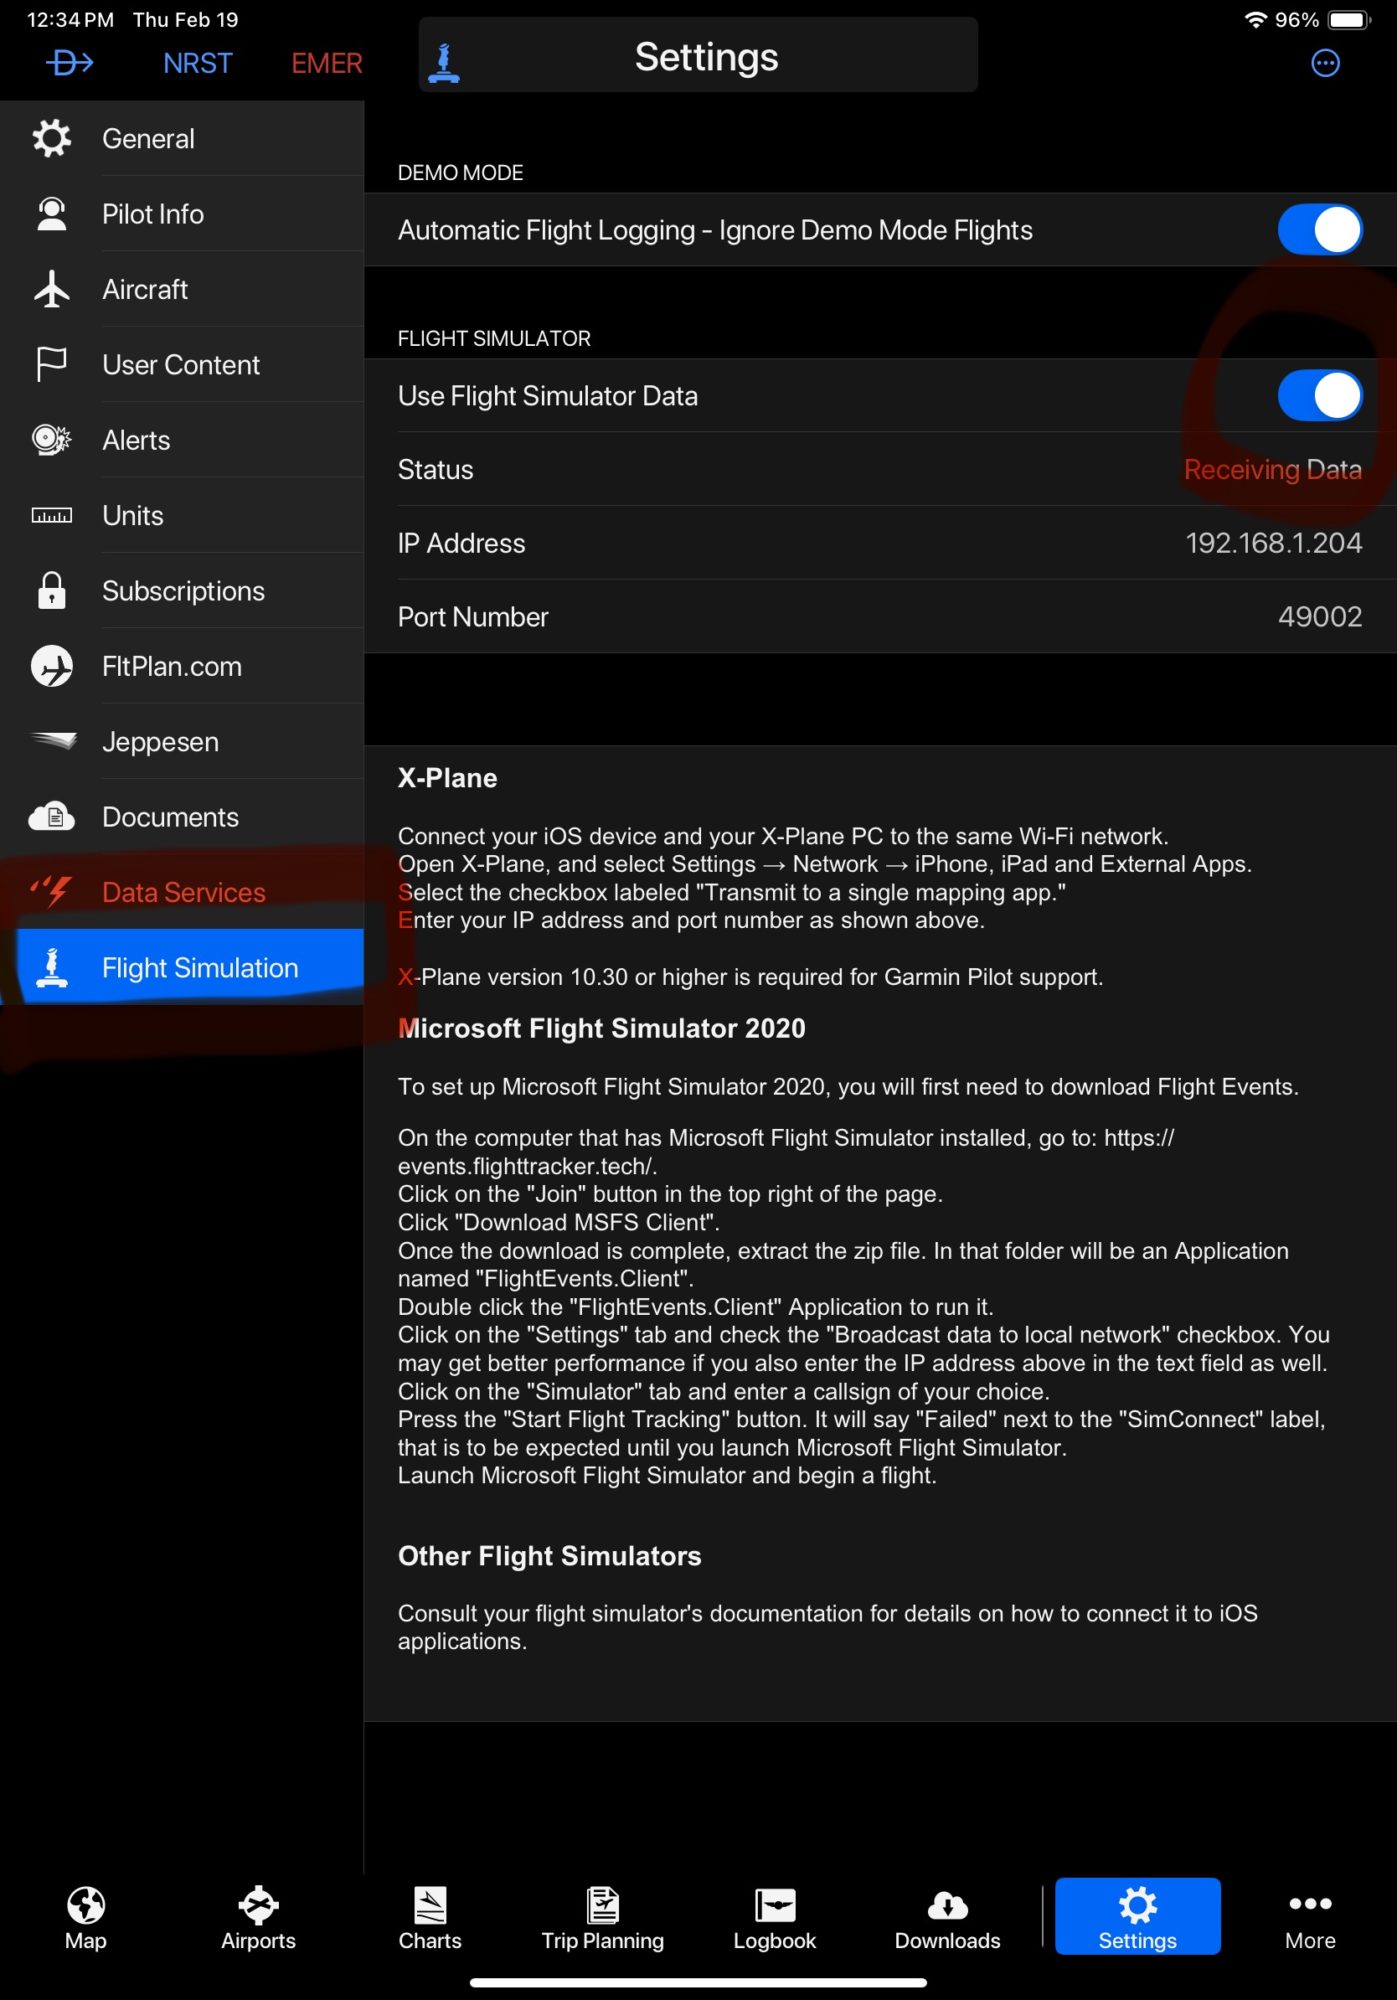 4. Return to map, aircraft data should be updated
1.In the app, select UDP Server mode, IP 127.0.0.1 (if LX North launched on same device, otherwise local IP of that device), UDP port 49002, ensure XGPS and XATT sentences are enabled. Press START button.
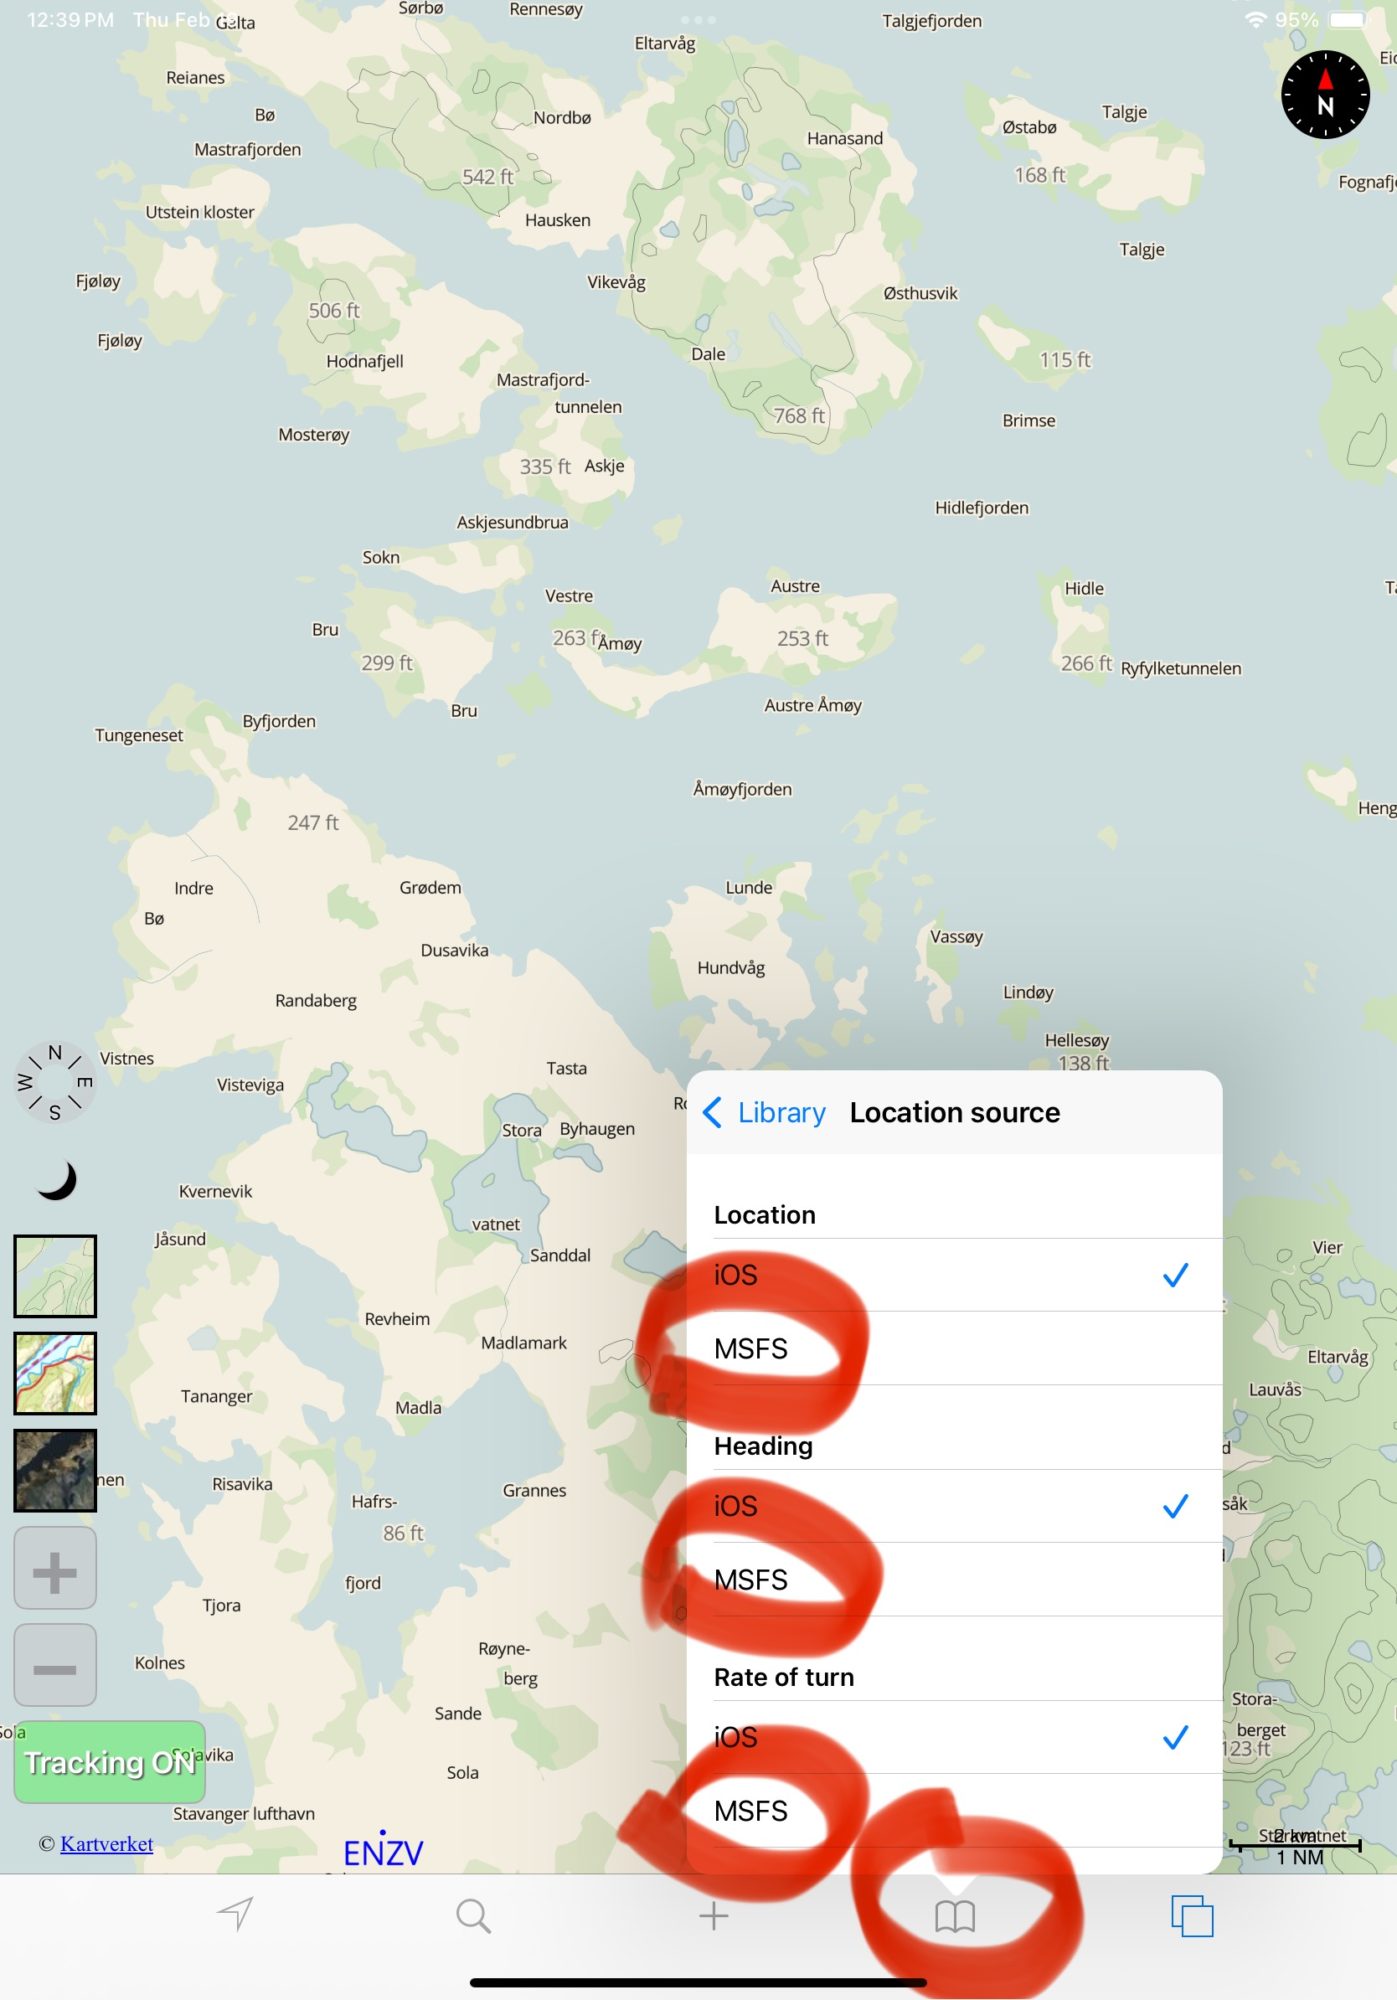
2. Open LX North, tap Library icon and check all MSFS options in the list
 3. Return to map, your simulation location should be received correctly.
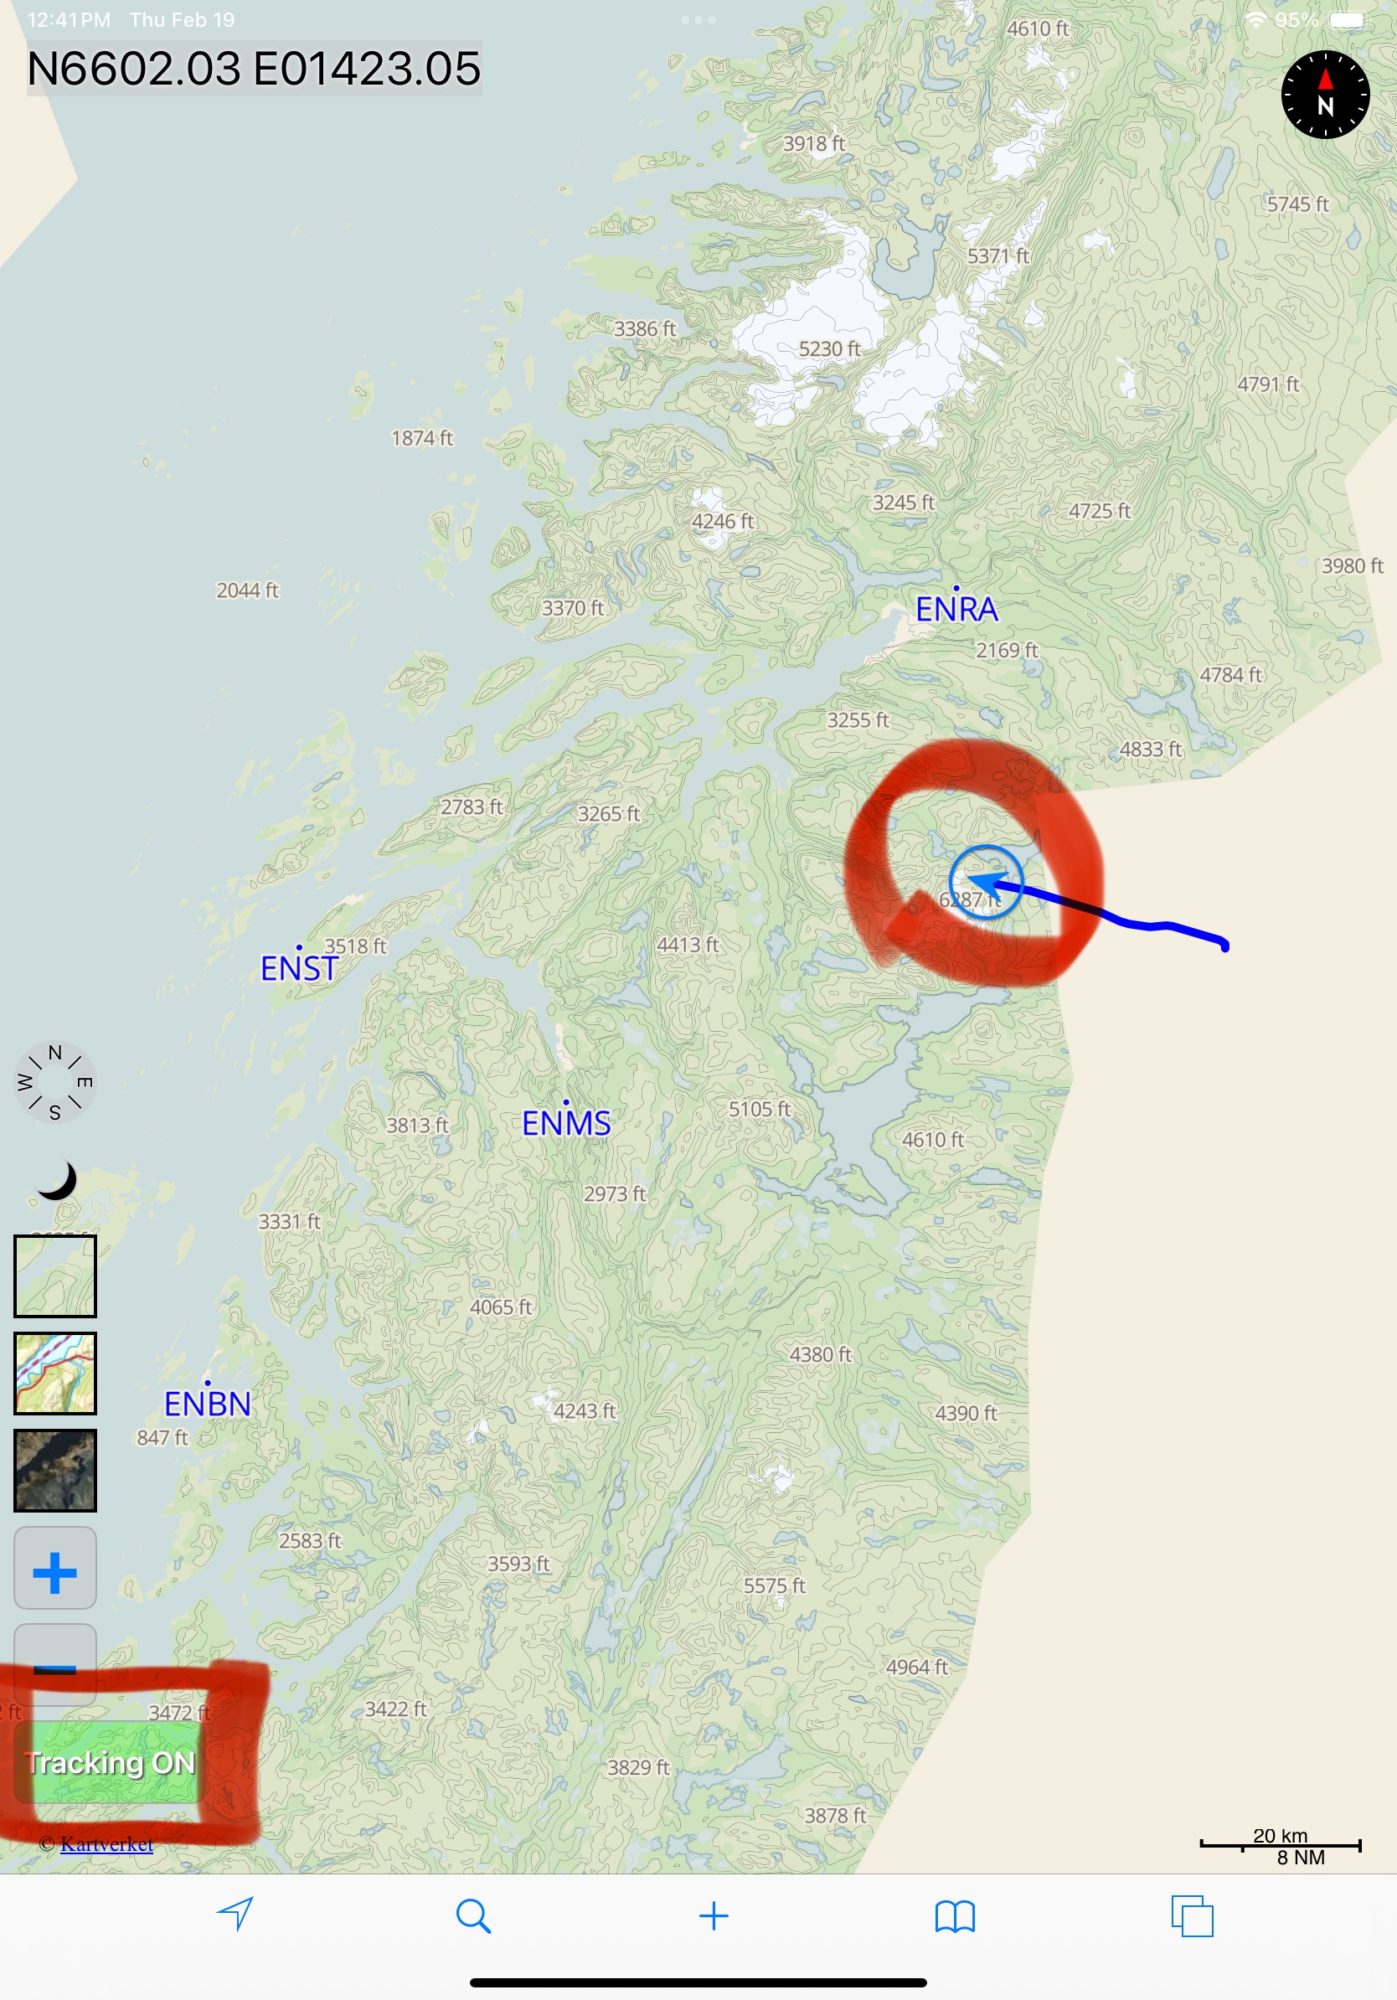
1.In the app, select UDP Server mode, IP 127.0.0.1 (if OzRunways launched on same device, otherwise local IP of that device), UDP port 49002, ensure XGPS and XATT sentences are enabled. Press START button.
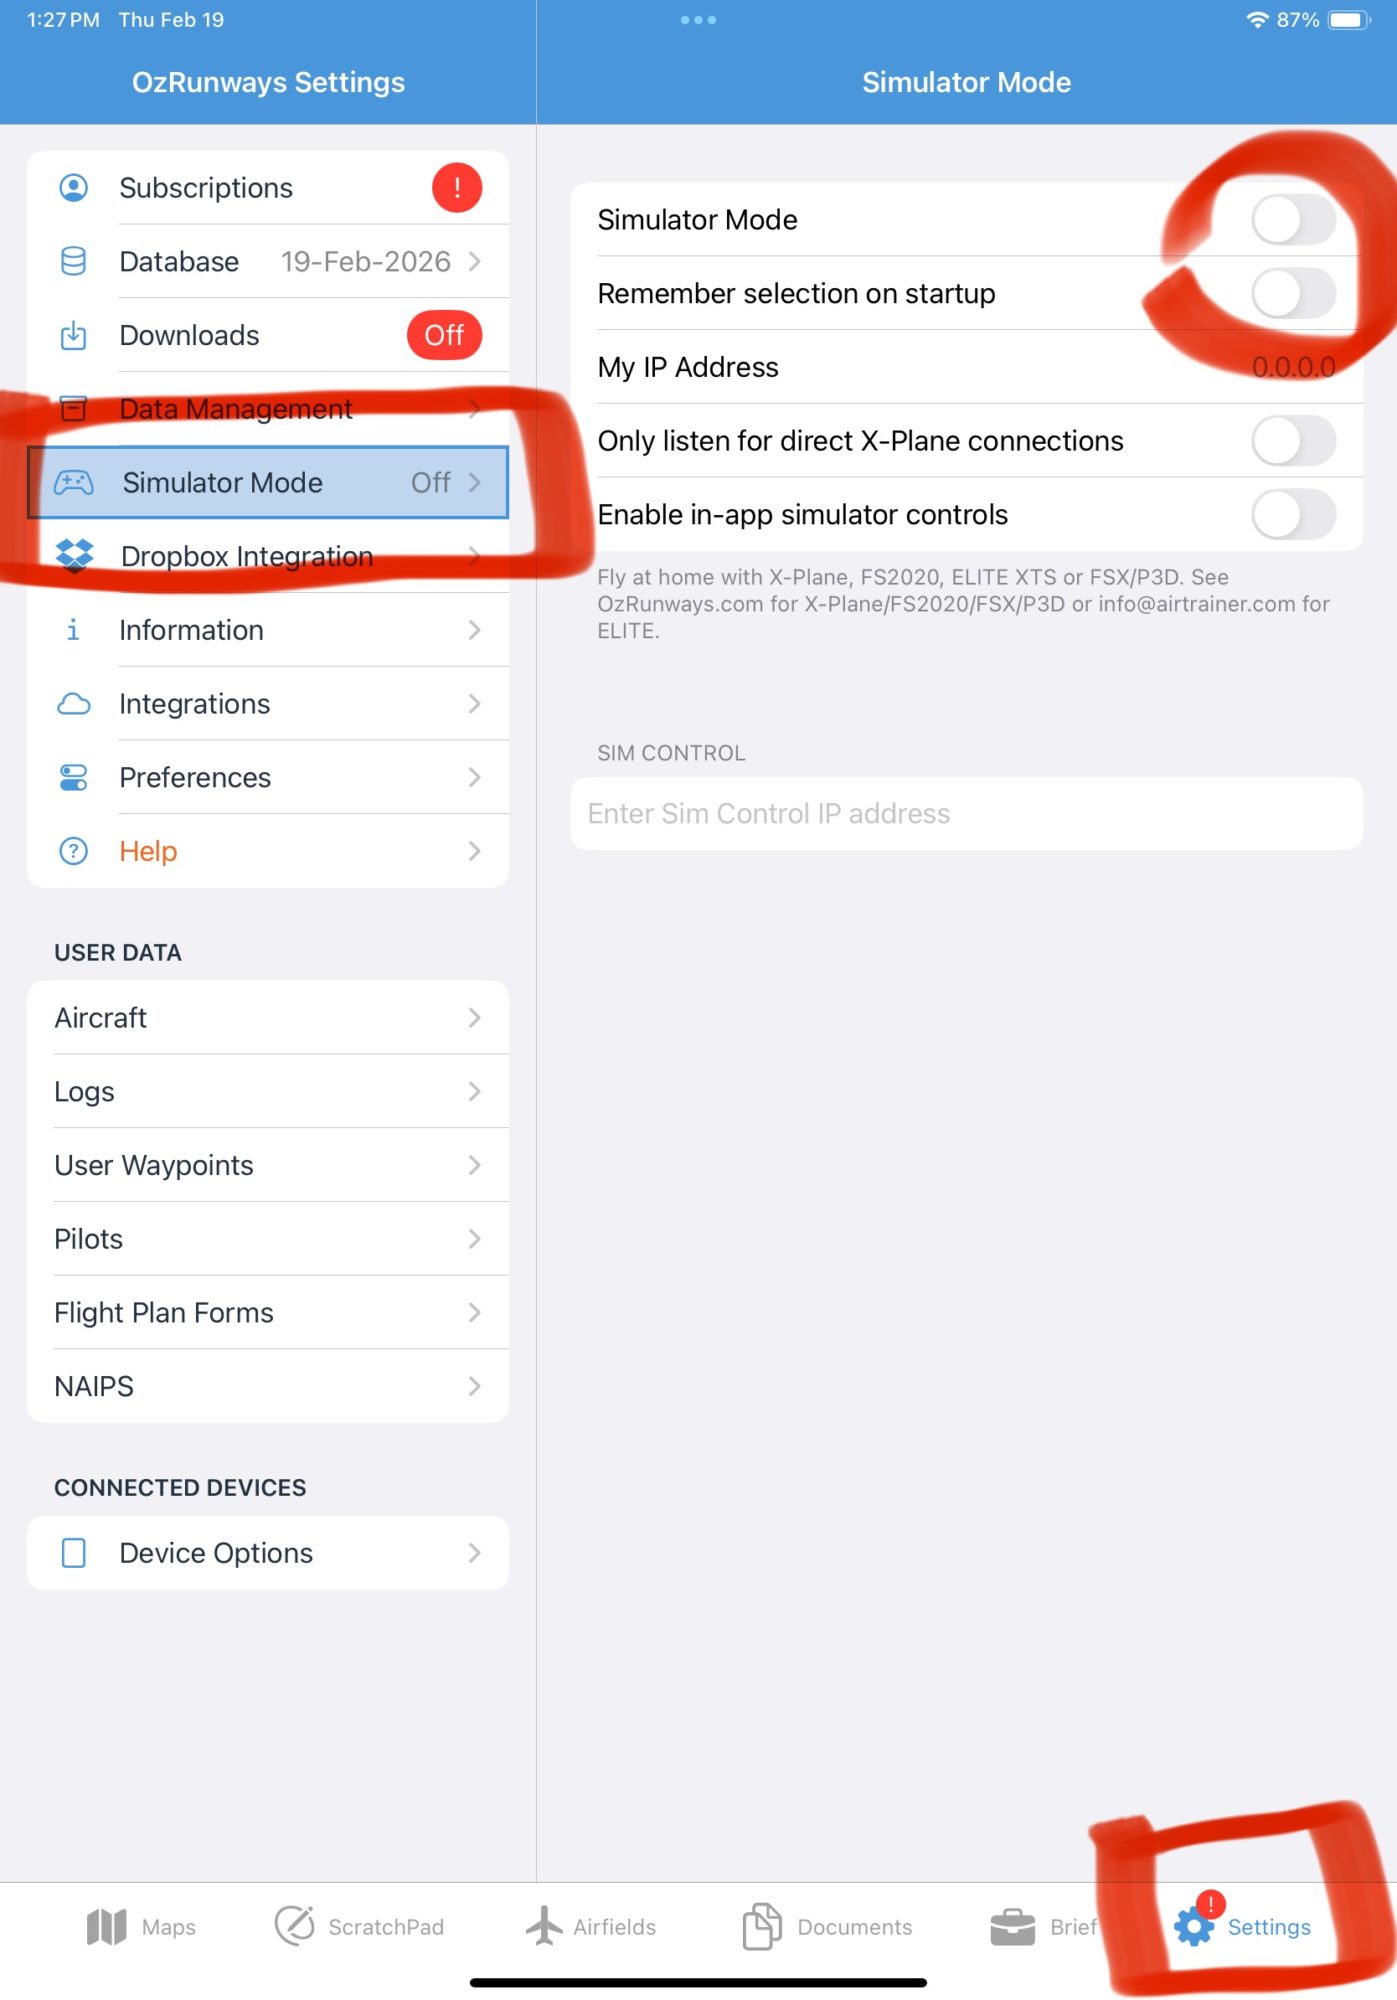
2. Open OzRunways, tap Settings gear icon and select SimulatorMode tab. Enable Simulator Mode and Remember selection on startup options
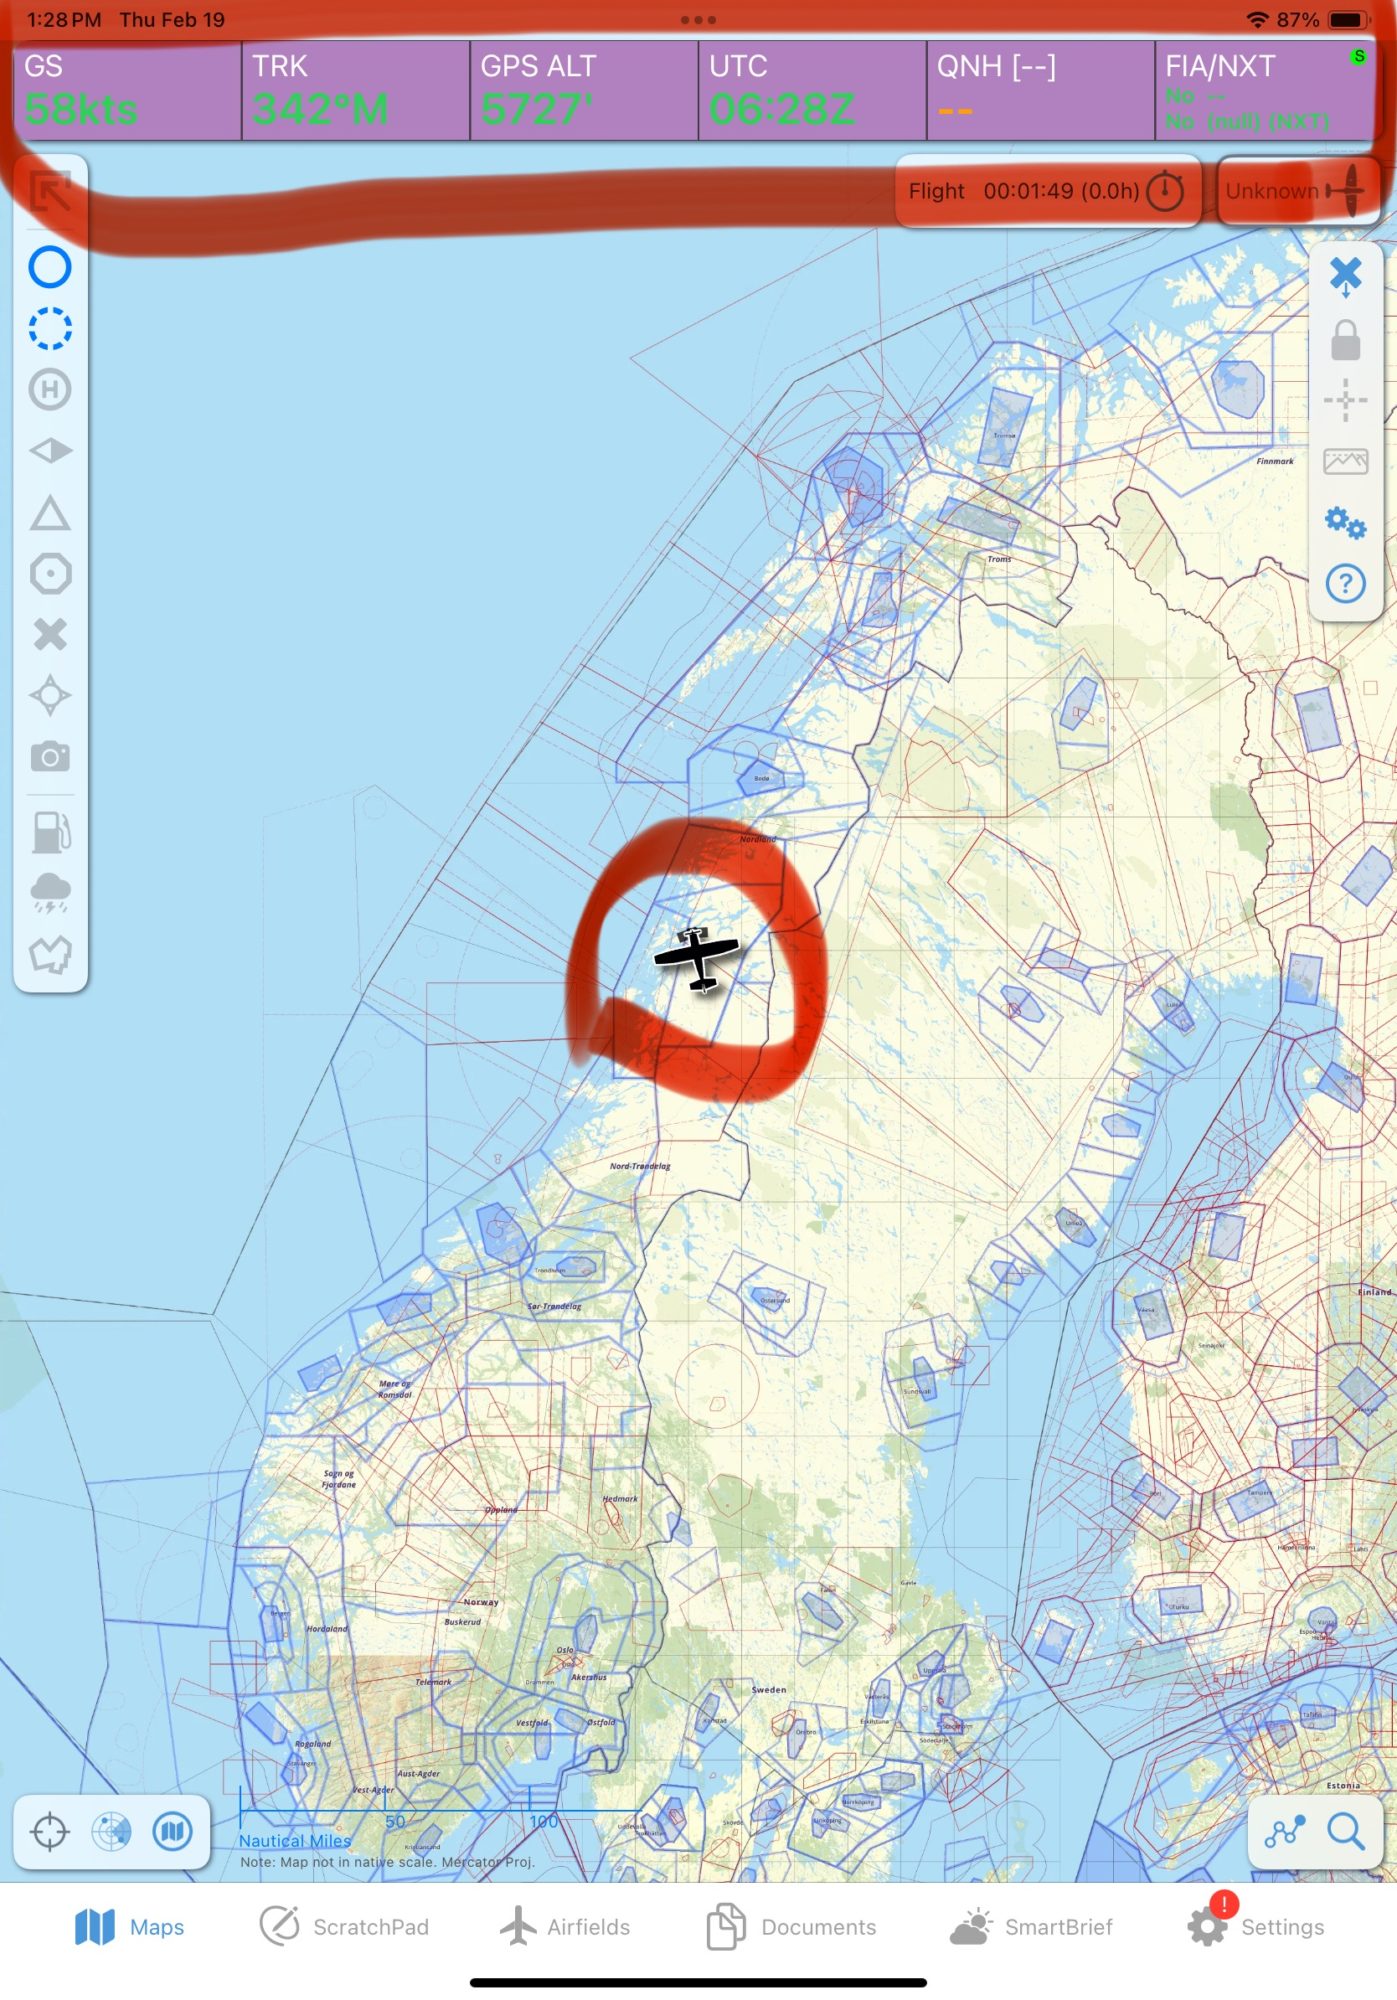
 3. Return to map, your simulation location should be received correctly. OzRunways manual
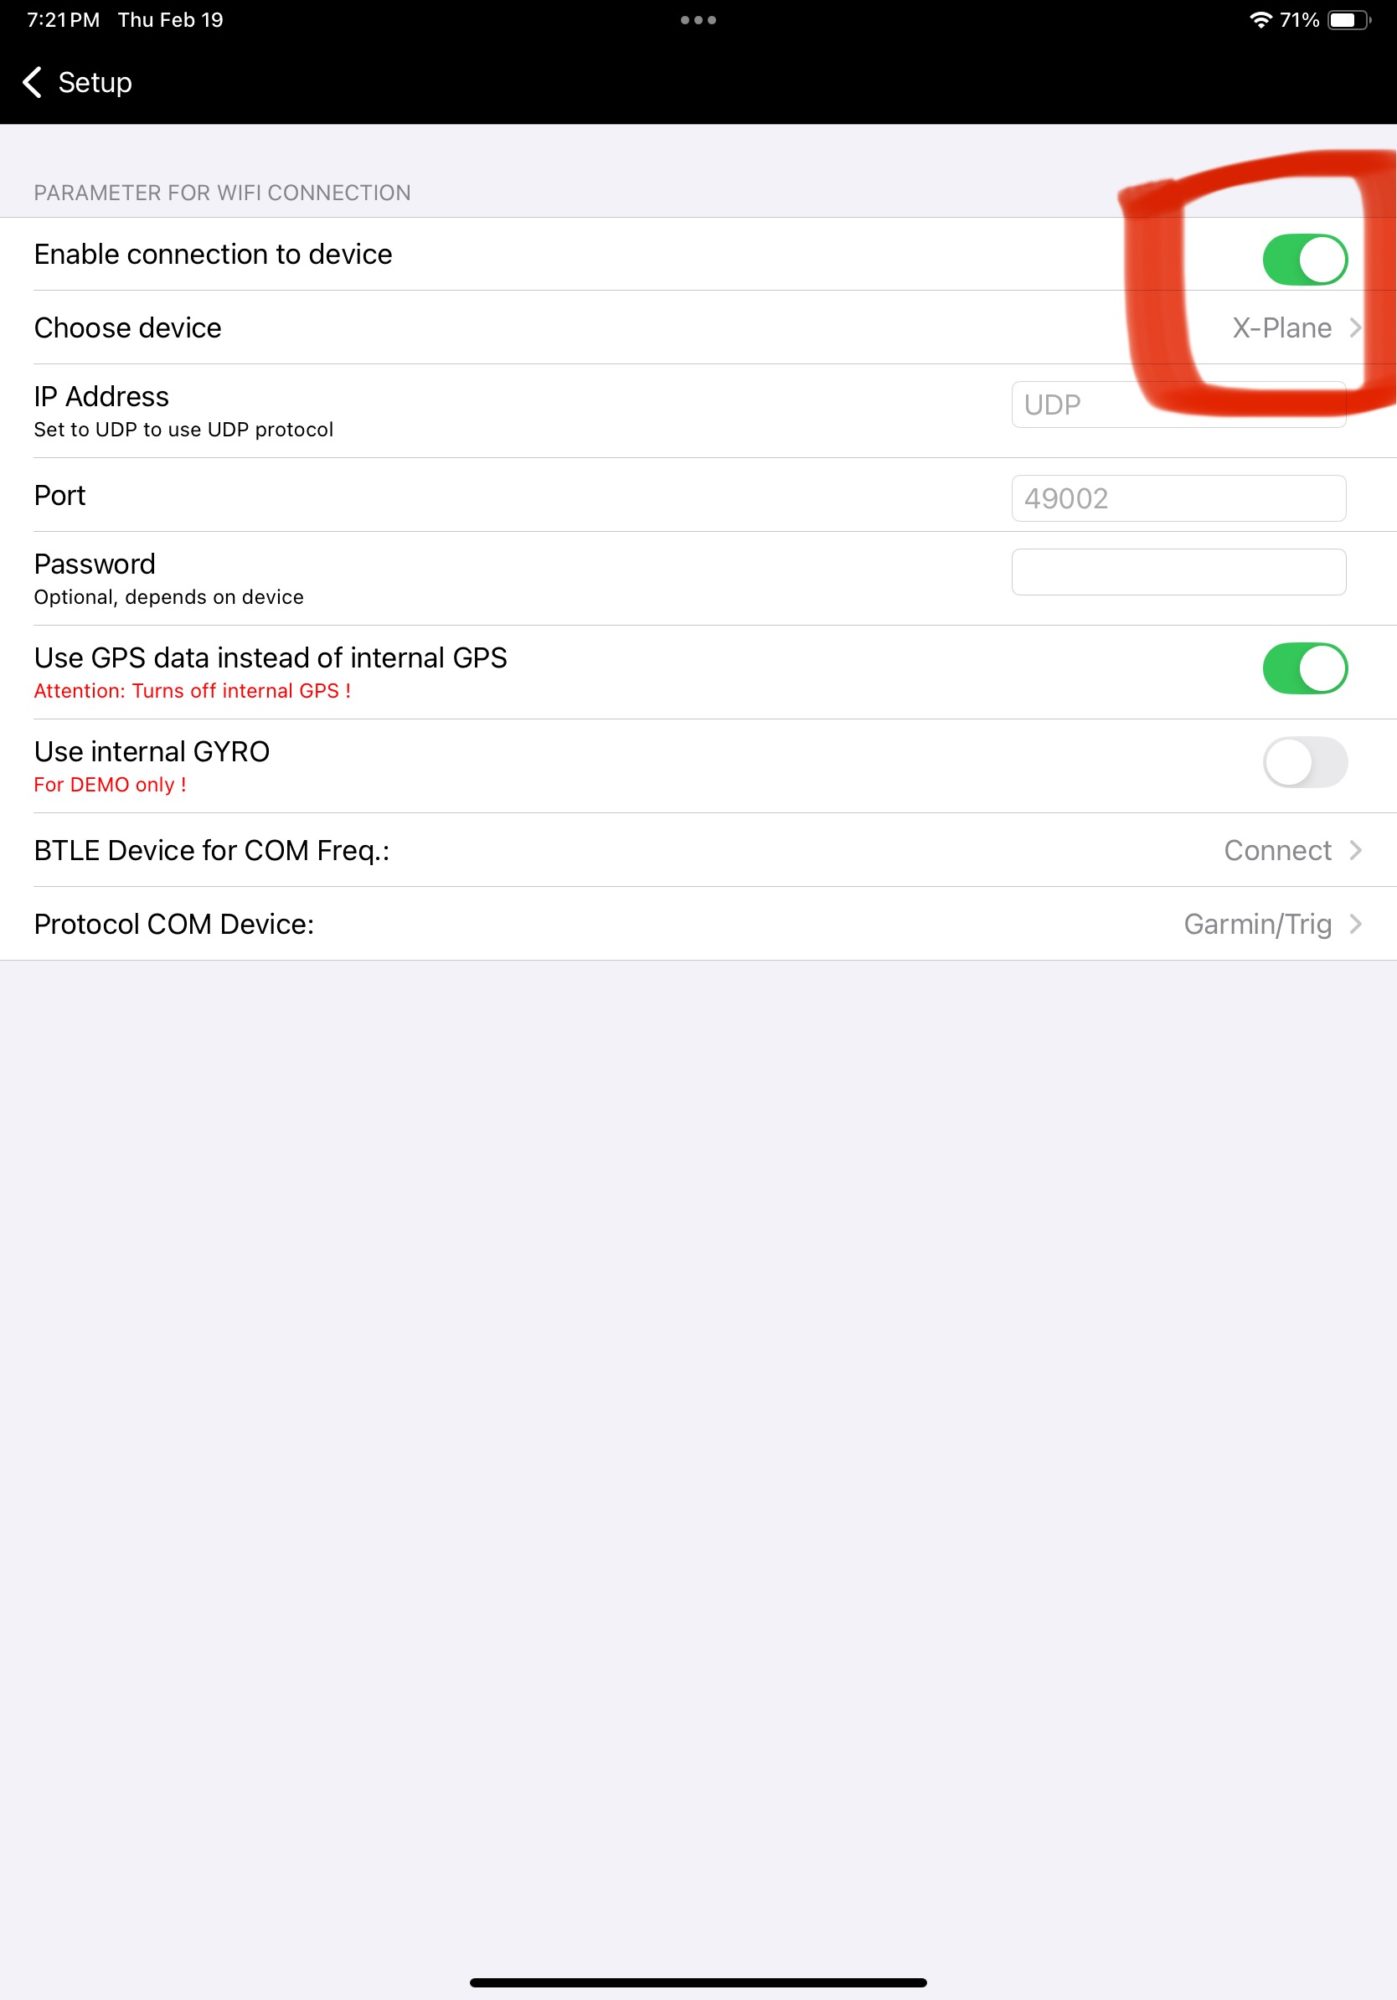
1.In the app, select UDP Server mode, IP 127.0.0.1 (if Sky-Map launched on same device, otherwise local IP of that device), UDP port 49002, ensure XGPS and XATT sentences are enabled. Press START button.
2. Open Sky-Map, tap Menu then Setup
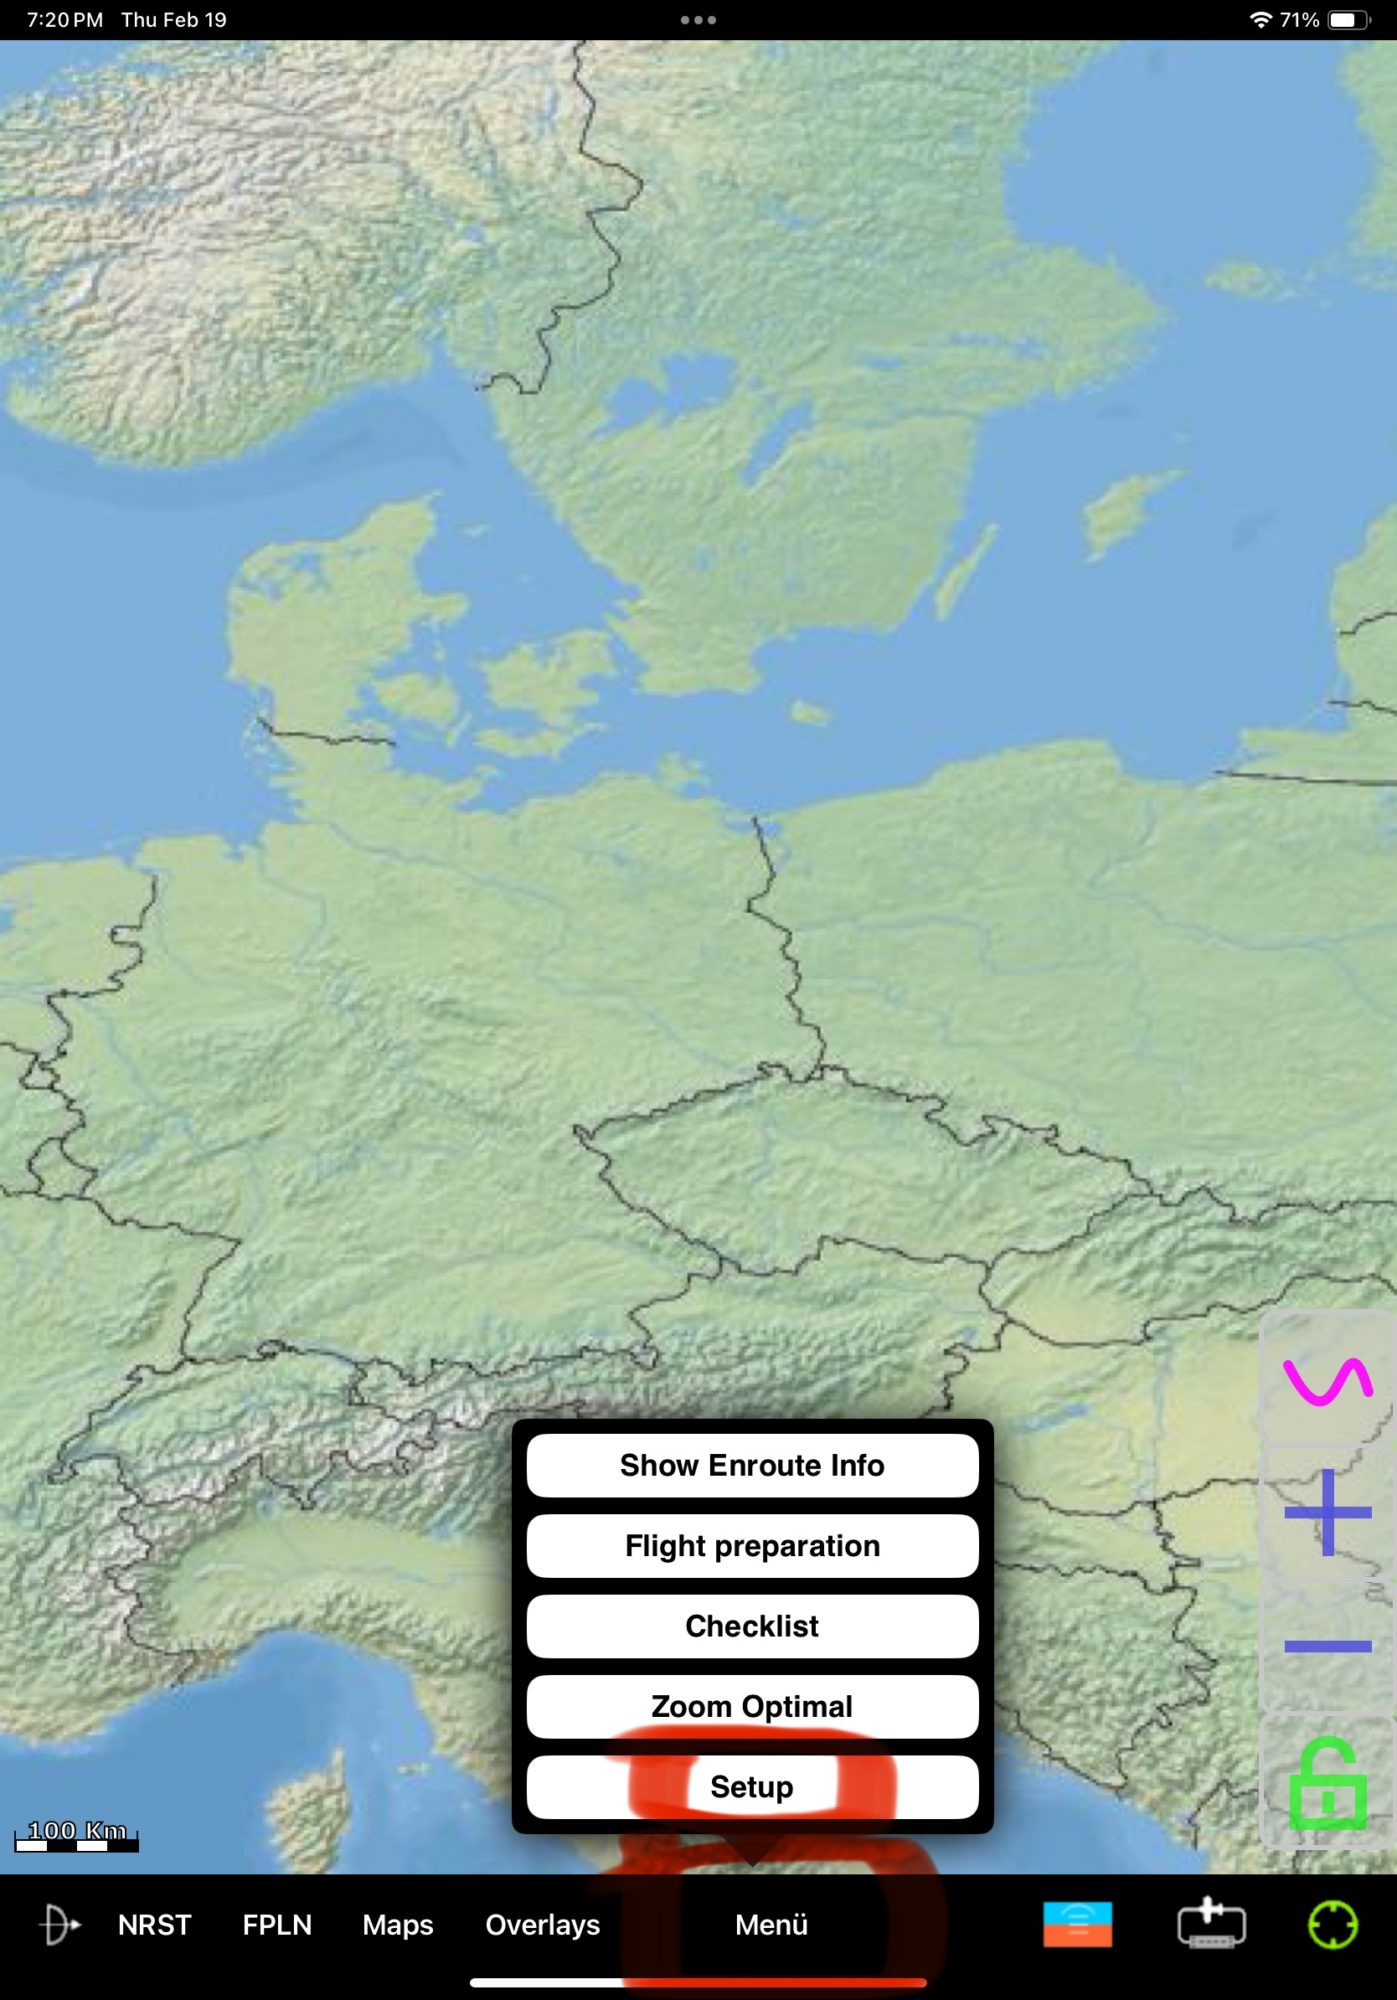 3. Select Wireless Interface Setup option
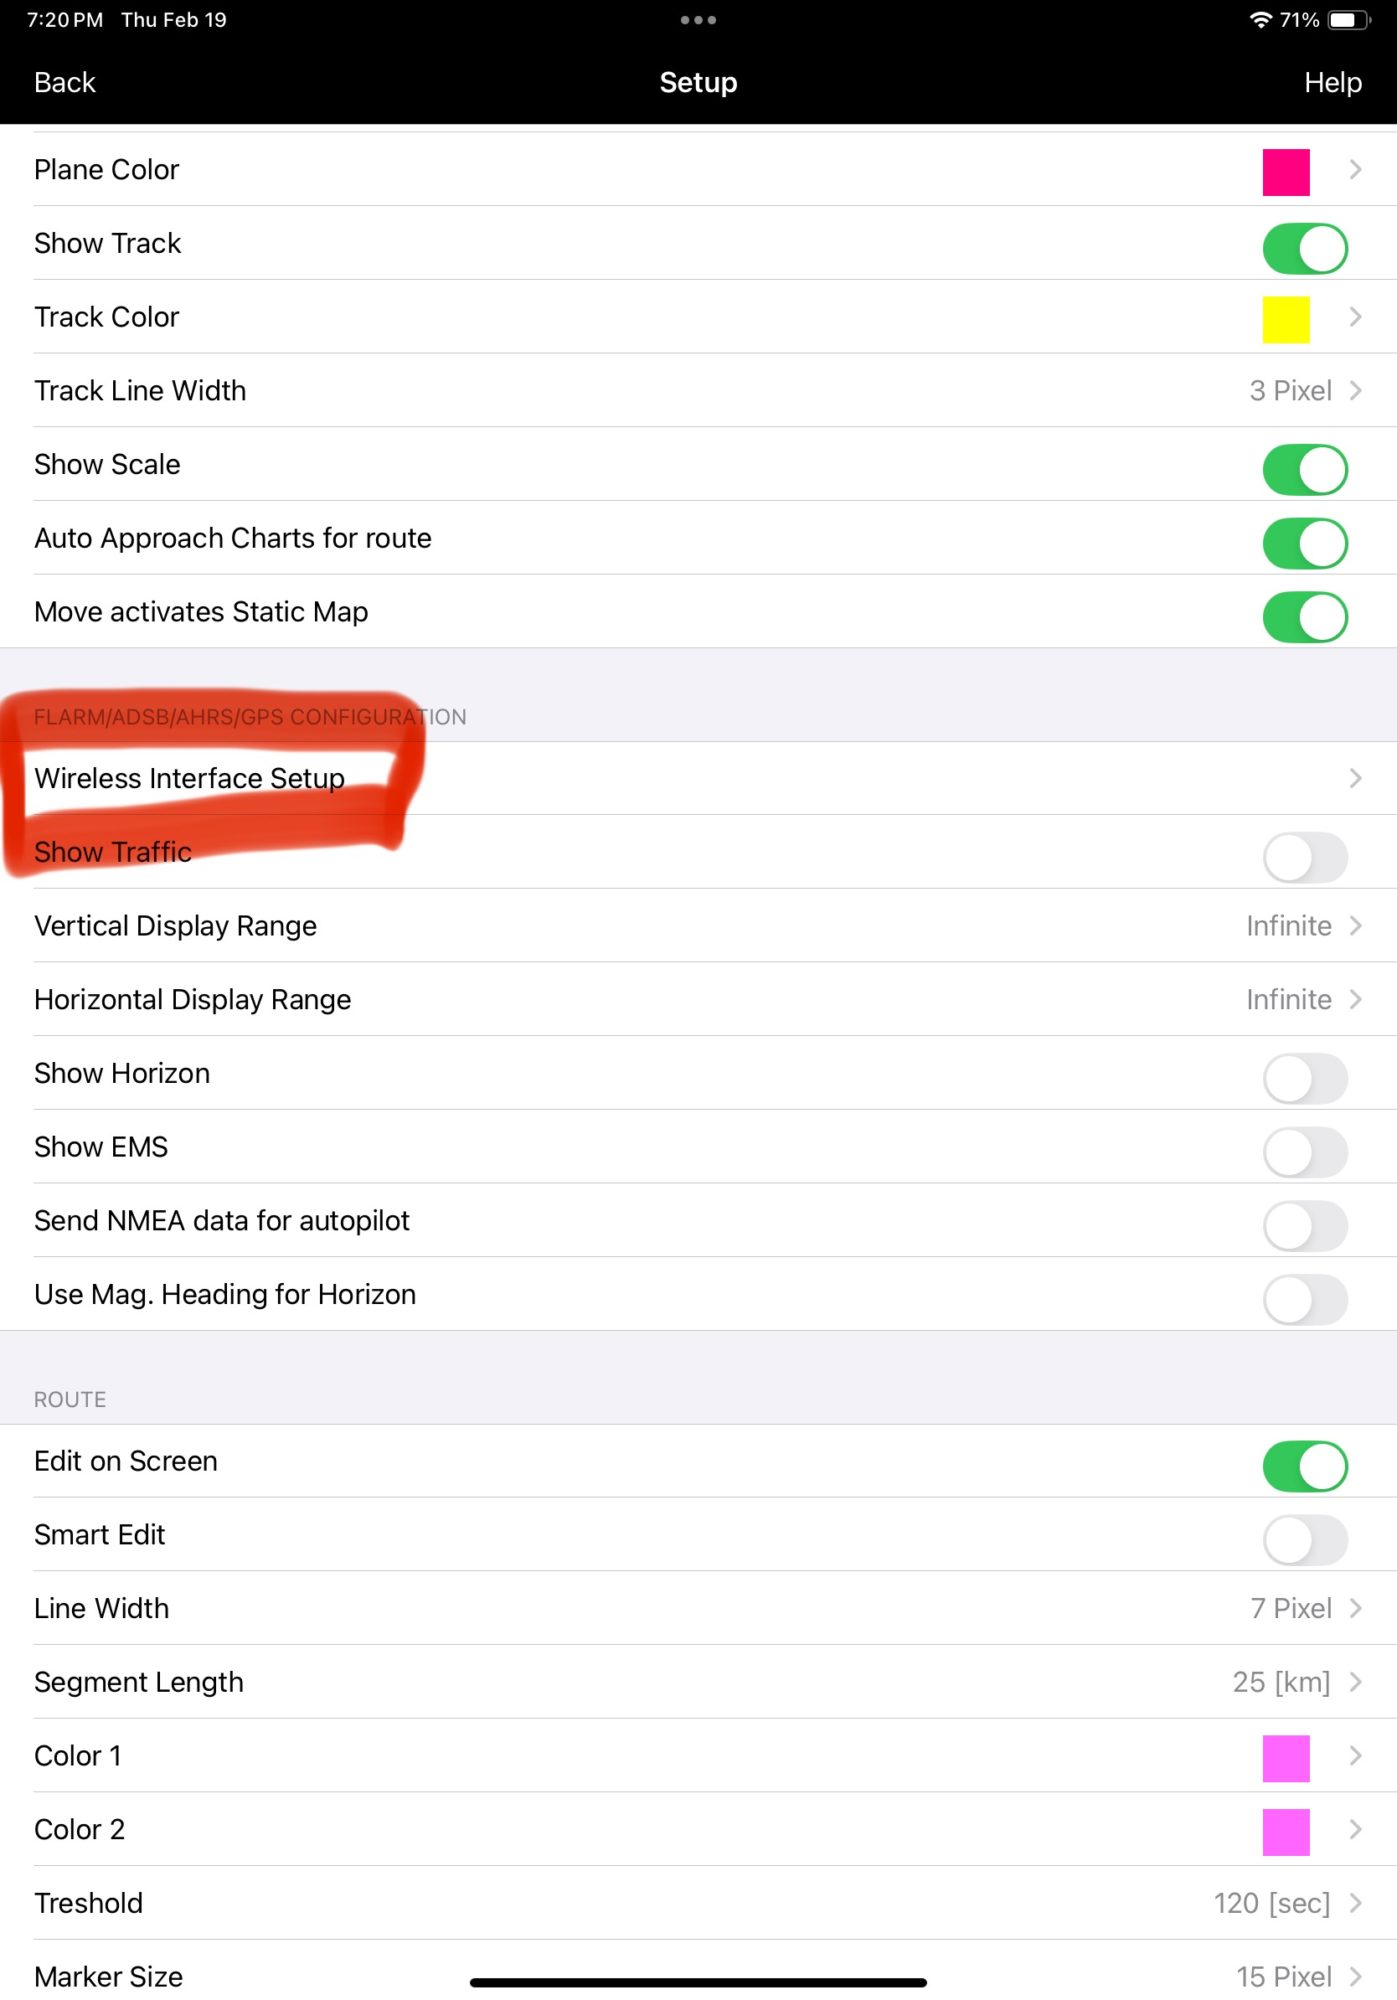 4. Enable connection to device option , select X-Plane device (as we use X-Plane data sentence)
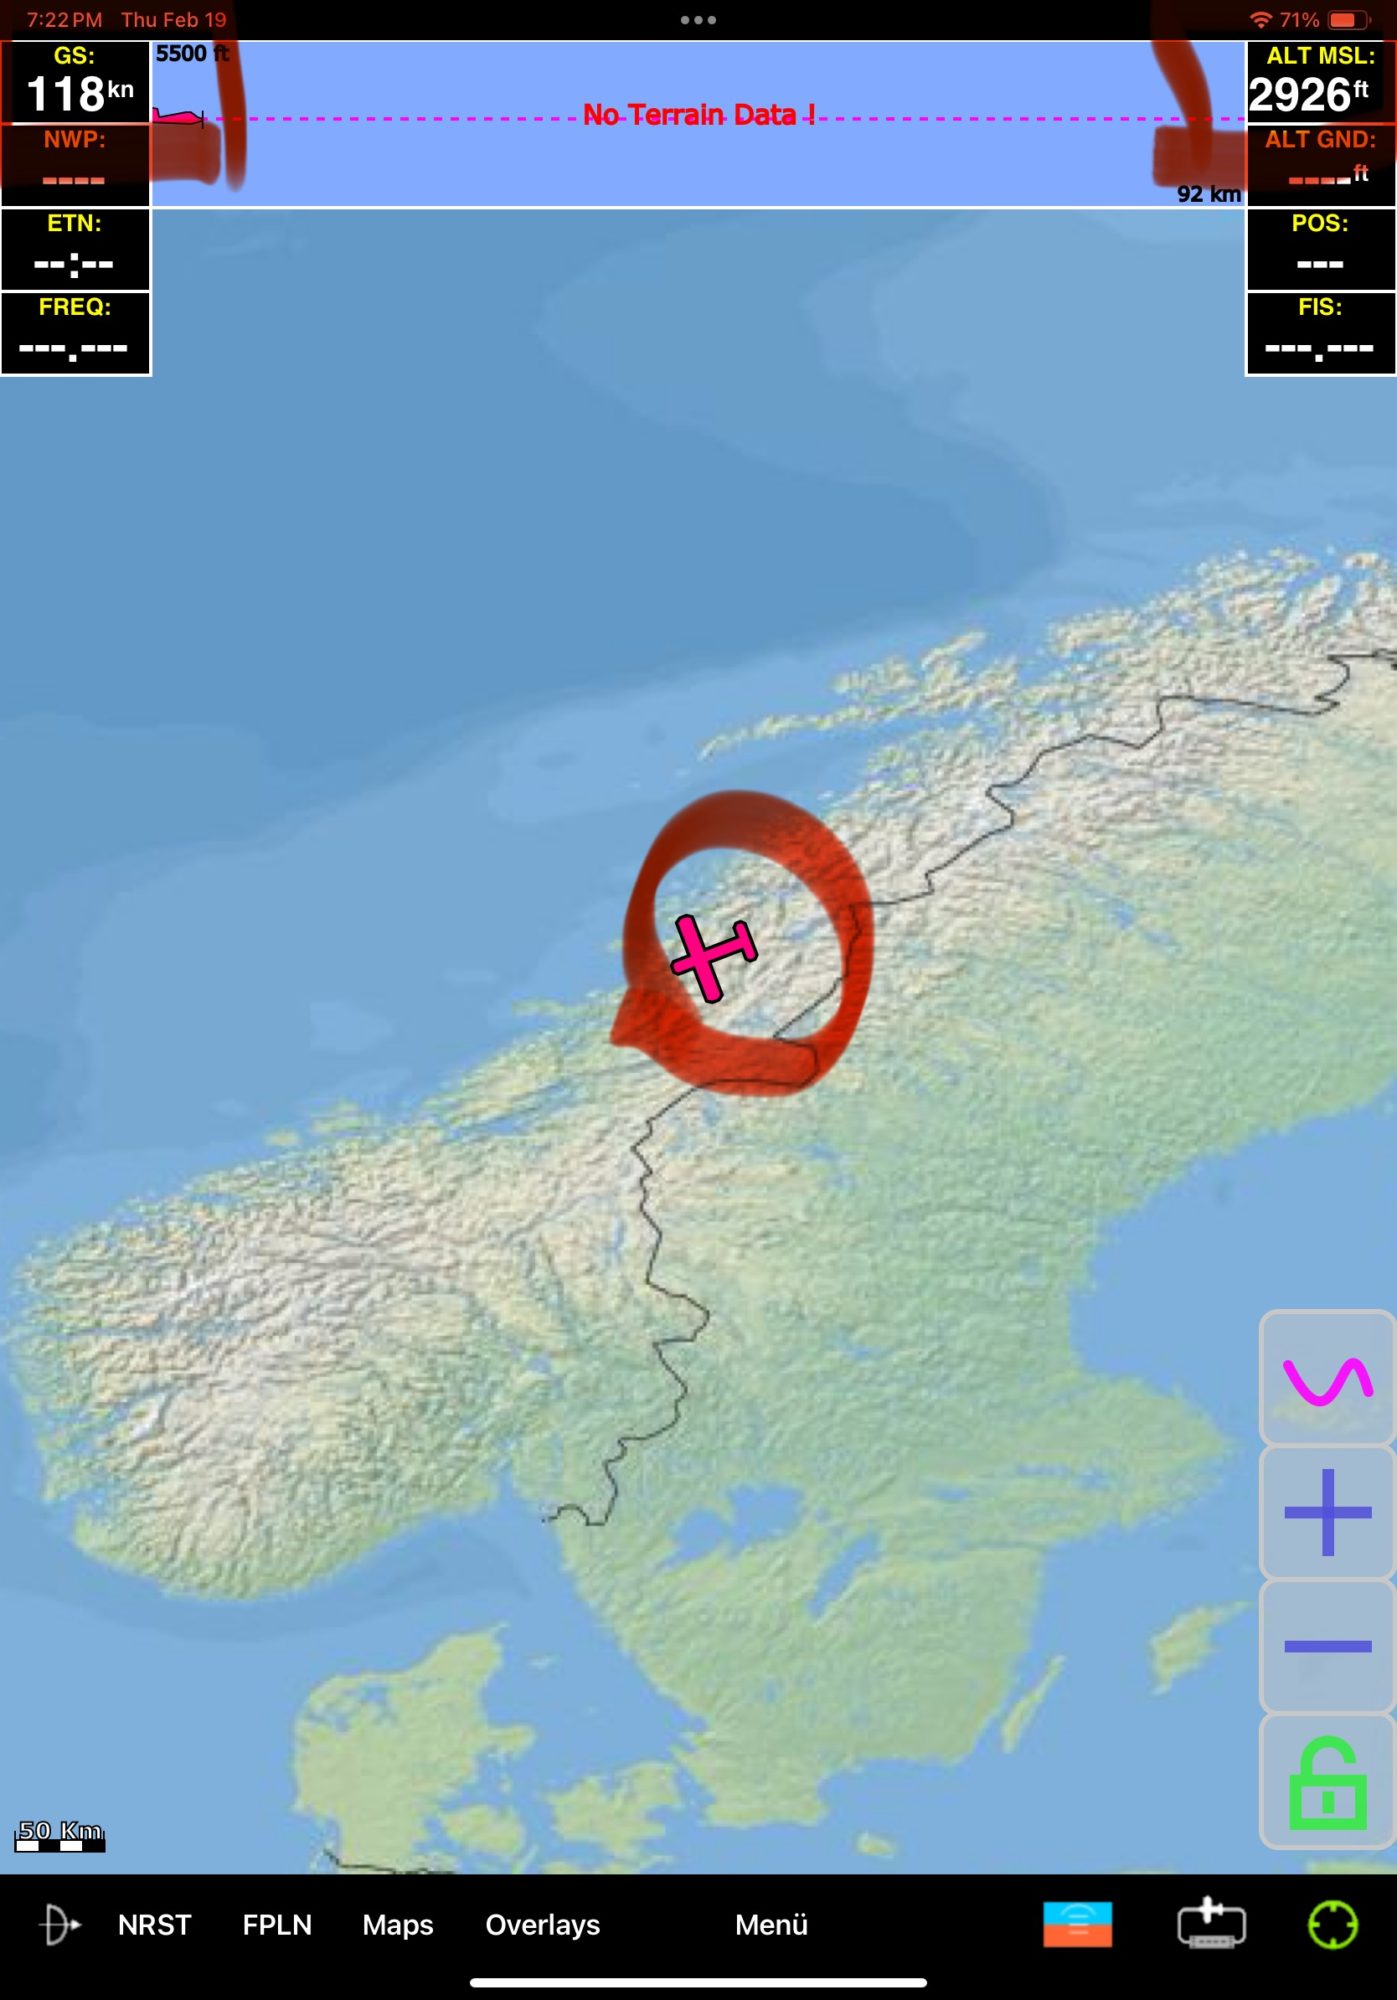
 5. Return to map, your simulation location should be received correctly.
1.In the app, select UDP Server mode, IP 127.0.0.1 (if Garmin Pilot launched on same device, otherwise local IP of that device), UDP port 49002, ensure XGPS and XATT sentences are enabled. Press START button.
2. Open Garmin Pilot, tap Settings gear icon
3. Select Flight Simulation mode, enable option Use Flight Simulator Data
4. Return to the map, ensure that your location and aircraft data displayed correctly
Garmin Pilot official tutorial
1.In the app, select UDP Server mode, IP 127.0.0.1 (if Stratus Insight launched on same device, otherwise local IP of that device), UDP port 49002, ensure XGPS and XATT sentences are enabled. Press START button.
2. Open Stratus Insight, tap Settings icon and enable Listen to UDP 49002
 3. Return to map, your simulation location should be received correctly. Stratus Insight official tutorial
1.In the app, select UDP Server mode, IP 127.0.0.1 (if SkyDemon launched on same device, otherwise local IP of that device), UDP port 49002, ensure XGPS and XATT sentences are enabled. Press START button.
2. Open WingX, tap Settings gear icon and enable Use X-plane/MS option
 5. Return to map, your simulation location should be received correctly. WingX official tutorial

Volanta (developed by Orbx) is a smart flight-tracking application designed for flight simulation enthusiasts. It acts as a digital logbook and real-time “radar” for your virtual flights across multiple platforms.
Volanta works by connecting directly to your flight simulator to pull telemetry data. It operates on a “get in and fly” philosophy, meaning you don’t have to manually start or stop a recording; the app detects when you are at an airport and starts tracking automatically.
Data Connection: FS2EFB toolbar panel (or FS24 table app) collects the aircraft data and send it to the mobile FS2EFB app by local network (PC or console) or relay server (for Cloud Gaming).
- Data Sync: then mobile app converts aircraft data into suitable for Volanta format and send to the Volanta desktop application by local network.
Cloud Integration: Values received by desktop application is synced to the Volanta servers, allowing you to view your flight progress on a web browser or the mobile app in real-time.
Configuration process:
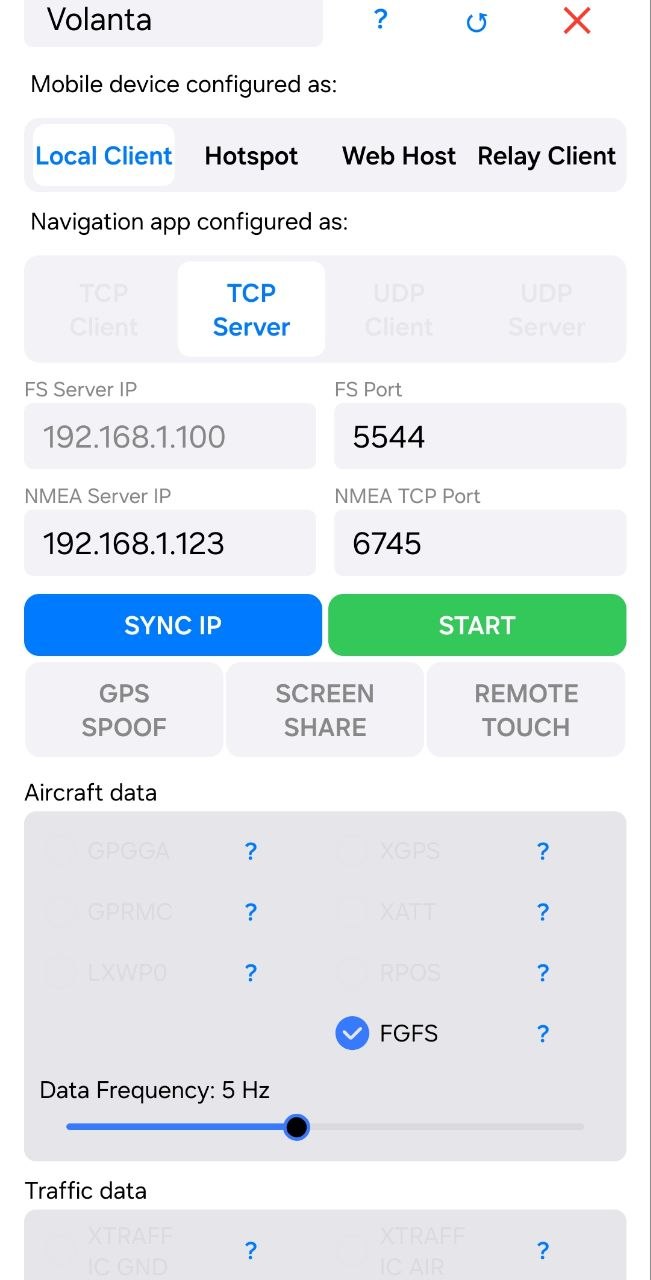
1. Start FS2EFB mobile app, select Volanta preset

2. In NMEA server IP field type in IP address of your Windows PC (you can get it by clicking network icon in the taskbar), press START button
3. Start FS2EFB toolbar panel or tablet app, sync IP, press START button. Ensure aircraft data coming from FS to the mobile app (altitude and velocity values updates).
4. Start Volanta desktop application. By design, Volanta desktop app may receive TCP packets only from installed applications. To make it receive data from the local network (mobile app), unpack this archive into any folder of your PC and launch “Setup Volanta LAN Access.cmd” file. You may need to do it each time desktop app is started.
5. Volanta desktop application should start to receive your FS aircraft data.
FS2EFB — Technical Description
System Architecture Overview
FS2EFB is a three-component bridge that extracts real-time telemetry from Microsoft Flight Simulator (MSFS) and delivers it to Electronic Flight Bag (EFB) apps on smartphones and tablets. The data flow is unidirectional:
MSFS (PC/console)
  └─ In-Game Panel (JavaScript, Coherent GT engine)
       │
       └── HTTP GET requests ──► Smartphone Bridge App (Android or iOS)
                                    │
                                    ├── NMEA 0183 sentences ──► EFB App (TCP or UDP)
                                    ├── GDL90 binary packets ──► EFB App (UDP port 4000)
                                    └── X-Plane DATA* binary ──► EFB App (same transport)
The smartphone acts as a protocol translator: it receives flight data via HTTP, converts it into the formats that EFB apps expect (NMEA, GDL90, or X-Plane binary), and delivers it over the appropriate transport.
Part 1: MSFS In-Game Panel
How Aircraft Data Is Extracted
The panel runs as a Web Component inside MSFS’s Coherent GT browser engine. Coherent GT exposes a global API for reading simulation variables synchronously. Each call takes a variable name and a unit string. The panel reads approximately 20 SimVars every tick:
Position & Navigation: Latitude and longitude (degrees, 6 decimal places), GPS ground track (degrees), magnetic heading (degrees), magnetic variation (degrees).
Altitudes: GPS altitude (meters, geometric) and barometric/indicated altitude (meters).
Speeds: True airspeed, indicated airspeed, and GPS ground speed — all in meters per second.
Vertical rates: Total energy variometer, netto variometer, and vertical speed — all in m/s.
Attitude: Pitch and bank angles in degrees.
Environment: Ambient wind direction (degrees) and wind velocity (km/h).
Time: Local hour, minute, second (2 decimal places), day, month, year (mod 100) — assembled into UTC time (HHMMSS.ss) and date (DDMMYY) strings.
Update Loop and Timing
The main loop is driven by requestAnimationFrame, which fires at the Coherent GT refresh rate (typically 30-60 fps). Two independent delta-time accumulators control data dispatch:
- Ownship accumulator: Compared against
1 / frequency(default 5 Hz = 200ms interval). When exceeded, ownship telemetry is sent and the accumulator resets. - Traffic accumulator: Compared against the configured traffic polling interval (default 4 seconds). When exceeded and the previous traffic batch is fully drained, a new traffic fetch is triggered.
This accumulator-based approach decouples the data send rate from the frame rate, providing consistent output regardless of MSFS rendering performance.
How Data Is Sent to the Smartphone
All communication from the panel to the bridge app uses asynchronous HTTP GET requests via XMLHttpRequest.
Ownship request format:
GET http://<ip>:<port>/?user=1&UTCtime=HHMMSS.ss&UTCdate=DDMMYY&TAS=...&IAS=...&GRspeed=...&TE=...&NETTO=...&GPStrack=...&MAGNhead=...&VS=...&lat=...&long=...&GPSalt=...&BAROalt=...&magVar=...&windDir=...&windSpd=...&pitch=...&bank=...&w=...&h=...
All values are SI units (meters, m/s, degrees). The w and h parameters convey the panel’s pixel dimensions for the screen-share feature. Request timeout is 1000ms; errors are silently ignored since the periodic nature of the loop provides automatic retry.
Traffic request format:
GET http://<ip>:<port>/?traffic=1&id=...&name=...&lat=...&long=...&alt=...&vspeed=...&airborne=...&heading=...&speed=...&callsign=...
String values are URI-encoded. Timeout is 1500ms.
IP Address Discovery and Synchronization
The panel needs to know the smartphone’s IP address and port. Two mechanisms exist:
- Local persistence: The MSFS SDK provides a key-value storage API. The IP:port string is saved on every keypress of the on-screen numpad and restored when the panel loads. A fallback DOM event listener handles cases where the storage API isn’t immediately available.
- Cloud sync: An HTTP GET to an external web server retrieves the IP:port. The smartphone can push its address to this same server via its own SYNC button. The panel validates the response (must contain both
:and., must not contain “Error”) before applying.
Traffic Data Collection and Queuing
Traffic collection is a two-phase process designed to avoid frame-rate drops:
Phase 1 — Bulk fetch: The panel calls an asynchronous Coherent API to request the full list of AI and multiplayer aircraft. This returns a promise. When it resolves, each aircraft is filtered by haversine distance against the configured range (default 250 NM). Qualifying aircraft are pushed onto a queue as structured objects.
Phase 2 — One-per-frame dispatch: Each frame, exactly one aircraft is shifted from the front of the queue and transmitted. Before sending, the panel computes ground speed from position history (a map keyed by aircraft ID storing previous lat/lon/timestamp). If previous data exists, speed is calculated as distance-over-time using haversine. The airborne flag is dynamically adjusted: below 1 m/s forces ground state, above 10 m/s forces airborne. The history map is capped at 500 entries with a 5-minute expiry.
Skip-frame mechanism: After every ownship send, traffic dispatch is suppressed for the current frame and the next frame. This prevents ownship and traffic data from competing for network bandwidth in the same frame.
Configuration Feedback Loop
The HTTP response from the bridge app carries a JSON object with the current configuration:
{
  "webPort": 5544,
  "tcpPort": 49002,
  "transportMode": "UDP_SERVER",
  "dataFrequency": 5,
  "trafficRange": 250,
  "trafficFrequency": 4,
  "nmea": {
    "GPGGA": true, "GPRMC": true, "LXWP0": true,
    "XGPS": true, "XATT": true,
    "XTRAFFIC_GND": false, "XTRAFFIC_AIR": false,
    "GDL90_GND": false, "GDL90_AIR": false,
    "PFLAA_GND": false, "PFLAA_AIR": false
  }
}
The panel applies the received frequency, range, and traffic-enable settings, keeping itself synchronized with the user’s choices on the smartphone. If the response is larger than ~100 bytes and passes magic-byte checks (JPEG: FF D8, PNG: 89 50), it is treated as a screen-share image frame instead.
Network Requirements and Difficulties
Same local network requirement: The MSFS PC/console and the smartphone must be on the same local network (WiFi). The panel sends HTTP requests directly to the smartphone’s IP address. If the devices are on different subnets or VLANs, communication will fail silently (the panel’s error handler is intentionally empty to avoid log flooding at 5+ Hz).
Firewall considerations: Windows Firewall may block inbound connections to the MSFS panel (if the EFB app needed to connect back), but since the panel is the initiator of HTTP requests, the typical issue is the smartphone’s firewall blocking incoming connections on port 5544. On Android, the app’s own firewall rules usually allow this. On iOS, the app uses Network.framework which handles local network permissions via the iOS local network privacy prompt.
Router AP isolation: Some consumer routers enable “AP isolation” or “client isolation” which prevents WiFi devices from communicating with each other. This silently breaks the bridge. The workaround is to use the smartphone’s mobile hotspot instead.
Hotspot mode: When the smartphone acts as a WiFi hotspot and the PC/console connects to it, the network topology is simpler (no router in between) and generally more reliable. The Android app provides a WiFi/Hotspot mode toggle that adjusts the displayed IP accordingly.
Port conflicts: Port 5544 is also used by Android Debug Bridge (ADB). If ADB over WiFi is enabled, the bridge app’s web server may fail to bind. The port is configurable to avoid conflicts.
Part 2: Smartphone Bridge Apps
Web Server (Receiving MSFS Data)
Both Android and iOS apps run a TCP server on the configurable web port (default 5544). When an HTTP GET request arrives:
- CORS preflight (
OPTIONS) requests receive a204 No Contentwith permissive CORS headers. - The query string is parsed into key-value pairs.
- A
traffic=1parameter routes to traffic processing; otherwise it’s ownship data. - The HTTP response is either JSON configuration (described above) or, if screen sharing is active on Android, a Base64-encoded JPEG image.
Every received request resets a 30-minute inactivity timer. If no data arrives for 30 minutes, the service auto-stops to conserve battery.
Output Transport Modes
Transport modes are named from the EFB app’s perspective, not the phone’s:
| Mode | Phone’s Role | How It Works |
|---|---|---|
| TCP Client | Phone hosts a TCP server on the output port. | EFB connects as a TCP client. Multiple EFB connections are accepted and stored in a thread-safe list. Data is broadcast to all connected clients. |
| TCP Server | Phone connects out as a TCP client. | The EFB hosts a TCP server. The phone lazily connects to the target IP:port when data needs to be sent. A 2-second cooldown prevents rapid reconnection attempts. |
| UDP Client | Phone binds a UDP socket on the output port. | The EFB sends a discovery/registration UDP packet to the phone. The phone records the sender’s address and replies with data to that endpoint. |
| UDP Server | Phone creates an unbound UDP socket. | The phone sends UDP datagrams to the configured target IP and output port. No handshake required — fire and forget. |
GDL90 always uses a separate dedicated UDP socket on port 4000, regardless of the NMEA transport mode. This matches the behavior of real ADS-B receivers (like Stratux) that EFB apps expect.
Data Flow Summary
HTTP Request (port 5544)
  │
  ├── Parse query parameters
  │
  ├── Ownship data?
  │     ├── Generate enabled NMEA sentences ──► Send via selected transport
  │     ├── Generate X-Plane DATA* packets ──► Send via selected transport (if RPOS enabled)
  │     ├── Generate GDL90 ownship report ──► Send via dedicated UDP:4000
  │     ├── Generate GDL90 AHRS report ──► Send via dedicated UDP:4000
  │     └── Update GPS mock location (Android only, if enabled)
  │
  └── Traffic data?
        ├── Generate XTRAFFIC sentence ──► Send via selected transport
        ├── Generate PFLAA sentence ──► Send via selected transport
        └── Generate GDL90 traffic report ──► Send via dedicated UDP:4000
Part 3: Output Protocols in Detail
NMEA 0183 Sentences
All standard NMEA sentences follow the format: $<TALKER><SENTENCE>,<fields>*<XX>\r\n where <XX> is the XOR checksum of all bytes between $ and * (exclusive), formatted as two uppercase hex digits.
Coordinate encoding: Decimal degrees are converted to DDmm.mmmm format (degrees + minutes with 4 decimal places). Latitude uses 2-digit degrees (DDmm.mmmm), longitude uses 3-digit degrees (DDDmm.mmmm). Hemisphere is indicated by N/S or E/W suffix.
$GPGGA — GPS Fix Data
$GPGGA,<HHMMSS.ss>,<lat>,<N/S>,<lon>,<E/W>,1,08,0.9,<alt_m>,M,0.0,M,,*XX\r\n
- Fix quality: hardcoded to 1 (GPS fix)
- Satellites: hardcoded to 08
- HDOP: hardcoded to 0.9
- Altitude: GPS altitude in meters MSL
- Geoid separation: hardcoded to 0.0
$GPRMC — Recommended Minimum
$GPRMC,<HHMMSS.ss>,A,<lat>,<N/S>,<lon>,<E/W>,<speed_kts>,<track>,<DDMMYY>,<magVar>,<E/W>,A*XX\r\n
- Status: always “A” (active)
- Speed: ground speed converted from m/s to knots (x 1.94384)
- Mode indicator: always “A” (autonomous)
$LXWP0 — LXNAV Variometer
$LXWP0,Y,<ias_kmh>,<baro_alt_m>,<vario_ms>,,,,,,<heading>,<wind_dir>,<wind_spd>*XX\r\n
- IAS converted from m/s to km/h (x 3.6)
- Vario: total energy in m/s
- Five empty fields between vario and heading
XGPS — ForeFlight/SkyDemon GPS (Proprietary)
XGPSFS,<lon>,<lat>,<alt_m>,<track>,<groundspeed_ms>\r\n
- No
$prefix, no checksum — raw proprietary format - Note: longitude comes before latitude
- Units: meters and m/s (no conversion)
XATT — ForeFlight/SkyDemon Attitude (Proprietary)
XATTFS,<heading>,<-pitch>,<-roll>,0.0,0.0,0.0,0.0,0.0,0.0,0.0,0.0,0.0\r\n
- No
$prefix, no checksum - Pitch and roll are sign-negated (MSFS convention to EFB convention)
- Nine trailing zero-value placeholder fields
XTRAFFIC — Custom MSFS Traffic (Proprietary)
XTRAFFIC<name>,<id>,<lat>,<lon>,<alt>,<vspeed>,<airborne>,<heading>,<speed>,<callsign>\r\n
- No
$prefix, no checksum - Aircraft name is embedded directly in the sentence identifier
$PFLAA — FLARM Traffic
$PFLAA,0,<relNorth>,<relEast>,<relVert>,2,<hexID>,<track>,,<speed>,<vspeed>,8*XX\r\n
- Relative distances use flat-Earth approximation: ~111,320 m/degree latitude; longitude scaled by cos(ownship latitude)
- Traffic ID is hashed to a 6-character uppercase hex string (lower 24 bits of hash)
- Aircraft type: hardcoded to 8 (powered aircraft)
X-Plane Binary DATA* Packets
When the RPOS mode is enabled, three separate 41-byte binary packets are sent in the standard X-Plane UDP DATA format:
Each packet structure:
Bytes 0-4:   ASCII "DATA*" (0x44 0x41 0x54 0x41 0x2A)
Bytes 5-8:   Group index (32-bit little-endian integer)
Bytes 9-40:  Eight 32-bit little-endian IEEE 754 floats
Group 20 (Position): latitude (deg), longitude (deg), altitude MSL (feet), altitude AGL (feet). Four unused zeros.
Group 3 (Speeds): IAS (knots), EAS (= IAS), TAS (knots), ground speed (knots). All converted from m/s (x 1.94384).
Group 17 (Attitude): pitch (deg, negated), roll (deg, negated), true heading (deg), magnetic heading (deg). Four unused zeros.
Additionally, a proprietary compact 41-byte RPOS packet format exists that interleaves longitude bytes across non-contiguous positions for a specific EFB app compatibility. The longitude float32 is split: its MSB is placed at byte 0 (serving as a frame-sync byte), while the lower 3 bytes are placed at bytes 38-40.
GDL90 Binary Protocol
GDL90 is the FAA standard for ADS-B data exchange, used by hardware receivers like Stratux and ForeFlight Sentry. The bridge emulates this protocol over UDP port 4000.
Frame Structure
Every GDL90 message is wrapped in a frame:
[0x7E] [message payload with byte stuffing] [CRC-16 LSB] [CRC-16 MSB] [0x7E]
- Flag byte:
0x7Emarks frame boundaries - Byte stuffing: Within the frame (excluding flag bytes),
0x7Eis escaped as0x7D 0x5E, and0x7Dis escaped as0x7D 0x5D - CRC-16: Polynomial 0x1021 (CRC-CCITT), initial value 0x0000. Computed over the unescaped message payload. Appended LSB-first, and the CRC bytes themselves are subject to byte stuffing.
Heartbeat (Message ID 0x00)
7-byte payload: [0x00, 0x81, 0x00, 0x00, 0x00, 0x00, 0x00]
- Status byte 1:
0x81= initialized + GPS valid - Sent every 1 second (required by the GDL90 specification)
Ownship Report (Message ID 0x0A) and Traffic Report (Message ID 0x14)
29 bytes total (1 byte message ID + 28 bytes payload). Both share the same structure:
Offset  Size  Field                    Encoding
──────  ────  ─────                    ────────
0       1     Message ID               0x0A (ownship) or 0x14 (traffic)
1       1     Alert/Address Type       Always 0x00
2-4     3     Participant Address      3-byte hash of ID string (ownship uses 0xAAAAAA)
5-7     3     Latitude                 24-bit signed: degrees / 180 * 2^23
8-10    3     Longitude                Same encoding as latitude
11-12   2     Altitude + Misc          Upper 12 bits: (alt_feet + 1000) / 25, clamped [0, 0xFFE]
                                       Lower 4 bits (misc nibble):
                                         bit 3 = airborne (1=yes, 0=ground)
                                         bit 0 = true track angle (always 1)
                                       → 0x09 for airborne, 0x01 for ground
13      1     NIC/NACp                 Fixed 0xB0
14-15   2     Horizontal Speed         12-bit unsigned scalar in knots, clamped [0, 4094]
              + Vertical Velocity      Byte 14: speed[11..4] (upper 8 bits)
                                       Byte 15 upper nibble: speed[3..0]
                                       Byte 15 lower nibble: vv[11..8]
16      1     Vertical Velocity cont.  vv[7..0] (lower 8 bits)
                                       12-bit two's complement, 64 fpm per LSB
                                       Clamped [-2048, 2047]
17      1     Track/Heading            0-360° mapped to 0-255 (heading * 256 / 360)
18      1     Emitter/Emergency        Upper nibble = category (1 = light aircraft)
                                       Lower nibble = emergency (0 = none) → 0x10
19-26   8     Callsign                 8 ASCII characters, space-padded
Unit conversions applied:
- Altitude: meters to feet (x 3.28084)
- Speed: m/s to knots (x 1.94384)
- Vertical speed: m/s to ft/min (x 196.8504), then divided by 64 for the 64-fpm LSB
Note on speed encoding: The horizontal speed and vertical velocity share byte 15 — the upper nibble contains the 4 least significant bits of speed, while the lower nibble contains the 4 most significant bits of the 12-bit vertical velocity value. This packing is specified by the GDL90 standard.
AHRS/Attitude Report (Message ID 0x4C — ForeFlight Proprietary)
13-byte payload (1 byte message ID + 12 bytes data):
Offset  Size  Field      Encoding
──────  ────  ─────      ────────
0       1     Msg ID     0x4C
1-2     2     Pitch      Signed 16-bit big-endian, tenths of a degree
3-4     2     Roll       Signed 16-bit big-endian, tenths of a degree
5-6     2     Heading    Unsigned 16-bit big-endian, tenths of a degree
7-12    6     Reserved   All zeros
Part 4: Presets System
Both Android and iOS apps include a preset system that configures the bridge for specific EFB applications. Presets are stored in a bundled CSV file with 18 columns:
EFB name, TCP_CLIENT, TCP_SERVER, UDP_CLIENT, UDP_SERVER, tcpPort, GPGGA, GPRMC, LXWP0, XGPS, XATT, Rpos, XTRAFFICGnd, XTRAFFICAir, Gdl90Gnd, Gdl90Air, PflaaGnd, PflaaAir
Value semantics for each integer:
| Value | Meaning |
|---|---|
| 0 | Force OFF and lock the control (disabled, nearly invisible at 5% opacity) |
| 1 | Leave the control enabled but don’t change its current state (user’s choice) |
| 2 | Force ON — check the checkbox or select the transport mode |
This three-state system allows presets to enforce required settings while leaving optional ones to the user.
Preset categories in the bundled data:
- XGPS/XATT-based aviation EFBs (ForeFlight, SkyDemon, Garmin Pilot, FlyQ EFB, AirMate, FltplnGO): UDP Server, port 49002, XGPS + XATT enabled, XTRAFFIC for traffic
- GDL90-based aviation EFBs (WingX, OzRunways, Stratus Insight, Sky-Map, EasyVFR, iFly GPS): UDP Server, port 49002, XGPS + XATT plus GDL90 traffic
- Soaring/glider EFBs (XCSoar, LK8000): TCP Client or UDP Server, port 4353, standard NMEA (GPGGA + GPRMC + LXWP0) plus PFLAA traffic
- Binary RPOS EFBs (Air Navigation Pro, AvPlan EFB): UDP Server, port 49002, only RPOS binary output
- Marine EFBs (Aqua Map, iNavX, iSailor, SeaNav, i-Boating): Various TCP modes, custom ports, only GPGGA + GPRMC
Selecting “EFB Preset” (the first entry) restores all controls to their unlocked state.
Part 5: Android-Exclusive Features
GPS Spoofing (Mock Location Provider)
The Android app can inject simulated GPS coordinates into the system location service, making all apps on the device (including EFB apps that read GPS) believe the phone is at the simulated aircraft’s position.
How it works:
- Permission flow: The app checks for
ACCESS_FINE_LOCATIONruntime permission, then probes for mock location capability by attempting to add a test provider to the system’s Location Manager. This requires the app to be set as the “Mock Location App” in Android Developer Options. - Prominent disclosure: Before enabling, a dialog explains that the app will replace the device’s real GPS with simulated flight data, with an explicit consent mechanism.
- Location injection: On each ownship HTTP request, if spoofing is enabled, the service creates a mock Location object with the simulated latitude, longitude, altitude, speed, bearing, and a synthetic accuracy value. This is pushed to the system’s Location Manager as a test provider update. All Android apps reading GPS will receive this simulated position.
- Service lifecycle: The foreground service declares
LOCATIONas a foreground service type when spoofing is active. On stop, the mock provider is removed, restoring real GPS.
Screen Sharing (MediaProjection)
The Android app can capture the device’s screen and transmit it back to the MSFS in-game panel, enabling VR users to see their EFB app without removing the headset.
How it works:
- Permission flow: A disclosure dialog explains screen capture. On acceptance, the system’s screen capture intent is launched via
startActivityForResult. - Capture pipeline: When granted, the result code and intent data are passed to the service. The service creates a
MediaProjection, anImageReader(for receiving frames), and aVirtualDisplaythat renders the screen content into the ImageReader’s surface. - Frame serving: Captured frames are stored as a volatile Bitmap reference behind a synchronized lock. When the MSFS panel sends an HTTP request with width/height parameters (indicating it wants a screen image), the latest bitmap is resized to fit the requested dimensions while maintaining aspect ratio, compressed as JPEG at quality 60, Base64-encoded, and returned as a
data:image/jpeg;base64,...string in the HTTP response body. - Throttling: Image frames are sent at most every 500ms (or 100ms during active drag gestures) to balance quality and bandwidth.
- Panel-side rendering: The MSFS panel detects image responses by checking magic bytes and displays them using a double-buffered foreground/background image pair for smooth transitions.
Remote Touch Simulation (Accessibility Service)
The Android app can simulate touch gestures on the device screen, dispatched remotely from the MSFS in-game panel. This enables VR users to interact with the EFB app without taking off the headset.
How it works:
- Touch event flow: The MSFS panel captures mouse clicks on the screen-share image and sends the coordinates as HTTP query parameters (percentage-based X/Y and gesture type). The bridge service broadcasts these as a namespaced intent.
- Accessibility Service: A separate Android Accessibility Service receives the broadcast intents and uses the Accessibility API’s gesture dispatch mechanism to simulate touches.
- Coordinate conversion: Incoming coordinates are percentages (0-100%) of the screen. The service queries real display metrics and converts to absolute pixel coordinates.
- Four gesture types:
- “tap”: Creates a stroke path at the coordinates with a 50ms duration and dispatches immediately.
- “down”: Begins a continued/drag gesture using the accessibility continued-stroke API with a 100ms segment and the “willContinue” flag.
- “drag”: Continues the stroke at updated coordinates with another 100ms segment.
- “up”: Ends the continued stroke with “willContinue” set to false.
- Safety timeout: A 2-second timer auto-releases orphaned drag gestures if no follow-up event arrives.
- Permission: Requires the user to manually enable the Accessibility Service in Android Settings. The app provides a direct link to the correct settings page.
Thread Safety (Android)
The Android service uses several mechanisms for thread safety across its web server thread, network I/O threads, and the main thread:
- Volatile fields: All shared state (running flag, timestamps, transport mode, ownship coordinates, UDP peer address, bitmap reference, generation counter) is declared
volatilefor visibility guarantees. - CopyOnWriteArrayList: TCP client connections are stored in a thread-safe list that allows concurrent iteration and modification without explicit locking.
- Synchronized locks: The screen capture bitmap is guarded by a dedicated lock object; old bitmaps are recycled within the lock.
- Generation counter: An integer counter is incremented on every socket restart. Each background thread captures the current generation when it starts and exits silently if the generation changes, preventing stale threads from producing confusing error messages during reconfiguration.
Part 6: iOS-Specific Details
Background Execution
iOS aggressively suspends apps that are not actively producing audio or using location services. The bridge app plays a silent audio loop using AVAudioEngine: a 1-second buffer of zeros at 44,100 Hz, looped continuously on a player node. The audio session is configured with the .playback category, which prevents iOS from suspending the app when the screen locks.
Audio Variometer
The iOS app includes an audio variometer that produces climb/sink tones based on the aircraft’s vertical speed:
Three zones based on climb rate (m/s):
| Zone | Range | Audio Behavior |
|---|---|---|
| Dead | -0.5 to +0.5 m/s | Silence |
| Sink | Below -0.5 m/s | Continuous solid tone, pitch decreasing with sink rate. At -0.5 m/s: ~440 Hz; at -5.0 m/s: ~220 Hz |
| Lift | Above +0.5 m/s | Pulsed/beeping tone. Pitch and beep rate increase with climb rate. At +0.5 m/s: ~440 Hz, slow beeps (~0.37s interval); at +10 m/s: ~1067 Hz, rapid beeps (0.1s interval) |
The implementation uses a 440 Hz sine wave buffer played through an AVAudioUnitVarispeed node. Changing the varispeed rate shifts both pitch and playback speed proportionally. Pulsing is achieved by a repeating timer that toggles the player volume between the master level and zero. To avoid audio jitter, the timer is only recreated if the interval changes by more than 0.05 seconds.
Networking
The iOS app uses Apple’s Network.framework (NWListener, NWConnection) exclusively — no third-party libraries. Network I/O runs on a private concurrent dispatch queue, while client list mutations are serialized on a dedicated serial queue to prevent race conditions.
Settings Persistence
All user settings use SwiftUI’s @AppStorage (backed by UserDefaults), providing automatic persistence without explicit save/load logic. The bridge manager is an ObservableObject whose published properties drive the SwiftUI view updates on the main thread.
FS2EFB data export toolbar v1.0.1 (FS24)
– UI issues fixed
– *.FPL import support
FS2EFB data export toolbar v1.0.0 (FS20)
– UI issues fixed
– *.FPL import support
FS2EFB data export toolbar v0.11 (FS20)
– weather import improved
– UI translated
Android & iOS app required: v1.26
FS2EFB data export toolbar v0.10 (FS20)
Weather preset and flight plan import issues fixed
FS2EFB data export toolbar v0.9 (FS20)
– Relay mode for Cloud Gaming support (some features does not work, like traffic export and screen share)
– issue fixed: LX NAV does not display imported flight plan
FS2EFB data export toolbar v0.8 (FS20)
* weather preset import
* language selector in Android/iOS apps
Android app version required: 1.23
iOS app version required: 1.23
FS2EFB data export toolbar v0.7 (FS20)
– flight plan import (supported formats: PLN, GPX, FLP)
– better screen share (Android)
Android app version required: 0.20 iOS app version required: 1.21
FS2EFB data export toolbar v0.6 (FS20)
- navigation apps presets
- better EFB support (artificial horizon, AI traffic)
Android app version required: 0.20 iOS app version required: 1.20
FS2EFB data export toolbar v0.5 (FS20)
traffic export, available sentences
* XTRAFF (X-Plane format, SkyDemon ForeFlight Garmin Pilot etc.)
* GDL90 (Stratus Insight)
* PFLAA (XCSoar, LK8000 – LXNAV data type)
Android app version required: 0.19
iOS app version required: 1.19
FS2EFB data export toolbar v0.4 (FS20)
* screen share of selected app or whole screen
* screen tap simulation (optional, require special accessibility permission)
* frequency slider moved from toolbat to the app
* minor UI changes
* default values set for SkyDemon/Foreflight compatibility
FS2EFB data export toolbar v0.2 (FS20)
– minimized GPS icon appears only when cursor is nearby (only works when placed in top left corner due to toolbar system limitations)
– QR images scalable
– frequency and IP stored in used data and restored on toolbar restart
FS2EFB data export toolbar v0.1 (FS20)
base functionality copied from Blanik tablet script. Shortly, it’s a toolbar which sends aircraft data to the mobile app. This app then shares data with navigation app, like XCSoar or SkyDemon. Android app supports GPS spoofing, which can be used common nav apps like Google Maps (developer mode should be enabled on the smartphone).
2 feedbacks on FS2EFB data export toolbar
Hi,
I cannot find the addon on Xbox MSFS 2020 Marketplace.
Are there any restrictions on regional or subscription availability on the marketplace?
I really would like to purchase and use it !
FS20 version of the add-on get 50% 1 star reviews, while FS24 – 0. We haven’t receive a single bug report for months so I decided to remove it from FS20 marketplace permanently due to unknown issue.